


Move a 3D object
- Move the object around the artboard (in 2-dimensional space)
- Move the object within the viewport (in 3-dimensional space)
- Rotate, translate, or scale the object in 3-dimensional space
Move the object around the artboard (in 2-dimensional space)
- Under Objects and Timeline, select the Viewport3D
object that represents your 3D object.
A blue bounding box appears around your 3D object on the artboard. - Use your mouse to drag
 the object around the artboard, scale
 the object, or rotate
 the object on the X-Y plane.
You can modify the movement in the following ways:
the object on the X-Y plane.
You can modify the movement in the following ways:
- Hold the SHIFT key while resizing or scaling to constrain the aspect
ratio.
- Hold the ALT key while resizing, scaling, or skewing to maintain the
position of the center point (instead of maintaining the position of the
opposite corner or edge).
- Hold the SHIFT key while rotating to snap every 15 degrees.
You can also rotate, reposition, and scale the Viewport3D object by using the properties in the Transform category of the Properties panel, just as you would with any object. You can also group 3D objects together. For more information about working with objects in general, see Working with objects.
If you scale the object so that part of it extends beyond the blue bounding box, the parts outside of the box will not be visible unless you uncheck the ClipToBounds property in the Appearance category of the Properties panel. - Hold the SHIFT key while resizing or scaling to constrain the aspect
ratio.
Move the object within the viewport (in 3-dimensional space)
- Select the Selection
 tool from the toolbox, and then double-click your 3D object on the artboard
to make the 3D translation handles appear.
tool from the toolbox, and then double-click your 3D object on the artboard
to make the 3D translation handles appear.
This action selects the world geometry container object under Objects and Timeline. - Use your mouse to drag
your 3D object around the artboard.
Notice that the 3D object does not get closer or farther away from you as you drag it. - Press ALT as you drag
the mouse up and down.
The 3D object moves closer and farther away from the camera.If you move the object so that part of it extends beyond the blue bounding box, the parts outside of the box will not be visible unless you uncheck the ClipToBounds property in the Appearance category of the Properties panel. Alternatively, you can increase the size of the blue bounding box using the first procedure in this topic.
Rotate, translate, or scale the object in 3-dimensional space
- Select the Selection
tool from the toolbox, and then double-click your 3D object on the artboard
to make the 3D translation handles appear.
This action selects the world geometry container object under Objects and Timeline. - Use your mouse to grab the X, Y, or Z-axis handles on the artboard. Your
cursor will change to indicate the action that you can take:
- The rotation
cursor
 (active
when you mouse over the arc handle) allows you to rotate the object
about an axis. When rotating, you can snap the rotation every 15 degrees by holding the
SHIFT key.
(active
when you mouse over the arc handle) allows you to rotate the object
about an axis. When rotating, you can snap the rotation every 15 degrees by holding the
SHIFT key. - The position cursor
 (active when you mouse over the arrow handle) allows you to move the object
along an axis.
(active when you mouse over the arrow handle) allows you to move the object
along an axis. - The scaling cursor
 (active
when you mouse over the box handle) allows you to scale the object along
an axis.
(active
when you mouse over the box handle) allows you to scale the object along
an axis.
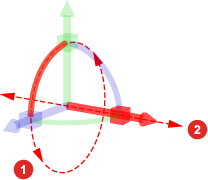
X axis handles for
 Rotation,
and
Rotation,
and  Position
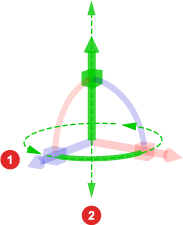
Y axis handles for
Rotation,
and Position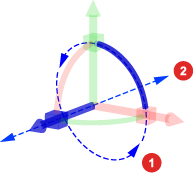
Z axis handles for
Rotation,
and PositionIf you move the object so that part of it extends beyond the blue bounding box, the parts outside of the box will not be visible unless you select the Viewport3D object under Objects and Timeline and then uncheck the ClipToBounds property in the Appearance category of the Properties panel. Alternatively, you can increase the size of the blue bounding box using the first procedure in this topic. - The rotation
cursor
|
|
If you can not see your material after moving your object, you might be viewing the side of a face that does not have a material applied to it. Each face has a property for the front and back of a face. For instructions about applying materials to faces, see Add or remove a material. |