Updated: 2009-04-09
With Microsoft Office Outlook 2007 Electronic Business Cards, Outlook users can include a graphical view of contact information with a name, address, and logo in a traditional business card format. The information appears in a Contacts item or as part of an e-mail message signature, for example. You can make it easy for people in your organization to use standardized business cards by providing business card templates. The templates can include your company's logo, fax number, and so on, with a unified design and color scheme.
Electronic Business Cards can be customized and provided to employees for download from an internal Web site. When a member of your organization downloads an Electronic Business Card from the Web site, you can provide code to automatically customize the card to include the employee's contact information with the standard content for your organization. You can also have employees complete their own information after they download a standardized template.

This topic includes two detailed examples for providing automatically-populated business cards: a Microsoft Office SharePoint Server 2007 solution and a .NET solution. Links are provided for downloading sample code for each solution, which you can customize (see Obtain sample solutions for distributing Electronic Business Cards later in this topic).
Options for adding employee contact information to cards
Example options for providing standardized Electronic Business Cards for users include:
-
Sending business card templates to employees as e-mail message attachments.
-
Providing business card templates on a network folder, for employees to browse and then save the card locally.
-
Setting up a distribution page on an internal Office SharePoint Server 2007 site.
-
Providing a custom .NET solution on an internal Web site.
The first two options require employees to personalize the cards with their contact information. The SharePoint and .NET options automatically populate business cards with employees' personal information.
 Note: Note:
|
|---|
|
A simple but limited way to provide Electronic Business Cards is to send the template as an e-mail attachment or provide the template on a network folder. The business cards are not automatically personalized; each employee must edit the card locally to add his or her contact information. |
-
Include Electronic Business Card templates as e-mail attachments. With this method, you send an e-mail message to employees—to individual departments or to your organization—that includes instructions and provides your organization's Electronic Business Card templates as vCard attachments. If you offer more than one business card design, you can embed preview images for each template in the body of the e-mail message. Employees can choose the best or most appropriate design to save.
-
Provide Electronic Business Card templates on a network folder. Providing templates and instructions on a public folder that is available to employees in a department or organization is another way to distribute Electronic Business Cards. If branding differs between groups in your organization, you can create multiple shared folders to provide different business cards for different departments. By limiting permission on the shared folder to members of that department or organization, you ensure that employees access only the templates that are appropriate for their role in the organization.
Providing a solution that automatically populates business cards with employees' contact information has a number of advantages, though this option involves more setup work than distributing templates for employees to personalize themselves.
A significant benefit to using a solution that automatically personalizes the cards is that employees do not need to edit the cards themselves. This saves time and reduces the chance of typographical mistakes and other errors. Also, since employee data is populated automatically, duplicate Contact entries are less likely to be created for the employee's business card when the card is created or updated.
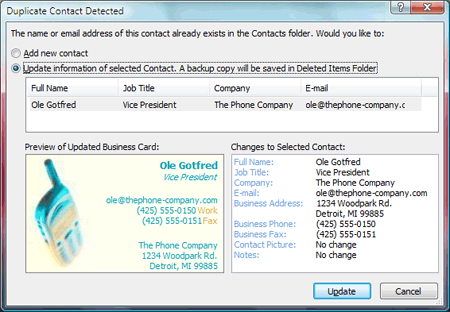
Another benefit is that centralized changes to business cards are straightforward to distribute. For example, if the company logo changes or if your organization changes its slogan, you can simply update the business card template and send an e-mail instructing employees to download new versions of their cards. When an employee saves the new card, the updated card includes the employee's information. This helps ensure a smooth transition to the new card format, and reduces the chance of errors from employees editing their own cards. Similarly, when someone receives a new job title or changes office locations, retrieving a new business card automatically reflects the change. There is no need for a manual update of the employee's card.
This topic describes two solutions for automatically populating Electronic Business Cards. With both solutions, you provide a Web page that enables employees to preview business card templates and retrieve business cards that are automatically customized with their personal information. The contact information is obtained from SharePoint, Active Directory, or another source of contact information (such as an LDAP directory). The user receives a customized card after he or she chooses a business card template.
-
Using a SharePoint site to distribute business cards
The most robust and flexible method of issuing business cards is to provide the business cards on a SharePoint site. The setup work required for this solution is minimal if you already have Office SharePoint Server 2007 implemented in your organization. With the SharePoint solution, user information is already available locally in user profiles. This simplifies the process. However, you might need to make minor configuration changes, such as mapping custom fields from the directory that provides SharePoint with employee data (for example, Active Directory).
-
Writing a custom .NET solution to distribute business cards
A .NET solution provides similar functionality to using a SharePoint solution, but requires additional coding. With a .NET solution, code running on the server dynamically retrieves employee contact information from a directory or database. You must use impersonation to obtain user data from a data source (for example, from Active Directory). Instead of being available locally in a profile, as in the SharePoint scenario, the data must be obtained directly using the data source's unique application programming interfaces (APIs).
Both methods use templates as the basis for standardized cards, as described in the next section. Following the section are examples of using a SharePoint site or a .NET solution, including code samples.
 Note: Note:
|
|---|
|
You can download sample solutions and technical information to help you deploy Electronic Business Cards in your organization. The next section provides links to download packages and explains how to use the sample code that is included. |
Obtain sample solutions for distributing Electronic Business Cards
You can use sample code as a starting point for a customized solution for distributing Electronic Business Cards. Sample solutions are available for a SharePoint solution and for a .NET solution as part of the Outlook 2007 Sample: Distributing Electronic Business Cards download package on the Microsoft Download Center.
Included in the package are the following items, which can be downloaded individually:
| Package name | Description |
|---|---|
|
EBCNet.exe |
Sample solution using .NET Framework 2.0 |
|
EBCSharePoint.exe |
Sample solution using Office SharePoint Server 2007 |
|
EBCvCard21Whitepaper.exe |
Outlook Extensions to the vCard 2.1 Format (whitepaper) |
|
EBCWhitepaper.exe |
Creating and Using Outlook Electronic Business Cards—Whitepaper |
You can download the sample solutions package for the deployment platform you use (Office SharePoint Server 2007 or.NET Framework 2.0). Then follow the directions in the next sections.
Sample solution packages
The sample solutions are packaged as IExpress files. When you double-click the IExpress package, you are prompted for a folder location for the files.
The sample solution for deploying Electronic Business Cards by using a Office SharePoint Server 2007 site is EBC Templates on SharePoint Deployment Example. The sample solution for deploying business cards by using a .NET solution is EBC Templates on .NET Deployment Example.
 Note: Note:
|
|---|
|
Technical information about Outlook vCard specifications can be helpful when you customize an Electronic Business Cards distribution solution. To learn more about Outlook vCards, see the whitepaper Outlook Extensions to the vCard 2.1 Format included in the download package. |
The following files and folders are included in the SharePoint sample solution package (EBCSharePoint.exe):
| File/Folder name | Description |
|---|---|
|
EBCDeploymentExample.aspx |
ASPX page containing the placeholder for the business card templates. This page should be set as the start page for the project. |
|
EBCDeploymentExample.aspx.cs |
C# file containing the server-side code for this solution. Includes code to load template previews and populates the user-selected template with the user's contact information. |
|
EBCDeploymentExample.csproj |
Visual Studio 2005 C# assembly project for the EBCDeploymentExample solution. |
|
EBCDeploymentExample.sln |
Visual Studio 2005 solution file for the example. |
|
EBCDeploymentExample.suo |
Visual Studio 2005 user options file for the EBCDeploymentExample solution. |
|
ExampleAssembly.snk |
Strong Name Key file used for signing the assembly file generated by compiling the EBCDeploymentExample project. |
|
ReadMe.txt |
Instructions for installing the example solution. |
|
web.config |
Configuration file for this Web site. Includes keys for the location of business card templates, the format of template preview images, and the URL of the SharePoint site containing user profiles used to populate the templates with employee data. |
|
\bin |
Folder containing the compiled assemblies when the EBCDeploymentExample project has been compiled. A compiled assembly can be in either the Debug or Release sub-folder, depending on the configuration when the project is compiled. |
|
\obj |
Folder containing temporary object files when the EBCDeploymentExample project is compiled. |
|
\Properties |
Folder containing the AssemblyInfo.cs file (automatically generated for the EBCDeploymentExample project). |
|
\Templates |
Folder containing templates and template previews for four example business card designs. |
The following files and folders are included in the .NET sample solution package, EBCNet.exe:
| File/Folder name | Description |
|---|---|
|
EBCDeploymentExample.aspx |
ASPX page containing the placeholder for the business card templates. This page should be set as the start page for the project. |
|
EBCDeploymentExample.aspx.cs |
C# file containing the server-side code for this solution. Includes code to load template previews and populates the user-selected template with the user's contact information. |
|
ReadMe.txt |
Instructions for installing the example solution. |
|
web.config |
Configuration file for this Web site. Includes keys for the location of business card templates, the format of template preview images, and the URL of the Active Directory used to provide contact data. This configuration file also contains the parameters to perform Windows user impersonation for authentication. |
|
\Templates |
Folder containing templates and template previews for four example business card designs. |
Working with the SharePoint sample solution: overview
The steps for working with the SharePoint sample solution are outlined here. For detailed descriptions that reference the sample code, see Using a SharePoint site for distributing business cards later in this topic.
Install and configure the following environment to work with the SharePoint sample solution:
-
Office SharePoint Server 2007 must be installed on a local computer running Microsoft Windows Server 2003 or later.
-
An Office SharePoint Server 2007 site must be available, configured with user profiles.
With the requirements in place, follow these steps to install and configure the solution for your organization's environment. First, configure the Web.Config file.
-
Open Web.Config from the download package in an editor and set SiteURL to the URL for your SharePoint site (for example, YourSharePointURL).
-
Open the Web.Config file for your SharePoint site in an editor, and copy the appSettings section of the download package's Web.Config file to the appSettings section of the SharePoint site's Web.Config file. The site's Web.Config file is located in SharePoint's home directory.
-
Save the Web.Config files and exit the editors.
Follow these directions to locate the Web.Config file for your SharePoint site.
To locate the home directory of a SharePoint site
-
In Windows, click the Start menu, and click Administrative Tools.
-
Click Internet Information Services (IIS) Manager and expand the node for your computer.
-
Expand Web Sites, and right-click the appropriate Web application (for example, SharePoint (80)).
-
Click Properties.
-
Click the Home Directory tab.
After configuring the Web.Config file, you compile the solution and place required files in the correct folders.
To compile the solution
-
Open EBCDeploymentExample.sln in Microsoft Visual Studio 2005.
-
Compile the project.
-
Copy the compiled assembly, located in bin\debug by default or bin\release if you compile in release mode, to the Global Assembly Cache. For more detailed instructions, see Copy the solution to the Global Assembly Cache in the "Using a SharePoint site for distributing business cards" section later in this topic.
-
Copy EBCDeploymentExample.aspx and the Templates folder to <SharePoint Install Drive> \Program Files\Common Files\Microsoft Shared\web server extensions\12\TEMPLATE\LAYOUTS.
You might need to change the permissions for EBCDeploymentExample.aspx to copy this file.
Navigate to http://YourSharePointURL/_layouts/EBCDeploymentExample.aspx to explore the sample solution.
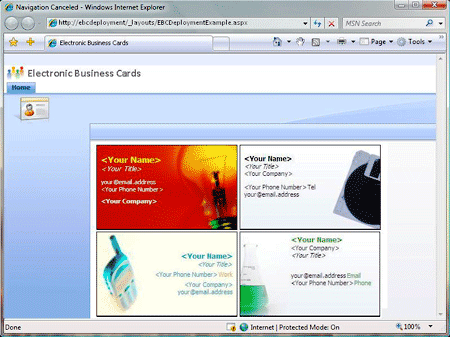
When users click a card image, they see a dialog box similar to the following example:
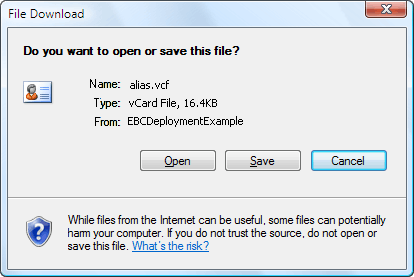
When users click Open, the business card is added to Contacts in Outlook, and the card is personalized with their contact information.
Working with the .NET sample solution: overview
The steps for working with the .NET sample solution are outlined here. For detailed descriptions that reference the sample code, see Using a .NET 2.0 internal Web site for distributing business cards later in this topic.
To work with the .NET sample solution, Microsoft Visual Studio 2005 must be installed on your local computer. It is also helpful to use a local Web site when you work with the sample solution.
Configure the environment to use the sample solution.
-
In Visual Studio, open an existing Web site and select the example folder.
-
On the Website menu, click Add Reference..., and select System.DirectoryServices.
-
On the Website menu, click Add Reference..., and select System.Drawing.
-
In Solution Explorer, right-click EBCDeploymentExample.aspx and select Set As Start Page.
-
Edit Web.Config from the download package in an editor and set userName and password to a valid username and password on your domain.
 Note:
Note:
Including a plain text username and password in a file is not a secure solution. See the following articles for information about creating a more secure solution: How to use the ASP.NET utility to encrypt credentials and session state connection strings and .NET Framework Developer's Guide: ASP.NET Impersonation.
-
In Web.Config, set ADPath to point to a valid Active Directory on your network.
-
Save the Web.Config file and exit the editor.
After you complete these configuration steps, you can see the sample solution by clicking Run to run the Web site in Visual Studio.
When users click a card image, they see a dialog box similar to the following example:

When they click Open, the business card is added to Contacts in Outlook, and the card is personalized with their contact information.
Templates for Electronic Business Cards
Regardless of the method you choose for distributing Electronic Business Cards to your organization, you can create and provide templates to help ensure standardized Electronic Business Cards. The cards can include information that is common to all business cards in the group or company, and can be designed to fit your corporate branding, including logos, colors, and layouts.
To build a template, you create a new contact item in Office Outlook 2007 and design the business card. You save the business card as a file on a Web site. Finally, you capture a screenshot image of the sample card to create a preview of the card.
Creating a business card in a new Outlook contact
The first step in providing an Electronic Business Card for users to download is designing a business card to use as a template. You do this by creating a business card in a new Outlook contact.
To create an Electronic Business Card in Outlook
-
On the File menu, point to New, and click Contact.
-
Type a name for the contact (for example, Sample Card).
-
Enter information on the business cards. For example, you might want to include:
-
Full Name
-
Job Title
-
Company
-
Business Phone
-
Business Fax
-
E-mail Address
-
Include all the items that you want to appear on the business card. Items specific to each person will populate with that person's personal information when the business card downloads. Other items, such as the Business Fax number, might be the same for everyone in the organization.
Once the business card is created with sample information, click Business Card in the contact item Ribbon to open the Electronic Business Card (EBC) editor.
In the editor, design the business card to include the layout and features. For example, you can import a corporate logo by clicking Change in the Card Design area. Adjust the image layout, area, and alignment until your logo appears in the right place on the card.
Adjust the text fields so that text appears in the desired order and is the correct size and color. You can also change the background color.
Click Save and Close to save your changes.
Saving an Electronic Business Card template on a Web server
Next you save the card as a file on the Web server that provides the Web site where people preview and download business cards.
To save an Electronic Business Card as a file on the Web server
-
Click the contact you created to select it.
-
On the File menu, click Save As.
-
In the Save in list, browse to a folder on your Web server where your templates will reside.
-
In the File name box, type a descriptive name for the file, such as office.vcf.
-
In the Save as type list, click vCard Files.
Creating a preview image of the Electronic Business Card
If you have more than one business card design, you can help people decide which card to download by providing a preview image of the business card templates.
To provide a preview image of a business card template
-
In Outlook, open the Contact item that contains the business card you designed and that you want to use as a template.
-
Right-click the business card image in the open Contact item.
-
In the context menu, click Copy Image.
-
In Microsoft Paint, on the Tools menu, click Edit.
-
Click Paste to paste the preview image.
-
On the Tools menu, click File.
-
Click Save and select the folder where you saved your vCard earlier.
Using a SharePoint site for distributing business cards
Once you have created standardized Electronic Business Cards templates as described in the previous section, you can choose from several options how to provide the templates to employees so they can obtain personalized business cards. If you use SharePoint in your organization, a straightforward way to provide the business cards is to create a page on an internal Office SharePoint Server 2007 site with sample images. Then you include code that queries SharePoint for user data to populate business card templates that correspond to the preview images.
The steps for working with the SharePoint sample solution are outlined earlier in Working with the SharePoint sample solution: overview. This section includes details about how to work with and customize the example for your organization.
In the example provided here, an ASP.NET page supported by code in a C# file facilitates distributing cards on the SharePoint site.
You can download the sample SharePoint solution as part of a package designed to help administrators get started with distributing Electronic Business Cards. Download the solution from the Outlook 2007 Sample: Distributing Electronic Business Cards download package on the Microsoft Download Center.
Create a C# Class Library project
By creating a Class Library, your project is configured to compile to an assembly. The compiled assembly can later be copied to the Global Assembly Cache (GAC). In order for EBCDeploymentExample.aspx and EBCDeploymentExample.aspx.cs to work together in SharePoint, EBCDeploymentExample.aspx must reference an assembly in the GAC that contains the compiled C# code from EBCDeploymentExample.aspx.cs.
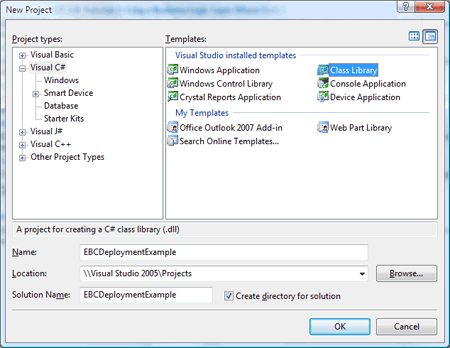
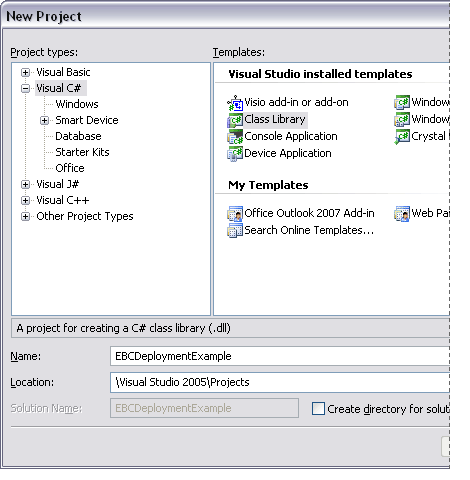
To create a new C# assembly project in Visual Studio
-
In Visual Studio, in the File menu, click New, and click Project.
-
On the New Project dialog, in the Project types: area, click Visual C#.
-
In the Templates: area, click Class Library.
-
In the Name: field, type a name for the project (for example, EBCDeploymentExample) and specify a location or use the default location.
-
Click OK.
Sign the assembly with a strong name key
In order for the compiled assembly to be trusted in SharePoint, it must be signed with a strong name key. You can sign the compiled assembly by using the strong name key provided with the sample solution in the ExampleAssembly.snk file, or you can create your own strong name key.
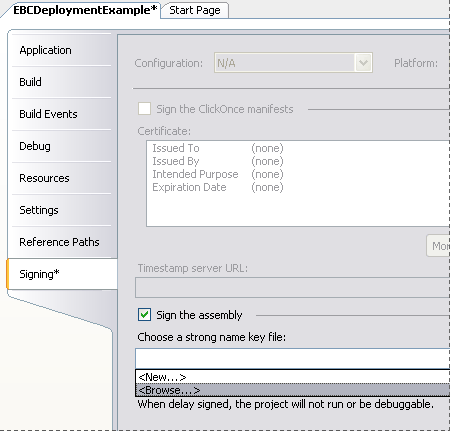
To sign a compiled assembly with the strong name key provided in the sample
-
In Visual Studio, go to Solution Explorer.
-
Right-click EBCDeploymentExample, and click Properties.
-
On the Signing tab, select the Sign the assembly check box.
-
In the Choose a strong name key file: drop-down list, click <Browse...>.
-
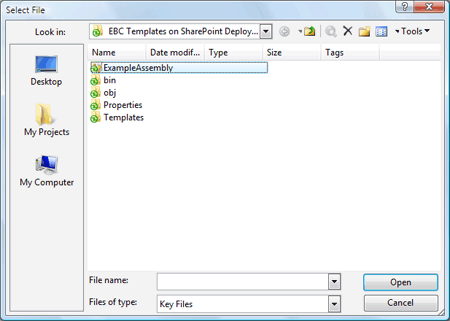
In the Open File dialog box, browse to the ExampleAssembly.snk file and click Open.
-
In the File menu, click Save to save the change.
For more information about strong name keys and signing assemblies, see the following resources: .NET Framework Developer's Guide: Creating Assemblies and .NET Framework Developer's Guide - How to: Sign an Assembly with a Strong Name.
Specify options for your customized solution
To customize the example solution to work in your environment, you must provide the server code with the following information:
-
The location of the templates to display on the Electronic Business Cards page.
-
The format of the thumbnail images that correspond to each business card. This format is the extension you used when saving the business card previews; for example, .jpg.
-
The URL of the SharePoint site on which this solution will run.
The SharePoint Web.Config file is a convenient way to make this information available to the server code. The Web.Config is located in the SharePoint site's Home directory. To find a SharePoint site's Home directory, follow the procedure earlier in this topic, To locate the home directory of a SharePoint site, in the section Working with the SharePoint sample solution: overview.
Copy the parameters in the Web.Config file included in the sample solution you downloaded to the appSettings block in your SharePoint Web.Config file. Change the value of siteURL to the URL of your local SharePoint site. If necessary, update values for the templatePath and templateFormat settings.
<configuration>
...
</appSettings>
<add key="templatePath" value="~/_layouts/Templates"
/>
<add key="templateFormat" value="jpg" />
<add key="siteURL" value="http://example" />
...
</appSettings>
...
</configuration>
Add required references
In order for the sample solution to work correctly, you must add certain references to the solution. Add the following references to your solution in Visual Studio by right-clicking the EBCDeploymentExample project and clicking Add reference…:
-
System
-
System.Configuration
-
System.Drawing
-
System.Web
-
Microsoft.SharePoint
-
Microsoft.Office.Server
The sample solution uses SharePoint User Profiles as the data source for employee contact information. The following section provides detailed information about using User Profiles in the sample application. Working with User Profiles is more convenient if you include specific references in the code. Add the following to EBCDeploymentExample.aspx.cs:
using System;
...
using Microsoft.SharePoint;
using Microsoft.Office.Server.UserProfiles;
Retrieve contact information by accessing SharePoint User Profiles
SharePoint User Profiles provide a consistent application programming interface (API) for accessing SharePoint user data, regardless of the original data source (for example, Active Directory or an LDAP directory). In the sample solution, User Profiles provide the employee contact information for completing a business card.
Perform the following steps to retrieve the employee contact information and populate a business card:
-
Locate the SharePoint User Profile for the employee who has chosen a business card to download.
-
Create properties for each item (name, job title, and so on).
-
Extract the value for each item in the UserProfile.
First, find the user's SharePoint profile. See the PopulateCard() function in the sample solution.
// Obtain the location of this SharePoint site.
String siteURL =
ConfigurationManager.AppSettings["siteURL"];
// Create a Profile Manager for this site.
UserProfileManager profileManager = new
UserProfileManager(Microsoft.Office.Server.ServerContext.GetContext(new
SPSite(siteURL)));
// Find the identity of the user accessing this
page.
string sAccount = this.User.Identity.Name;
// Get the SharePoint profile for the user with the given
identity.
UserProfile user =
profileManager.GetUserProfile(sAccount);
Next, create the properties for each item.
UserProfileValueCollection givenName = null;
UserProfileValueCollection lastName = null;
UserProfileValueCollection jobTitle = null;
UserProfileValueCollection email = null;
UserProfileValueCollection phone = null;
UserProfileValueCollection company = null;
Retrieve the values for the properties from the UserProfile. Properties that are not included in UserProfiles by default can be included in UserProfiles when SharePoint synchronizes with the source of the user data. For example, "company" is not a default UserProfile property. In this code sample, "company" is mapped to the Company field in the directory that provides SharePoint with employee contact data.
givenName = user[PropertyConstants.FirstName];
lastName = user[PropertyConstants.LastName];
jobTitle = user[PropertyConstants.Title];
email = user[PropertyConstants.WorkEmail];
phone = user[PropertyConstants.WorkPhone];
company = user["company"];
For more information about defining additional SharePoint UserProfile properties, see Personalization Services in SharePoint Products and Technologies.
Use site templates for a consistent look
It is straightforward to configure new pages hosted on a SharePoint site to follow the look and feel of the site. By specifying a Master Page File and then adding asp:Content sections for the header, footer, and any other panes common to pages on your SharePoint site, the new page fits seamlessly with the rest of the site.
Note that in order for a page hosted by SharePoint to access a compiled assembly (such as EBCDeploymentExample.aspx), the page must reference the name, version, and public key token for the assembly. You specify these values by using the Inherits parameter, as shown in the following example.
Both the Master Page File and Inherits parameters are set in the Page tag at the top of EBCDeploymentExample.aspx.
<%@ Page Language="C#"
MasterPageFile="~/_layouts/simple.master" ValidateRequest="False"
Inherits="EBCDeployment.Example, EBCDeploymentExample,
Version=1.0.0.0, Culture=neutral, PublicKeyToken=0bac7bedd8e30aa1"
%>
The content sections specify which standard SharePoint components follow a SharePoint site template. The following content section illustrates how you can follow the site template.
<asp:Content ID="PageTitle"
ContentPlaceHolderId="PlaceHolderPageTitle"
runat="server">
<SharePoint:EncodedLiteral ID="EncodedLiteral1"
runat="server" text="Electronic Business Cards"
EncodeMethod='HtmlEncode'/>
</asp:Content>
Host the new page in your SharePoint site
To host the new page in SharePoint, you place the page in the SharePoint LAYOUTS virtual directory. To do this, copy the EBCDeploymentExample.aspx file to the following folder:
-
<SystemDrive> :\Program Files\Common Files\Microsoft Shared\web server extensions\12\TEMPLATE\LAYOUTS
Now users can access the page at the following location:
-
http:// example /_layouts/EBCDeploymentExample.html.
Where example is the name of your SharePoint site.
Copy the solution to the Global Assembly Cache
The last steps in implementing the SharePoint sample solution are to compile the assembly, then copy the assembly to the Global Assembly Cache (GAC), where EBCDeploymentExample is configured to access it. Copy the compiled assembly—EBCDeploymentExample.dll—from <project folder> \bin\debug to the GAC, which is located in <SystemDrive> :\windows\assembly. If you compile in release mode, the folder will be bin\release instead of \bin\debug.
To copy your assembly to the new folder, open both folders in Windows Explorer and drag the .dll file from \debug folder to the GAC folder.
 Note: Note:
|
|---|
|
You may need to reset Internet Information Services (IIS) before the new SharePoint page can access the assembly and work properly. To reset IIS, open a Windows command window and type iisreset. |
Now you can navigate to http://YourSharePointURL/_layouts/EBCDeploymentExample.aspx to explore the sample solution.
Using a .NET 2.0 internal Web site for distributing business cards
If you do not have Microsoft Office SharePoint Server 2007 sites in your organization or want more flexibility in how you provide Electronic Business Cards, you can create a custom .NET solution for distributing cards. The steps for working with the .NET sample solution are outlined earlier in Working with the ASP.NET sample solution: overview. This section includes details about how to work with and customize the example for your organization.
When you have created standardized Electronic Business Cards templates as described in the previous section, you can customize the .NET sample solution provided as a download to use Active Directory and ASP.NET 2.0 to implement a solution for your organization. Similar to the SharePoint option, you use this solution to provide a page on an internal Web site with preview images and query employee data to populate business card templates that correspond to the preview images.
This section provides guidance for understanding the sample solution to developers who are unfamiliar with using Active Directory together with .NET Framework 2.0.
Opening a current Web site in Visual Studio
To begin working with the sample .NET solution provided in the download package, open a local Web site in Microsoft Visual Studio (VS) 5.0 and navigate to the folder that contains the sample solution. When you open an existing Web site in VS, the VS project recognizes the relationship between the EBCDeploymentExample.aspx and EBCDeploymentExample.aspx.cs files. The Web site's configuration is automatically imported from the sample solution's Web.config file.
To use an existing Web site with the sample solution in Visual Studio
-
In Visual Studio, on the File menu, click Open, and click Web Site.
-
Browse to the folder that contains the sample solution from the download package.
-
Click OK.
Specify options for your customized solution
To customize the example solution to work in your environment, you must provide the server code with the following information:
-
The location of the templates to display on the Electronic Business Cards page.
-
The format of the thumbnail images that correspond to each business card. This format is the extension you used when saving the business card previews; for example, .jpg.
-
The folder path of the Active Directory that provides the employee data for personalizing the business card templates.
-
The method of authentication; for example, Windows authentication.
-
Credentials for impersonation.
You also might choose to provide assembly references for the Visual Studio compiler. References required for the sample solution are provided in the "Adding required references" instructions in a later section.
The Web.Config file of the Web site is a convenient way to make this information available to the server code. Open the Web.Config file in the sample solution to set the parameter values for your configuration.
<configuration>
<appSettings>
<add key="templatePath" value="~/Templates"/>
<add key="templateFormat" value="jpg"/>
<add key="ADPath"
value="LDAP://ServerName.exchange.yourdomain.com/DC=exchange,
DC=yourdomain,DC=com "/>
</appSettings>
<system.web>
<authentication mode="Windows"/>
<identity impersonate="true"
userName="username"password="password"/>
</system.web>
</configuration>
It is important to specify a valid Active Directory for the ADPath parameter. The userName and password parameters represent the username and password for the Web site's service account. A more secure way to provide credentials is to encrypt the values instead of leaving them as clear text. For more information about encrypting credentials, see How to use the ASP.NET utility to encrypt credentials and session state connection strings.
Add required references
You must add specific references to the solution to enable the sample solution to work correctly. In Visual Studio, right-click EBCDeploymentExample project and click Add reference… to add each of the following references to your solution.
-
System
-
System.Configuration
-
System.DirectoryServices
-
System.Web
The System.DirectoryServices reference is required for connecting to and querying Active Directory.
Working with Active Directory is more convenient if you include specific references in the code. Add the following reference to EBCDeploymentExample.aspx.cs:
...
Using System.DirectoryServices;
Connect to Active Directory
To connect to Active Directory, create a DirectoryEntry parameter that includes the Active Directory path variable ( ADPath ):
DirectoryEntry de = new
DirectoryEntry(ConfigurationManager.AppSettings["ADPath"]);
Query Active Directory for employee contact information
You use the DirectorySearcher function to query Active Directory for employee contact information. Create the function using the DirectoryEntry created in the previous section.
DirectorySearcher ds = new DirectorySearcher(de);
Next, determine the identity of the user visiting the Web site. Remove the domain from the user's identity, and ensure that data for only the user with the correct alias is retrieved. This example assumes that the e-mail address format in your organization is alias@yourdomain.com.
string longAlias = this.User.Identity.Name;
int start = longAlias.IndexOf("\\"); // Parse away the
domain name.
int end = longAlias.Length; // Get the length of the
alias.
string alias = longAlias.Substring(start + 1, (end -
(start + 1)));
ds.Filter = "(mailnickname=" + alias + ")";
Next, specify the properties of the Outlook contact (vCard) that will be retrieved, so it can be updated later.
ds.PropertiesToLoad.Add("givenName"); // Get the given
name.
ds.PropertiesToLoad.Add("sn"); // Get the surname.
ds.PropertiesToLoad.Add("title"); // Get the job
title.
ds.PropertiesToLoad.Add("mail"); // Get the email
address.
ds.PropertiesToLoad.Add("telephoneNumber"); // Get the
phone number.
ds.PropertiesToLoad.Add("company"); // Get the company
name.
Search the directory for the user with the specified alias and store the results in a SearchResultCollection.
SearchResultCollection data = ds.FindAll();
Access contact information in Active Directory query results
After you retrieve the contact information from Active Directory, you use the information to personalize the employee business card.
To access contact information in Active Directory query results, first create properties for the contact information.
PropertyValueCollection givenName = null;
PropertyValueCollection lastName = null;
PropertyValueCollection jobTitle = null;
PropertyValueCollection email = null;
PropertyValueCollection phone = null;
PropertyValueCollection company = null;
Then find the values for the properties in the result set.
// In case invalid data was returned, try...
try
{
// Get the properties needed for the EBC.
DirectoryEntry resultEntry =
data[0].GetDirectoryEntry();
givenName = resultEntry.Properties["givenName"];
lastName = resultEntry.Properties["sn"];
jobTitle = resultEntry.Properties["title"];
email = resultEntry.Properties["mail"];
phone = resultEntry.Properties["telephoneNumber"];
company = resultEntry.Properties["company"];
}
catch (Exception)
{
// Create a writer for error output.
StreamWriter sw = new
StreamWriter(Response.OutputStream);
sw.WriteLine("Error updating template!");
sw.Close();
}
When the employee downloads the business card, it is now populated with the employee's contact information.
Download this book
This topic is included in the following downloadable book for easier reading and printing:
See the full list of available books at Office Resource Kit information

