Previous Next


Welcome to Snagit : Snagit Profiles: A Faster, More Efficient Way to Capture : Create a New Profile Based on an Existing Profile

Create a New Profile Based on an Existing Profile
Save new settings as an updated profile, as a new profile, or use the profile settings once and do not save them.
When you change profile settings, the profile selected in the Profiles pane has a yellow box around it and an asterisk next to the profile name to indicate you have modified a profile.
The following instructions provide a general method for changing your settings followed in parenthesis by a specific example. Substitute any profile and select your desired profile settings.
*
Select a Profile close to what you need.
(In the Profiles pane, click the Window profile.)
*
If necessary, change the Output.
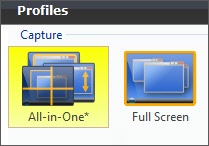
(In the Profile settings pane, select Output > Email from the dropdown list.)
*
Include an Effect to add a special Effect, specific size, color, or resolution requirement.
(In the Profile settings pane, select Effects > Edge Effect > Drop Shadow Edge from the dropdown menu.)
*
Customize the Edge Effect in the Edge Effect task page.
(In the Drop Shadow Edge task page, set the Shadow Depth to 40.)
*
Click the Capture button to take the capture.
(Move the rectangle around the screen to highlight a window. Click with the mouse to capture. The capture displays within the Capture Preview window.)
Save Profile Options
*
To save the settings as the current profile’s new defaults, click the Save Profile’s Current Settings button C:\Work\SnagIt\Snagit_910_EN\Snagit_910_EN_Main_Help\PNGs\SaveSettingsCurrentProfile.jpg at the top right of the Snagit screen.
*
To save the settings as a new profile, click the Save As New Profile button C:\Work\SnagIt\Snagit_910_EN\Snagit_910_EN_Main_Help\PNGs\SaveAsNewProfile.jpg at the top right of the Snagit screen.
 
For more information, see:
*
*
*
*
*

Previous Next