| C H A P T E R 6 | Part 2 Deploying Microsoft Office | Microsoft Office Resource Kit |
| Customizing Client Installations |
In This Chapter
Understanding the Office Setup Program
Modifying Client Setup with the Network
Installation Wizard
Running Client Setup with the Modified STF
File
The flexibility available in the standard Setup process is sufficient for many situations. But there are cases in which it is beneficial to customize the client installation process using the tools and strategies described in this chapter. For example, if you want to install a uniform configuration of Microsoft Office 97 for Windows on all your client computers, including a particular selection of converters and templates, you can create a customized Setup script using the Network Installation Wizard.
| Note The information in the following sections pertains only to Office 97 for Windows and the Windows 95 and Windows NT operating systems. |
|
The Office Setup program receives all of its instructions from a set of tables that describe which files are to be installed and how each installation is to occur. Setup uses the following three primary files:
These files are designed for the standard Office client installation process. By making modifications, however, you can create a customized client installation process.
![]()
![]()
For more information about the contents of the Setup files, see Appendix B, "Setup Command-Line Options and File Formats."
Customizing a Network Installation
The LST, STF, and INF files reside in the same folder as Setup.exe. The most common method for creating customized client installations is to create an administrative installation point and modify these Setup files directly on the server. That way, all users who install Office over the network run the custom client installation that you design.
Note The majority of this chapter assumes a network installation. If you are installing Office directly from the Office CD or floppy disks, you cannot customize the Setup process using the tools described in this chapter. For more information about network installations, see Chapter 4, "Installing Microsoft Office."
There are two ways you can modify the Setup files to customize the client installation. You can change values in the STF file to select the following:
You can also add new entries to the STF or INF file so that Setup performs the following additional tasks during client installation:
|
The Network Installation Wizard modifies the LST, STF, and INF files for the client Setup used in Office 97. Using this tool, you can change the values for items in the STF file. If the user installs Office in batch mode, Setup uses the default values you specify in the modified STF file. If the user installs Office in interactive mode, the values you set with the Network Installation Wizard appear as default responses during client Setup.
Note The Network Installation Wizard runs on the Windows 95 or Windows NT operating system only.
| Tools and Utilities The Office Resource Kit Tools and Utilities include a new version of the Network Installation Wizard that replaces the Network Installation Wizard in the Microsoft Office for Windows 95 Resource Kit. This new version works with STF and INF files from both Office 97 and Office 95. For information about installing the updated Network Installation Wizard, see "Network Installation Wizard Version 2.1" in Appendix A, "Microsoft Office Resource Kit Tools and Utilities." |
To understand how the Network Installation Wizard modifies Office Setup, first become familiar with the basic client installation process for Office. If you have not already done so, read Chapter 4, "Installing Microsoft Office."
The Network Installation Wizard guides you through the process of creating a customized Setup in the following steps:
The following sections describe each of these steps in more detail.
| Tools and Utilities The Office Resource Kit Tools and Utilities include documents that describe more advanced techniques for customizing your Office installation. For more information, see "Advanced Documentation" in Appendix A, "Microsoft Office Resource Kit Tools and Utilities." |
|
Editing International STF Files Although the user interface of the Network Installation Wizard is English only, the Network Installation Wizard can edit STF files of any language. You can edit STF files for international versions of Office (including doublebyte character system versions such as Japanese, Korean, and Chinese) by using the Network Installation Wizard version 2.1, which is included with the Office Resource Kit Tools and Utilities. For more
information about this version of the Network Installation Wizard,
see "Network Installation
Wizard Version 2.1" in Appendix A, "Office Resource Kit Tools
and Utilities." |
Start the Network Installation Wizard
Like other Office wizards, the Network Installation Wizard guides you through a series of panels and options. You proceed to the next panel by clicking Next, and you can go back to the previous panel by clicking Back. The Setup files are not modified until you click Finish, so you can go back and change any answers before you complete the final panel.
You can quit the Network Installation Wizard at any time by clicking Cancel.
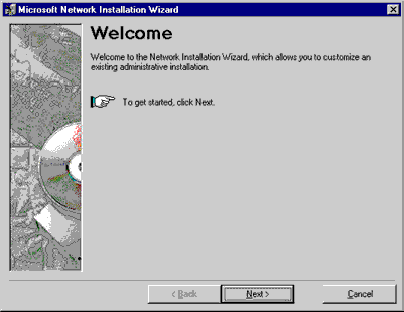
After the initial Welcome panel, the Network Installation Wizard asks for the name of the LST file to customize. Enter the name of the LST file from the folder containing the main Office application files. For example, in Office 97 Professional Edition, the LST file name is Setup.lst.
Note Office 95 does not use an LST file. If you are customizing an Office 95 installation, you must specify the STF file instead. In the Open LST or STF File panel, click Browse. In the Files of type box, select Setup Table File (*.stf) and then select the correct STF file.
The Network Installation Wizard finds the name of the STF file, which is defined in the LST file, and then opens the STF file. The Network Installation Wizard looks for the STF and INF files in the same folder in which the LST file resides. While the Network Installation Wizard is reading the STF file, which can take a minute or two, it displays a progress bar.

After opening the STF file, the Network Installation Wizard opens the INF file specified in the STF file. The INF file resides in the same folder as the STF file and has the same file name with an INF extension. In Office 97 Professional Edition, the name of the INF file is Off97Pro.inf. If the Network Installation Wizard cannot find the INF file specified in the STF file, you are prompted to enter the location and name of the file.
Select a Primary Location for the Office Application Files
The Network Installation Wizard then displays the name of the folder where the main Office application files are installed during client Setup. You can change the default folder by entering a new name, or by clicking Browse and selecting a new folder.
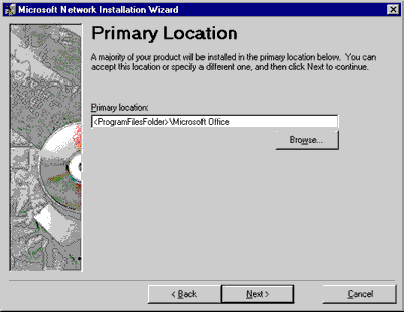
If you run client Setup in batch mode (using the /q commandline option), Setup installs the Office application files in this folder. If a user runs client Setup interactively, this folder appears as the default folder, which the user can change.
Note Remember that the folder name you enter here is used by Setup when users install Office. If you specify a folder on a network server, that folder must be accessible during client Setup. If you specify a local folder, Setup creates a folder with that name on the user's hard disk.
Select a Default Folder for Office Documents
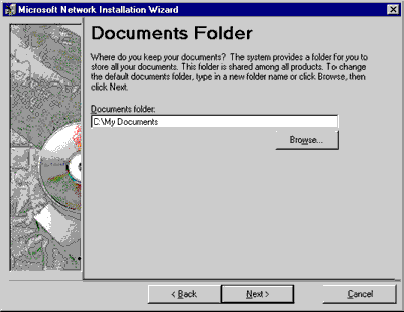
Both Windows 95 and Windows NT Workstation version 4.0 provide a default folder to store all user documents, including Office documents. By default, this folder is named My Documents and is located at the root directory of the C drive. If the default folder has not yet been defined on the user's hard disk, the Network Installation Wizard allows you to specify a name and path for this folder, which is created during client Setup. If the folder has already been defined in the user's hard disk, then setting this option has no effect.
| Tip In Windows 95 and Windows NT Workstation 4.0, you can use a system policy to define a default file name and path for the documents folder for all users in your workgroup. In the System Policy Editor, set the following policy: |
User\Office\Common\Personal Folder
For more information, see "Using Windows System Policies to Customize Office" in Chapter 7, "Customizing and Optimizing Microsoft Office."
Select a Location for Shared Office Applications
Next, the Network Installation Wizard displays a panel similar to the dialog box that was displayed when you created the administrative installation point. The options in this panel determine whether users choose where to install shared applications, or whether you make that choice for them. The panel contains these options:
Shared applications are stored on the server, and users run them over the network. Users running client Setup do not make the choice.
Shared applications are installed on each user's computer. Users running client Setup do not make the choice.
Users choose where to install shared applications when they run client Setup.
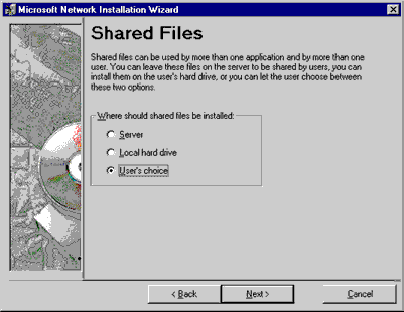
If users install Office in batch mode with no user interaction, you must select either Server or Local hard drive. If you select Server, a second panel is displayed for you to specify a location on the network for the shared applications. (This panel is also displayed if you select User's choice, since users in that scenario may choose to store shared applications on the network.)
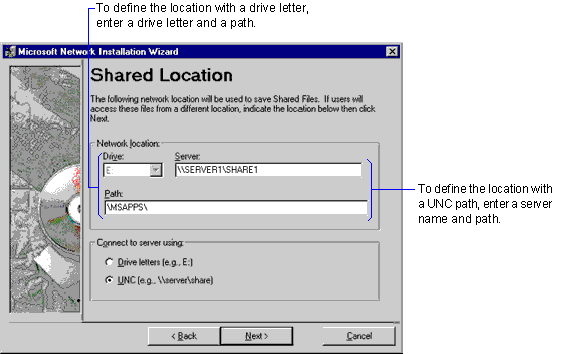
Under Connect to server using, you can specify whether you want the location of the shared applications to be defined with a drive letter or with a UNC path. If you select the Drive letters option here, you must enter a drive letter and a path under Network location. You do not need to have a valid connection to the drive while running the Network Installation Wizard. However, users must have a valid connection to the drive during client Setup. If you select the UNC option, you must enter a server name and path under Network location.
Note UNC stands for Universal Naming Convention and refers to the \\servername\sharename syntax used for defining servers and shared areas on the server for LAN Managercompatible networks.
When you click Next, the Network Installation Wizard attempts to connect to the server to verify it. If it encounters any errors, the Network Installation Wizard asks whether you want to use the path as specified. To continue and leave the path as it is, click Yes; to change the path, click No.
The following table shows some reasons why the verification might fail and what you can do to fix the problem.
Office Setup can create a log file containing information about the installation. If you specify a log file in the Installation Log panel in the Network Installation Wizard, then each time Office is installed from this administrative installation point, Setup writes one record into the log file. The log file is a text file, and each record contains the following fields:
The Network Installation Wizard gives you the opportunity to create a log file by specifying the log file name. If you do not want a log file, click Next without entering a file name.
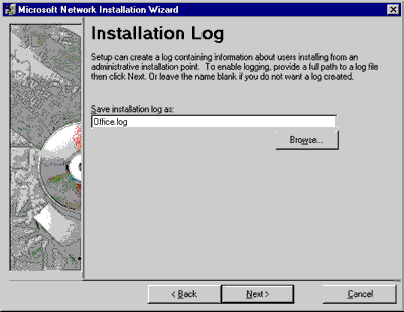
Note The installation log file is a new feature of Setup for Office 97. If you are using the Network Installation Wizard with an Office 95 STF file, the Installation Log panel does not appear.
Choose the Type of Installation
Office 97 Setup offers three types of installation: Typical, Custom, and Run from Network Server. If you select Typical or Custom in the Installation Type panel, the Network Installation Wizard displays the Components panel so you can select which components you want Setup to install. If you run Setup in batch mode (/q commandline option) using the Typical or Custom installation type (/b commandline option), Setup installs the components you selected.
For example, if you select Custom in the Installation Type panel and then select a number of text converters in the Components panel, you can use the command setup.exe /q /b2 to install those converters with Office. For more information about Setup commandline options, see Appendix B, "Setup Command-Line Options and File Formats."
Note After you finish customizing the Setup files, the Network Installation Wizard displays a suggested Setup command string in the final panel. This string includes the correct installation type parameter. For example, if you select Typical in the Installation Type panel, the Network Installation Wizard displays in the final panel a suggested command string that includes the parameter /b1.
If you run Setup interactively, then the components you select with the Network Installation Wizard are displayed as default selections.
Note A fourth installation type, Run from CD, is available when you install Office directly from the Office CD. Because you are modifying the STF file for a network installation, that option is not discussed here.
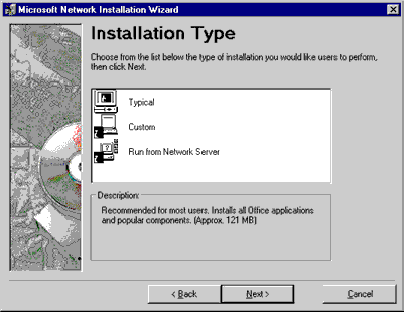
If you select Typical in the Installation Type panel, the Network Installation Wizard displays the list of Typical installation options in the Components panel in a format similar to the one presented to an end user running client Setup in interactive mode.
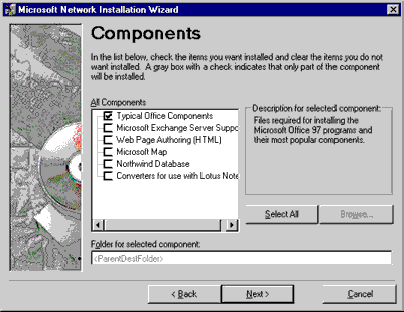
If you select Custom in the Installation Type panel, the Network Installation Wizard displays the list of Custom options in the Components panel.
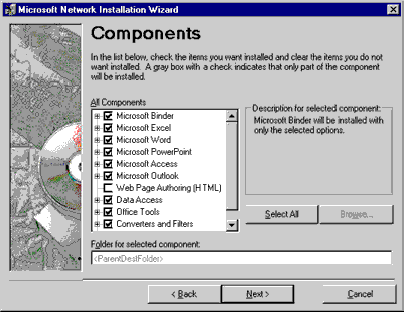
When you select an installation option in the All Components box, a description appears under Description for selected component, and the folder name appears in the Folder for selected component box. Each of these installation options may have additional options — if so, a plus sign (+) appears to the left of the option in the All Components box. Clicking the plus sign (+) expands the list, displaying its additional components.
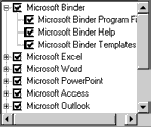
You can select all or only some of a set of additional components:
The Select All button allows you to select all the Office options, along with all their additional components.
If you use the modified STF file in batch mode, the state of a check box for a particular option indicates whether the option is installed when client Setup is run: selected options are installed; cleared options are not.
If you use the modified STF file in interactive mode, the state of the check boxes in the All Components box represents the default settings that are presented to the user during client Setup. For example, if you select the Office Tools check box, that check box is selected when the user runs client Setup interactively and views the options for a Custom installation.
With the Browse button you can modify the default folder for a selected option. Both the long and short names of the folder you select are kept in the STF file. However, the Return long folder name to previous dialog check box in the Browse Folders dialog box determines which form of the name is displayed in the Components panel. This option does not affect the STF file, but only the way you view the folder name in the Network Installation Wizard. (The default is to use long folder names.)
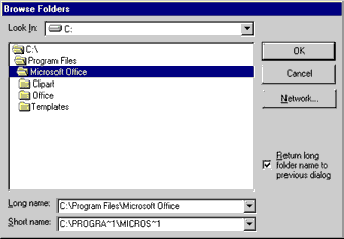
When you are creating a customized network installation, you can use a set of special folder identifiers to specify standard system folders in the Browse Folders dialog box. That way, you do not need to know the exact location of these folders on each user's computer.
The Network Installation Wizard may also display the identifier <NoneSpecified> for a particular folder. This means that the folder name has not yet been determined, but will be resolved by Setup during installation.
Note You can specify a subfolder for any of these folders by appending a backslash ( \ ) and a subfolder name to the folder identifier — for example, <WindowsFolder>\Media.
Configure the Installation Environment
The STF file contains a number of questions that Setup uses to further configure the network installation. The questions Setup displays to the user depend on previous user responses and on the installation environment.
For example, suppose a user is installing Microsoft Outlook. If Setup finds Microsoft Schedule+ 95 on the hard disk, Setup asks whether to configure Outlook to use Schedule+ as the primary calendar. If Schedule+ 95 is not found, Setup does not display that question. If the same question can be asked in several situations during installation, then the STF file defines that question in multiple locations.
The Network Installation Wizard displays every Yes/No question that may appear during client Setup in the STF file and allows you to determine the default answers. Because a particular question may appear more than once in the STF file, the Network Installation Wizard may repeat the same question several times in the Yes/No Questions panel. To ensure that your default answer is used during client Setup, change every occurrence of the question in this panel.
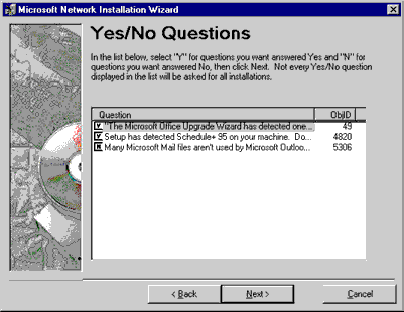
Clicking a question in the Yes/No Questions panel switches the answer from Yes to No and back again.
| If the error is caused by this | Do this |
| Misspelled server or share name. | Click No and correct the name. |
| Share not yet created. | Click Yes and create the share before users begin installing Office. |
| Cannot connect to a share on the server. (Many networks do not allow you to do this if you run directly from the server.) | Click Yes; you can verify the share later from another computer on the network. |
| Invalid UNC path | Click Yes; verify that the share is accessible before users try to install from this server |
| This folder identifier | Represents this folder |
| <ParentDestFolder> | The destination folder of the Office component. |
| <SetupSourceFolder> | The folder from which Setup is run. |
| <WindowsFolder> | The main Windows folder. |
| <SystemFolder> | The Windows system folder. |
| <SharedFilesFolder> | The folder in which shared applications are stored. |
| <ProgramFilesFolder> | The Program Files folder in Windows 95, or the Windows directory on Windows NT Workstation. |
|
Why Are There Duplicate Items in the List? In some of the lists displayed in the Network Installation Wizard, you may see what appear to be duplicate entries. This occurs because there are several execution paths that Setup can take through the STF file, depending on the configuration of the user's computer and whether Setup finds a previous version of Office installed. The same question may appear in more than one path; however, Setup asks each question only once during installation. Because the Network Installation Wizard does not know what path Setup will take, it displays every instance of a question. If you want to specify a default answer, you must do so for all the duplicate questions in the list, so that Setup uses the same answer in every context. In these lists, the Network Installation Wizard displays an Object ID column with the heading ObjID. The Object ID is a number in the STF file that uniquely identifies each item in the list. This number helps the Network Installation Wizard distinguish between duplicate items in the STF. You do not need to use this number when running the Network Installation Wizard. For more
information about the structure of the STF file, see
Appendix B, "Setup Command-Line
Options and File Formats." |
Select Items for Program Manager
The Network Installation Wizard allows you to specify which application icons you want to install in the Program Manager group when you install Office on a computer running Windows NT Workstation 3.51. In the Program Manager Items panel, you can specify the Program Manager group and the default working folder for each item you select. The corresponding Program Manager icons are created when you install Office on a computer running Windows NT Workstation 3.51.
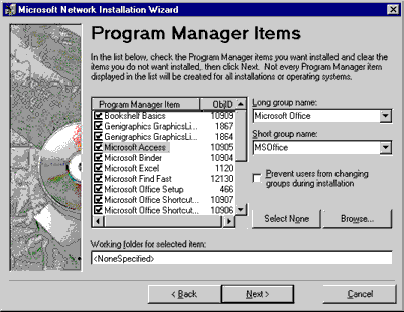
When you click an item in the Program Manager Item box, the corresponding Program Manager group appears to the right. You can change the group name, and you can select the Prevent users from changing groups during installation check box if you do not want users to modify the location of the selected item.
The working folder for the application appears below the Program Manager Items box. This is the default folder used for creating new files or browsing for existing files. Some applications explicitly define the folder to be used for certain types of files (for example, Word defines a specific folder to be used for template files), in which case the working folder is used only for those files that have no other folder explicitly defined for them. You can change this folder by clicking Browse.
Clicking Select None clears the check boxes for all items in the list.
|
Which Icons Are Actually Installed? The items listed in the Program Manager Items panel include all the program icons defined in the Office STF file; however, not all of these icons are necessarily installed during client Setup. The icons that are actually installed depend on the options the user selects during Setup, along with other factors that Setup encounters, such as whether a previous version of Office is installed. Clearing a check box in this list, however, guarantees that the corresponding icon is not installed. If there are
duplicates of an item in the list, only one corresponding program
icon is actually created in Program Manager during installation.
However, you must modify each duplicate item the same way, so that
the correct icon is created regardless of the path Setup takes. For
an explanation of duplicate items displayed in the Program
Manager Items or Shortcuts panels, see the sidebar
"Why Are There Duplicate Items in the
List?" earlier in this chapter. |
Select Shortcuts for the Start Menu or Desktop
The Start Menu and Desktop Items panel in the Network Installation Wizard allows you to select the shortcuts that appear in the Windows\Start Menu folder or on the Desktop when you install Office on a computer running Windows 95 or Windows NT Workstation 4.0.
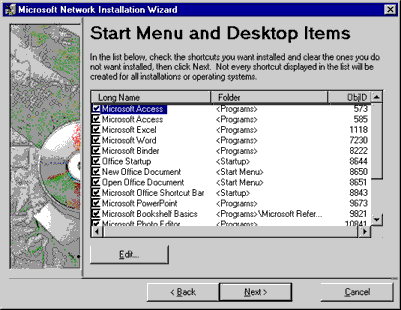
Note The shortcuts in the list include all the program files defined in the Office STF file; however, not all of these items are necessarily installed during client Setup. For more information about which items are installed and about how Setup handles duplicate items, see the sidebar "Why Are There Duplicate Items in the List?" earlier in this chapter.
To change the properties of a shortcut, select it in the list and then click Edit. In the Edit Shortcut dialog box, you can change the folder in which the shortcut is installed, as well as the name and working folder of the shortcut.
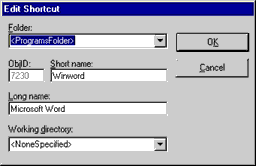
You can use a set of standard folder identifiers to specify Start Menu folders in the Edit Shortcut dialog box.
| This folder identifier | Represents this folder |
| <StartMenuFolder> | Start Menu folder |
| <ProgramsFolder> | Programs folder in the Start Menu folder |
| <StartupFolder> | Startup folder in the Start Menu folder |
| <DesktopFolder> | Desktop folder |
You can also append a subfolder to a standard folder identifier in the Folder box. For example, <ProgramsFolder>\Microsoft Office or <DesktopFolder>\ValuPack.
In the Working directory box, you can enter a full path or a special folder identifier, like the ones used in the Browse Folders dialog box of the Components panel. For a list of folder identifiers that you use to specify standard system folders, see the table in "Choose the Type of Installation" earlier in this chapter.
Choose Folder for Modified Setup Files
In the Choose Setup Files Subfolder panel, specify the subfolder in which you want the Network Installation Wizard to create the customized LST, STF, and INF files. The subfolder name you specify is created in the folder in which the original STF folder resides.
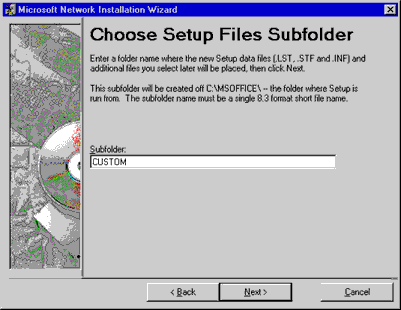
Note The folder name you enter in the Subfolder box must conform to the standard MSDOS eightcharacter filename format.
Add Additional Files to the Office Installation
The Network Installation Wizard allows you to add files to the Office installation process. These are additional files, provided by you, that Setup installs along with the Office files. For example, you could add a Word template file you have created for your workgroup to use.
![]() To add files to the installation
process
To add files to the installation
process
This can be any type of file located anywhere on the network.
In order for added files to be accessible during client Setup, they must reside in the Custom folder. If you click No, you must remember to copy the file to the Custom folder yourself.
Setup installs the file in this folder during client Setup. You must specify a folder; entering a description in the Description for selected file box is optional.
The Network Installation Wizard allows you to add registry entries to the user's Windows registry during the installation process. This can be useful if, for example, you have written an application that relies on the contents of a particular registry entry. You can add the entry to Office Setup so that your application is ready after the user installs Office.
![]() To add a new registry
entry
To add a new registry
entry
The Add dialog box appears.
Toplevel keys include the following: HKEY_CLASSES_ROOT; HKEY_CURRENT_USER; HKEY_LOCAL_MACHINE; and HKEY_USERS.
The data must match the data type already specified.
This description is stored with the key in the registry and is optional.
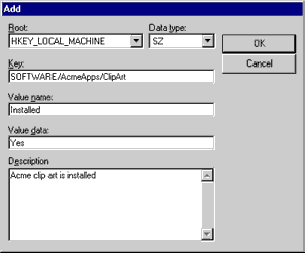
For example, you can enter the new registry key HKEY_LOCAL_MACHINE\SOFTWARE\AcmeApps\ClipArt\Installed with a value of Yes using the following entries in the Add dialog box.
When you run client Setup to install Office on a client computer, you can specify a commandline option that runs Setup in batch mode, without requiring input from the user during the installation. Setup can run in several of these quiet modes; the one you choose determines whether Setup displays anything to the user or runs completely silently.
The Select Quiet Mode panel allows you to choose how you want Setup to run. When the Network Installation Wizard is finished, it displays a suggested Setup command string that includes the appropriate commandline option corresponding to the quiet mode you select in this panel.
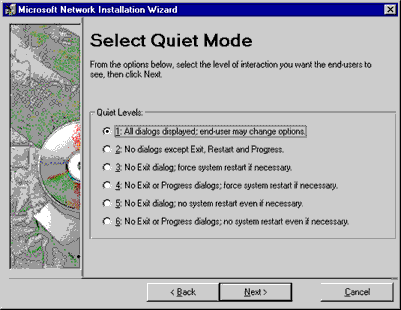
For example, if you select 4: No Exit or Progress dialogs; force system restart if necessary, then the Network Installation Wizard suggests that you use the /QT Setup commandline options. For a description of all Setup commandline options, see Appendix B, "Setup CommandLine Options and File Formats."
To complete the customization process, the Network Installation Wizard saves the modified LST, STF, and INF files. These files are created in the subfolder you specified in the Choose Setup Files Subfolder panel.
In the Save Changes panel, you can specify the names of the customized STF, INF, and LST files.
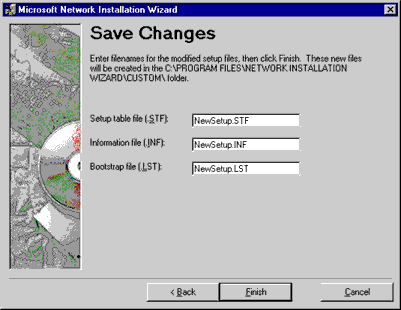
Note The name of the INF file you specify here is stored in the STF file, and the name of the STF file is stored in the LST file. If you rename either the STF or INF file on the disk, Setup cannot find it during installation.
For more information about how to use the modified STF file with Setup, see "Running Client Setup with the Modified STF File" later in this chapter.
Finish the Network Installation Wizard
When the Network Installation Wizard finishes writing the new
LST, STF, and INF files, it displays
the Done! panel.
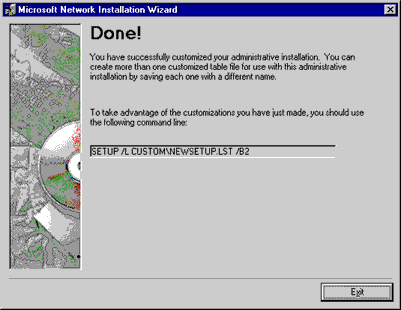
Based on the name of the LST file you entered in the Save Changes panel and the installation type and quiet mode you selected, the Network Installation Wizard suggests a Setup command string to use when running Setup. The following commandline options may be included in the string:
For a description of all Setup commandline options, see Appendix B, "Setup CommandLine Options and File Formats."
| In this box | Select or type this text | |
| Root | HKEY_LOCAL_MACHINE | |
| Data type | SZ | |
| Key | SOFTWARE\AcmeApps\ClipArt | |
| Value name | Installed | |
| Value data | Yes | |
| Description | Acme clip art is installed | |
|
When you have successfully modified the LST, STF, and INF files with the Network Installation Wizard, you need to make them available so that users running client Setup use your modified files and not the original ones.
Note Because the LST, STF, and INF files are interrelated, you cannot rename them directly on disk after you have created them with the Network Installation Wizard. To change the name of any of these files, run the Network Installation Wizard again and specify a different name.
The Network Installation Wizard creates the modified LST, STF, and INF files in a subfolder of the folder containing the Office Setup program. To use the modified files, the user runs Setup from the Setup folder with the command string suggested by the Network Installation Wizard.
For example, suppose your administrative installation point is in folder MSOffice on the network share \\Server1\Install. In the Choose Setup Files Subfolder panel of the Network Installation Wizard, you enter Custom as the name of the subfolder that contains the modified Setup files (for example, NewSetup.stf, NewSetup.inf, and NewSetup.lst). To install Office using your customized Setup files, users connect to \\Server1\Install\MSOffice and run Setup with the following command string (along with any other commandline options you require):
setup /l Custom\NewSetup.lst
Setup opens your modified LST file in the Custom subfolder and installs Office using the custom files you created with the Network Installation Wizard.
You can create more than one customized Office installation by running the Network Installation Wizard for each variation. Save each set of modified LST, STF, and INF files in a separate subfolder. Users specify the appropriate subfolder in the Setup command string when they run Setup.
For example, suppose you have three departments with unique installation requirements: Engineering, Accounting, and Services. You can run the Network Installation Wizard three times, creating a customized Office installation for each department, and save the custom files in separate subfolders: Engineer, Account, Services. Users from each department run Setup by connecting to the administrative installation point and using one of the following command strings:
setup /l Engineer\NewSetup.lst
setup /l Account\NewSetup.lst
setup /l Services\NewSetup.lst
For more information about commandline options for Setup.exe, see Appendix B, "Setup CommandLine Options and File Formats."
Installing Office over the Network
Once you have modified the LST, STF, and INF files, there are three ways to initiate a client installation of Office: interactive, batch, and push.
In an interactive installation, users connect to the Office server and run Setup using the commandline options you have chosen. Setup prompts the user for installation information. Modifications you have made to the STF file are displayed as default responses to user prompts.
In a batch installation, you create a batch file which runs Setup using your customized STF file with the appropriate commandline options. The user runs the batch file, which in turn installs Office with no additional user interaction. Setup does not prompt the user for information, but uses the responses from the customized STF file instead.
For example, a command line for Setup might be
setup.exe /l Custom\NewSetup.lst /q1
The /l option directs Setup to use your custom LST, STF, and INF files in the Custom subfolder. The /q1 option directs Setup to run without further user intervention, displaying only progress indicators to the user. For a description of all the available Setup commandline options, see Appendix B, "Setup Command-Line Options and File Formats."
By placing this command line in a batch file that the user can run, you can create a simple mechanism for users to launch a customized version of Office client Setup.
In a push installation, you initiate client Setup automatically with no user intervention. This can be done by putting the customized Setup command line in the user's system logon script, so Office installation is initiated the next time the user logs on to the network.
You can also use a network administration tool, such as Microsoft Systems Management Server, to initiate a push installation. For more information, see the following section, "Using Microsoft Systems Management Server to Install Office."
Using Microsoft Systems Management Server to Install Office
You can use a network administration tool, such as Microsoft Systems Management Server, to distribute a customized version of Office client Setup to your users.
Microsoft Systems Management Server version 1.2 helps you automate largescale deployment of Office by performing an automatic installation that requires no intervention from you or the user.
Important This section supplements the Microsoft Systems Management Server documentation; it does not replace it. The procedures that follow provide additional information for using Systems Management Server to install Office, but they do not cover all Systems Management Server options and features. For complete information, see the Microsoft Systems Management Server Administrator's Guide.
To use Systems Management Server to distribute Office, perform the following steps:
Note Before you use Systems Management Server to install Office, you must create an administrative installation point on a server. Systems Management Server uses the administrative installation point as the package source folder. For more information, see "Installing Office from the Network" in Chapter 4, "Installing Microsoft Office."
To install Office on your users' computers, you create a package to run Setup using the standard Typical, Custom, or Run from Network Server installation types, or using a Setup script you have customized. Once the package is created, you create a Run On Workstation job to execute Setup on the user computers that you designate.
Creating a Package for Office
You create a package for Office by using the Systems Management Server Administrator program and importing the Office PDF. The Office PDF is located in the main Office folder in the administrative installation point and is named Off97std.pdf (Standard Edition) or Off97pro.pdf (Professional Edition).
| Tools and Utilities The standard Office PDF described in this section supports only local client installations and does not support Run from Network Server installations or sharing Office components over the network. The Office Resource Kit Tools and Utilities include additional PDF files that support Run from Network Server installations. For more information, see "Package Definition Files" in Appendix A, "Microsoft Office Resource Kit Tools and Utilities." |
The Office PDF file contains command definitions for the standard installation types: Typical and Custom, as well as the complete installation (a Custom installation with all the Office components selected) and Uninstall options. Each of these command definitions contains a Setup command line that directs Setup to run in batch mode with the specific installation type (except for Custom, which always runs interactively).
For example, the following commandline installs a Typical installation using your customized Setup files:
CommandLine = setup.exe /l Custom\NewSetup.lst /q1 /b1
The /l commandline option in this example directs Setup to use your custom LST file in the Custom subfolder. The /q1 commandline option directs Setup to run with no user interaction, and the /b1 option directs Setup to use the Typical installation type. When this command is run from the Systems Management Server package, Setup automatically installs Office using the options you defined for the Typical installation type in your custom STF file. For a description of all the available Setup commandline options, see Appendix B, "Setup CommandLine Options and File Formats."
To use one of the standard Office installation types for installing Office on your client computers, create a package using the unmodified Office PDF.
![]() To create an Office Setup
package
To create an Office Setup
package
The PDF file is located in the administrative installation point in the folder containing the main Office application files.
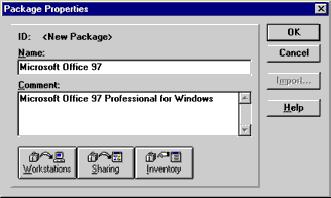
To create a Setup command that differs from those available in the Office PDF, you add a new command to the Office PDF. For example, if you want Setup to run with your custom Setup files and to generate a log file, then you can add a new command in the PDF that runs Setup using the commandline options /l and /g. You do this with the Systems Management Server Administrator program.
![]() To add a new command to the Office
package
To add a new command to the Office
package
For example, type Install Office
For example, to run a Typical installation of Setup with your custom Setup files in full quiet mode, and generating a log file, type the following string:
setup.exe /l Custom\NewSetup.lst /b1 /qt /g "setup.log"
If you are installing on Windows NT Workstation, you can also select the System (Background) Task check box to indicate that you want the package to run in the background.
Note For more information about creating, modifying, or distributing packages, or for information about other package options available in Systems Management Server, see the Microsoft Systems Management Server Administrator's Guide.
Creating a Job for the Office Package
Once you have created the Systems Management Server package for Office, you create a Run On Workstation job to distribute the package.
![]() To create a Run On Workstation
job
To create a Run On Workstation
job
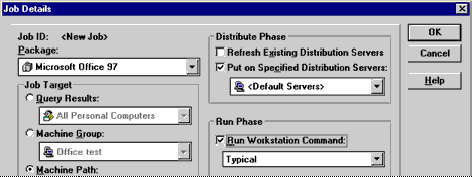
Important The previous procedure describes how to create a simple job for the Office package and how to select the appropriate Office Setup command line. To finish creating the job, you must define job targets (user computers) on which to install Office, and you must set the job schedule. For more information about creating and scheduling the job, see the Microsoft Systems Management Server Administrator's Guide.
When the job is executed, Systems Management Server copies all
the files from the main Office folder on the administrative
installation point to a folder on one or more Systems Management
Server distribution servers that service the users on your network.
When a user runs the package, Setup is run from within this copy of
the administrative installation point.
|