| C H A P T E R 29 | Part 5 Using Microsoft Office Throughout Your Organization | Microsoft Office Resource Kit |
| Workgroup Features in Microsoft Access |
In This Chapter
Security Features in Microsoft Access
Multiuser Applications and Locking
Database Replication
Visual SourceSafe
See Also
This chapter explains how to administer features in Microsoft Access that are designed for sharing database applications developed in Access among users in a workgroup. It describes how the various workgroup features of Access work and provides information for supporting them.
| Note Access runs only on Windows 95 and Windows NT Workstation version 3.51 or later. |
|
As a workgroup administrator, you might initiate or oversee workgroup-wide security practices to help protect Access database applications. This section describes the options available in Access for helping to protect databases and applications developed in Access. These options are independent of any additional security measures at the operating system level.
Access supports several levels and methods to help protect files:
You can use startup options to restrict access to default menus and toolbars, the Database window, and special keys.
You can set a password to help control opening the database.
You can save an application as an MDE file to remove Microsoft Visual Basic for Applications source code and prevent changes to the design of forms, reports, and modules.
You can use database encryption to help prevent unauthorized users from viewing the objects in an application with a disk editor or other utility program. You can use encryption in conjunction with all other methods to help protect an application.
You can use userlevel security to apply the most powerful and flexible method to help protect an application. However, establishing userlevel security is a complex process that may exceed your requirements. If this is the case, use one or more of the other security methods.
The strategy you use depends on the extent of security you need and how the application is used. The following sections explain these options.
Restricting User Access with Startup Options
In a casual environment where strict security is not required, you can use still startup options to restrict access to default menus and toolbars, the Database window, and special keys. To perform the following procedure, the application must have a startup form and a custom menu bar that contains only the commands you want available.
For information about creating a startup form or a custom menu bar, see Access online Help.
![]() To use startup options to help
protect an application
To use startup options to help
protect an application
This prevents users from using the SHIFT key to bypass the settings in the Startup dialog box. For information about how to set the AllowBypassKey property, see Access online Help.
A user who knows how to create the appropriate line of Visual Basic code can bypass this method of security by setting the AllowBypassKey property of the database back to True. If you want a higher level of security, establish userlevel security in addition to, or instead of, setting startup options. For information about userlevel security, see "Setting User-Level Security" later in this chapter.
Helping Protect File Open with a Database Password
Assigning a password to a database is an easy way to prevent unauthorized users from opening an application. Use this approach when you want to help control which users can open an application, but not whether they can modify or save the application.
Important Before you set the database password, make a backup copy of the database. Also, close the database before you set the password; if the database is located on a server or in a shared folder, make sure no other user has it open.
![]() To set a database
password
To set a database
password
![]()
![]()
Important Do not use a database password if you plan to replicate the database. You cannot synchronize a replicated database if a database password has been set. Defining userlevel security permissions does not interfere with replica synchronization. For more information about database replication, see "Database Replication" later in this chapter.
When you set a database password, the Set Database Password command changes to Unset Database Password. To clear a database password, click Unset Database Password on the Security submenu (Tools menu), type the correct password in the Password box, and then confirm it in the Verify box.
Anyone who knows the database password and has access to the Unset Database Password command can change or clear the password. To help prevent users from changing or clearing the password, or from setting an initial password, use userlevel security to remove the Administer permission on the database for all users and groups except the database administrator. By default, the Users group, the Admins group, and the creator (owner) of the database all have Administer permission on the database. For more information about permissions, see "Setting User-Level Security" later in this chapter.
If you use a password to help protect a database containing tables that are linked to another database, anyone who can open the database that contains the link can open the linked table. When the link is established, Access stores the password in an unencrypted form. If this compromises the security of the passwordprotected database, do not use a database password to help protect the database. Instead, establish userlevel security to help control access to the sensitive data. For more information, see "Setting User-Level Security" later in this chapter.
Note Setting a database password does not prevent someone from using a disk editor or other utility program to read data without opening the database. To help prevent this, encrypt the database. For more information about encrypting a database, see "Encrypting a Database" later in this chapter.
Protecting Source Code with an MDE File
Saving a database as an MDE file creates a copy of the database that contains no Visual Basic source code. Saving a database application as an MDE file also reduces the size of the database and makes the application's use of memory more efficient. The code is compiled and functional, but cannot be viewed or edited. In an MDE file, users can view or modify the design of the following objects:
However, users cannot view or modify the design of forms, reports, or modules.
Note Saving a database as an MDE file does not create a runtime version of the database. To use an MDE database, users must have Access 97 installed. Alternatively, if you have Microsoft Office 97 Developer Edition, you can save a database as an MDE file and then use the Setup Wizard to create a distributable runtime version of it.
Saving a database as an MDE file prevents a user from:
However, tables, queries, and macros can be imported from nonMDE databases. Similarly, tables, queries, and macros in an MDE database can be exported to another database.
If you need to modify the design of forms, reports, or modules in a database saved as an MDE file, you must open the original database, modify it, and then save it as an MDE file again.
![]()
![]()
![]() To save a database as an MDE
file
To save a database as an MDE
file
The original database is unchanged, and a new copy is saved as an MDE file using the file name and location you specify.
Note The process of saving a database as an MDE file automatically compiles all modules and compacts the destination database, so you do not need to perform these steps.
Because saving a database as an MDE file prevents all users (including database administrators) from modifying the design of forms, reports, and modules, this option may be too restrictive. If you require additional control and flexibility in these areas, do not save a database as an MDE file — establish userlevel security instead. For more information, see "Setting User-Level Security" later in this chapter.
When should I use an MDE file? Making an MDE file
from a database that contains tables creates complications with
reconciling different versions of the data if you need to modify
the design of the application later. For this reason, saving a
database as an MDE file is most appropriate for the frontend of an
application that has been split into a backend database containing
only tables and a frontend database containing the remaining
objects. For more information about splitting a database, see
"Splitting a Database into a
Front-end/Back-end Application" later in this
chapter. |
Using Other Forms of Security with MDE Files
Saving a database as an MDE file is a good way to protect the code and the design of forms and reports in a database application, without requiring users to log on and without having to manage the user accounts and permissions required by userlevel security. However, an MDE file does not control how users gain access to tables, queries, and macros.
If you want to help control these database objects, establish user-level security before you save a database as an MDE file. You can use a database password to help control who can open an MDE database, and you can use user-level security to help control how users gain access to the tables, queries, and macros in the application. To use a database password or establish userlevel security for an MDE database, you must implement these features in the original database before you save it as an MDE file. The database password or userlevel security is preserved in the new MDE database.
If the database you want to save as an MDE file utilizes user-level security, you must use the Workgroup Administrator before you start Access to join the workgroup defined by the workgroup information file that was in use when the database was created. For information about using the Workgroup Administrator, see Access online Help.
The workgroup information file defines the user accounts used to gain access to the database. For more information about workgroup information files, see "How Workgroup and Permission Information Is Stored" later in this chapter.
Tip Instead of using the Workgroup Administrator, you can use the /wrkgrp commandline option to start Access with the workgroup information file you specify. For more information about using startup commandline options, see Access online Help.
In addition, make sure your user account has the following permissions:
For more information about database passwords, see "Helping Protect File Open with a Database Password" earlier in this chapter. For more information about userlevel security, see "Setting User-Level Security" later in this chapter.
Saving a Replicated Database as an MDE File
A replicated database (either a replica or a Design Master) cannot be saved as an MDE file; however, once a database is saved as an MDE file, it can be replicated. For information about replicating databases, see "Database Replication" later in this chapter.
To save a replicated database as an MDE file, you must first remove replication system fields, tables, and properties. For more information about removing replication fields, tables, and properties, see Access online Help.
Making an MDE File from a Database That References Another Database
If you try to make an MDE file from a database (MDB) or an addin database (MDA) that references another database or addin, Access displays an error message and does not complete the operation. To make an MDE file from a database that references another database, you must save all databases in the chain of references as MDE files, starting with the first database referenced. After saving the first database as an MDE file, you must then update the reference in the next database to point to the new MDE file before saving it as an MDE file, and so on.
For example, if Database1.mdb references Database2.mdb, which references Database3.mda, you would proceed as follows:
For information about referencing another database, see Access online Help.
If you want to help protect a database from unauthorized access by someone using a disk editor or other utility program, you can encrypt it. Encryption helps make a security-enhanced database indecipherable, helping to protect it from unauthorized viewing or use, particularly during electronic transmission or when it is stored on floppy disk, tape, or compact disc. Encrypting an unsecured database has no effect because anyone can open the database in Access or Visual Basic and gain full access to all objects in the database.
The UserLevel Security Wizard automatically encrypts a database. You can encrypt or decrypt a database by starting Access without opening a database, and then clicking Encrypt/Decrypt Database (Tools menu, Security submenu). When you encrypt a database using the same file name as that of the original database, Access deletes the original unencrypted file if the encryption process is successful. If an error occurs, Access leaves the original file intact.
Note Encrypting a database slows its performance by up to 15 percent. Also, an encrypted database cannot be compressed by programs such as DriveSpace® or PKZIP. If you try to compress an encrypted database, its size does not change.
Userlevel security is a flexible method to help protect sensitive data, code, and object design in a database application developed in Access. In addition, userlevel security is the only form of Access security that allows you to establish different levels of access to sensitive data and objects.
Before you begin establishing userlevel security for an application, make sure you understand how the Access userlevel security model works. This section explains the significance of a workgroupbased userlevel security model; how you can create user and group accounts to create a workgroup and establish permissions; and how you can use the tools that Access provides, such as the UserLevel Security Wizard, to help protect databases. You can also use Data Access Objects (DAO) in Visual Basic to establish and manage security in ways that are not available in the Access user interface.
For information about establishing security using Visual Basic, see "Using Data Access Objects to Establish UserLevel Security" in Chapter 14, "Restricting Your Application," in Building Applications with Microsoft Access 97.
Understanding the Microsoft Access UserLevel Security Model
Unlike the security models of most other database systems, the primary form of security in Access is userlevel security rather than sharelevel security. Access userlevel security is similar to the security used in most network environments, such as Microsoft Windows NT Server versions 3.51 and 4.0. When users start Access, they enter a name and password in the Logon dialog box. The password confirms user identity by checking the name and password against data in the workgroup information file. Users can change their password at any time without affecting anyone else on the system. When users log on, each user is also identified as a member of one or more groups.
When a user opens a security-enhanced database, Access determines the user's level of access to an object (including the database itself) by checking the set of permissions assigned to that user for that object. Different users and groups can have different permissions for the same objects. Every time the user tries to perform an action on an object, such as opening a form, running a query, or modifying the data in a table, Access checks to see whether the user, or any of the groups to which the user belongs, has the necessary permissions to carry out the operation. If so, the action is performed. If not, Access informs the user that he or she does not have permissions to perform the requested action, and the operation fails.
In contrast, database systems that provide sharelevel security associate passwords with specific objects, and users must supply passwords to gain access to the objects. Users who know the password for a specific object can gain access to it. A user's level of access is determined by the kind of password that user has been given. For example, managers may be given an update password for a table, allowing them to change records, and general staff members may be given a read password, allowing them to view records but not modify them.
Note Access does provide a simple form of sharelevel security: the ability to help protect opening a database with a password.
You can create a similar system with Access userlevel security by creating a Managers group with Update Data permission and a Staff group with only Read Data permission, and then assigning each user to the appropriate group. Users do not supply passwords when accessing the objects, because they are identified as a member of the appropriate group when they log on to Access.
How Workgroup and Permission Information Is Stored
Access stores information about users and groups in a database called a workgroup information file. A workgroup information file stores:
The SID is a machinegenerated, nonreadable binary string that uniquely identifies the user or group.
Each workgroup information file defines a workgroup and can be used by many Access databases. A workgroup is a group of users in a multiuser environment who share data and the same workgroup information file. You manage users, their passwords, and the groups they are assigned to in the User and Group Accounts dialog box (Tools menu, Security submenu). For more information about users and groups, see "Users and Groups" later in this chapter.
The following illustration shows how these elements of Access userlevel security are related.

The location of the workgroup information file in use is specified in the Windows registry. You can create a new workgroup information file or specify which file to use with the Workgroup Administrator.
Tip You can also specify which file to use when starting Access with the /wrkgrp commandline option. For information about using this commandline option, see Access online Help.
For more information about using the Workgroup Administrator or how the workgroup information file is specified in the registry, see Access online Help.
You use the User and Group Accounts dialog box (Tools menu, Security submenu) to create new user and group accounts for your workgroup. When you create a new user or group account, you supply a name and a personal identifier (PID). The PID is a casesensitive alphanumeric string that can be 4 to 20 characters long. Access sends the name and the PID to an encryption program to generate the security identifier (SID) for that account. The SID is used internally by Access to uniquely identify and validate users and groups. The PID is not a password. It is used only when creating user and group accounts. A user's password can be designated only after an account for that user has been created.
|
Saving Names and Personal Identifiers (PIDs) Be sure to write down the exact, casesensitive names and PIDs that you use to create user and group accounts and keep them in a safe place. If your workgroup information file is damaged or lost and you need to recreate it, you must reenter the exact names and PIDs to recreate identical SIDs for the user and group accounts. Use the Workgroup
Administrator to create an identical workgroup information file to
contain these accounts by reentering the name, organization, and
workgroup ID (WID) that you used when you created it
originally. |
An Access workgroup information file contains the following default user and group accounts:
Admin is the default user account. Before userlevel security is established, all users are automatically logged on using the Admin user account. Therefore, the Admin user owns and has full permissions on all objects created in the database. Because the Admin user's SID is identical across all installations of Access and Visual Basic, all objects that the Admin user owns or has permissions on are open to anyone using another copy of Access or Visual Basic. When establishing userlevel security, it is important to make sure that the Admin user does not own or have any permissions on objects that you want to help secure. For assistance in restricting objects, run the UserLevel Security Wizard provided with Access. For more information about running the UserLevel Security Wizard, see "Establishing Security with the User-Level Security Wizard" later in this chapter.
Admins is the workgroup administrator's group account. The Admins group must have at least one member at all times. Before userlevel security is established, the default Admin user is the only member of the Admins group. Because members of the Admins group have the power to perform actions such as changing permissions, modifying user and group memberships, and clearing users' passwords, be careful when assigning users to this group.
Users is the default group account comprising all user accounts. Access automatically adds user accounts to the Users group when you create them. Any permissions assigned explicitly to the Users group are available to all users in all installations of Access and Visual Basic because, like the SID for the Admin group, the SID for the Users group is identical in all workgroup information files. Likewise, when establishing userlevel security, make sure that the Users group does not own or have permissions on objects that you want to restrict.
How do I create a security-enhanced workgroup information file? The Access Setup program uses only the user's name and the company name provided during Setup to create the SID for the Admins group of the default workgroup information file. Because these two values are available from the Access Help menu, unauthorized users trying to breach security could recreate an identical Admins account by using the Workgroup Administrator to create a new workgroup information file with these values, and then add themselves to the Admins group. Before establishing userlevel security, use the Workgroup Administrator to create a new workgroup information file, making sure to enter the workgroup ID (WID), which is a value known only to you. This helps ensure that the new workgroup information file contains a new Admins group with a unique, SID. Start the Workgroup Administrator by doubleclicking Wrkgadm.exe in the System folder (Windows 95) or the System32 folder (Windows NT Workstation 3.51 or 4.0). For information about using the Workgroup Administrator, see Access online Help. Record the exact, casesensitive values you type in the Name, Organization, and Workgroup ID boxes, and keep them in a safe place. If the workgroup information file is lost or damaged, you can recreate it with an identical Admins group by reentering these three values. Members of this recreated Admins group can grant themselves permissions on all objects that were created when the old workgroup information file was in effect. |
Permissions
Explicit permissions are permissions granted directly to a user; no other users are affected. Implicit permissions are permissions granted to a group; all users who are members of a group get the permissions assigned to that group.
The easiest way to administrate a resticted workgroup is to create new groups and assign permissions to the groups, rather than to individual users. Then you can change individual users' permissions by adding or removing them from groups. In a simple situation, you may want to use only the default groups to define permissions — assigning administrators to the Admins group and all other users to the Users group. If you do this, keep in mind that because the Users group is identical across all installations of Access, any permissions you assign to the Users group are available to all users of Access.
For a higher level of security, revoke all permissions for the Users group, create your own groups, and assign permissions to them. There is no need to create an alternative to the Admins group as long as you enter a workgroup ID when you create a new workgroup information file. By doing so, you help make sure that the Admins group is unique to that file.
When a user tries to perform an operation on an object, the user's security level is determined by the least restrictive of the permissions explicitly granted to the user and the permissions implicitly granted to the groups to which the user belongs. For example, if User1 has no explicit permissions on the Orders table but belongs to the Clerks group, which has Read Data permission on the Orders table, User1 can read the data in the table. If User1 is removed from the Clerks group and does not belong to another group with permissions on the Orders table, User1 is denied access to the Orders table.
Permissions can be changed on an object by:
Permissions for a database can be changed only by the owner of
the database or by members of the Admins group.
Why can't I revoke Administer permission for the Admins group? In the Admins group, the Administer permission — the right to change permissions — cannot be revoked using the Access user interface. Even if you clear the Administer check box on the Permissions tab in the User and Group Permissions dialog box (Tools menu, Security submenu) for the Admins group on an object, the permission remains. You can use DAO code to revoke the Administer permission, but this is not recommended because there is no way to grant the permission back again. Instead, make sure you are using a workgroup information file created with a WID, which helps ensure a unique Admins group, and then make sure only the appropriate users are assigned to the Admins group. |
Even though users may not currently be able to perform an action, they may be able to grant themselves permissions to perform the action. This is true if the user is a member of the Admins group of the workgroup information file in use when the database was created, or if the user is the owner of an object.
The following table summarizes the permissions that you can revoke or assign.
Note Some permissions automatically imply the selection of others. For example, the Update Data permission for a table automatically implies the Read Data and Read Design permissions, because they are needed to modify the data in a table. The Modify Design and Read Data permissions imply the Read Design permission. For macros, the Read Design permission implies the Open/Run permission.
You can set the permissions that users and groups receive by default for all new objects in a database. For example, you can prevent the Users group from getting permission to add tables. This reduces your administrative burden, because you do not need to keep checking to make sure that new objects are properly protected.
Note You can prevent users from creating new tables and queries by using Visual Basic code to remove permissions on the Container object, but you cannot prevent users from creating new forms, reports, macros, or modules.
For information about how to assign default permissions for new objects, see Access online Help.
Ownership
The user who creates an object is the owner of the object. The owner of an object can always grant permissions on the object, even if a member of the Admins group has revoked his or her explicit permissions on it. One way to change the ownership of an object is to use the Change Owner tab in the User and Group Permissions dialog box (Tools menu, Security submenu). In addition to allowing the transfer of ownership to another user, the Change Owner tab is the only way to transfer ownership to a group. A group can own any kind of object except the database itself.
Another way to transfer ownership to another user is to log on as that user and recreate the object. To recreate an object, you can make a copy of the object, or you can import it or export it to another database. To recreate an object, you must have Read Design permission for the object and, if the object is a table or query, you must also have Read Data permission.
Note You can change ownership of a query only if you own the query, or if its RunPermissions property is set to User's. For more information about the RunPermissions property, see "Using the RunPermissions Property with User-Level Security" later in this chapter.
The user who creates a database is the owner of the database. Before you establish userlevel security, the default Admin user is the owner of the database. The owner of a database can always open the database and create new objects in it and can also grant or revoke the permission to open the database. A database owner's permissions cannot be revoked by using the Change Owner tab in the User and Group Permissions dialog box (Tools menu, Security submenu).
Important If you do not transfer database ownership to a security-enhanced user account, any user of Access or Visual Basic can open the database. The only way to transfer the ownership of all of the objects and the database is to log on as the user whom you want to own the database, create a new blank database, and then import all of the objects. The easiest way to help protect your database and transfer ownership of the database and all of its objects to a security-enhanced account is by running the UserLevel Security Wizard.
Establishing Security with the UserLevel Security Wizard
Once you understand how the different pieces of the Access userlevel security model fit together, you can proceed with the steps to help protect a database. Although you can perform individual steps yourself, the UserLevel Security Wizard is the easiest and most reliable way to help protect a database.
To establish userlevel security with the UserLevel Security Wizard, you specify the object types that you want security-enhanced, and the UserLevel Security Wizard revokes permissions on those objects for all users and groups except the user who is currently logged on. The UserLevel Security Wizard creates a new, security-enhanced copy of the database and leaves the original copy unmodified. The UserLevel Security Wizard also recreates linked tables and table relationships in the new database. After you run the UserLevel Security Wizard, you can create new users and groups and assign permissions to help control how the objects in the application are used.
Important You must have a security-enhanced workgroup information file before you run the UserLevel Security Wizard. If you do not have a security-enhanced workgroup information file, use the Workgroup Administrator to create one. (For more information, see the sidebar "How do I create a security-enhanced workgroup information file?" earlier in this chapter.) When you create a new workgroup information file, it automatically becomes the current file and is used the next time you start Access.
![]() To create a new administrator user
for the database
To create a new administrator user
for the database
This causes the Logon dialog box to appear the next time you start Access.
Once you have created the new account, or if you already have a security-enhanced workgroup information file, use the Workgroup Administrator to make sure it is in use. Then exit Access and then restart it, logging on as the administrator user you created (that is, log on as a member of the Admins group).
Important Before you run the User-Level Security Wizard, you must have a security-enhanced workgroup information file in use, and you must be logged on as the administrator user whom you want to be the owner of the secured database.
![]() To establish security with the
UserLevel Security Wizard
To establish security with the
UserLevel Security Wizard
The UserLevel Security Wizard creates a new database, exports copies of all of the objects from the original database, helps protect the object types you selected by revoking all permissions of the Users group for those objects in the new database, and then encrypts the new database. The original database is not changed in any way.
Typical permissions may include Read Data and Update Data permissions for tables and queries, and Open/Run permission for forms and reports.
For more information about creating users and groups, see "Users and Groups" earlier in this chapter. For information about how to assign permissions and a list of permissions you can assign, see Access online Help.
If you choose to help secure all object types in the database, the UserLevel Security Wizard removes the Users group's Open/Run permission for the database. The only users who can open the new security-enhanced database are members of the Admins group of the workgroup information file in use when you ran the wizard and any additional users or groups to whom you gave permissions in Step 4. No other users of Access and Visual Basic can open the database or gain access to the secured objects within it.
If you choose to help secure only some object types in the database, the UserLevel Security Wizard does not remove the Users group's Open/Run permission for the database. In this case, all users of Access and Visual Basic can open the new security-enhanced database and gain access to unsecured objects, but they cannot gain access to the secured objects within it.
Securing a Frontend/Backend Application
There are some particular factors to take into account when establishing userlevel security for an application that is split into a backend database containing only tables and a frontend database containing the remaining objects and links to the tables in the backend database. You may not know the name of the specific network location for the backend database, or you may want to allow a database administrator to move the backend database. In either situation, make sure that users can relink the tables in the backend database.
Follow these general steps to establish userlevel security on a frontend/backend application.
You can assign permissions directly to the tables in the backend database, or you can remove all permissions to those tables and create queries in the frontend database that use the tables in the backend database whose RunPermissions property is set to Owner's. For more information about the RunPermissions property, see "Using the RunPermissions Property with User-Level Security" later in this chapter.
This is required even if you are using queries with the RunPermissions property set to Owner's.
Granting users Modify Design permission on linked tables in the frontend database does not grant them the same permissions on the tables in the backend database.
For information about using DAO code to assign permissions, see "Assigning Permissions for Objects" in Chapter 14, "Securing Your Application," in Building Applications with Microsoft Access 97.
Tip You can also write code that prompts users during startup to refresh table links. For sample code that does this, see the RelinkTables and RefreshLinks functions in the RefreshTableLinks module of the Orders sample application that comes with Access.
Because users have Modify Design permission for the linked tables in the frontend database, they can reset the link to the backend tables if the location of the backend database changes. They cannot make any modifications to the design of the tables in the backend database, however.
Securing a Database Without Requiring Users to Log On
If you want to help secure some objects in a database, such as the code modules and the design of objects, but you do not care about establishing different levels of access for different groups of users, you may want to consider securing an application without requiring users to log on.
![]() To establish userlevel security
without requiring users to log on
To establish userlevel security
without requiring users to log on
Typical permissions may include Read Data and Update Data permissions for tables and queries, and Open/Run permission for forms and reports. If you have secured the application properly, the Admin user should no longer be a member of the Admins group.
Users can now open the application without logging on. When users start Access, they are automatically logged on using the Admin user account. Users have only the permissions you assigned. This works for any workgroup, because the Admin user account is the same in every workgroup information file. Only members of the Admins group of the workgroup information file that was in use when you ran the UserLevel Security Wizard have full permissions on the objects in the database.
Important Do not distribute copies of the workgroup information file in use when you help secure the database using this procedure. If you need to allow a user to administer the database, give the copy of the workgroup information file only to that user.
To perform administrative functions, you must use the workgroup information file that was in use when you secured the database. There are two ways you can log on as a member of the Admins group of that workgroup information file:
– or –
Removing UserLevel Security
If you want to remove userlevel security, perform the following procedure.
Important Before you remove userlevel security from the database, make a backup copy.
![]() To remove userlevel
security
To remove userlevel
security
Tip You can select all of the objects in the Object Name box at once by clicking the first item in the list, holding down SHIFT, and then clicking the last item in the list.
This is not necessary if users use the default workgroup information file created when installing Access.
The new database is now completely unsecured. Anyone who can open the new database has full permissions on all its objects. This works for any workgroup because the Admin user account and Users group account are the same in every workgroup information file, and all users, including the Admin user, are members of the Users group. The workgroup information file in use when the new database is created defines the Admins group for the new database.
Using the RunPermissions Property with UserLevel Security
For Access to display a table or query, it needs to read the design of the table or query. For example, it needs to read field names and other field properties, such as the Format and InputMask properties. Therefore, for a user to read and display the data in a table or query, the user must also have permissions to read the design of the table or query. (This is why selecting the Read Data permission check box in the User and Group Permissions dialog box automatically selects the Read Design check box as well.) If you do not want users to see the design of a table or query, you can use the RunPermissions property of queries to restrict access to this information.
The RunPermissions property determines whether Access uses permissions for the query user or the query owner when checking the userlevel security permissions for the underlying tables in a query. If the RunPermissions property is set to User's, then the users of a query have only their own permissions to view data in underlying tables. However, if the owner of a query sets the RunPermissions property to Owner's, anyone who uses the query has the same level of permissions as the query's owner to view data in the underlying tables.
The RunPermissions property allows you to create queries to display data to users who do not have permission to gain access to the underlying tables. Using this feature, you can build different views of the data, resulting in recordlevel and fieldlevel security for a table.
For example, suppose you have a security-enhanced database with an Employees table and a Salary table. By using the RunPermissions property, you can build several views of the two tables: one that allows a user or group to view but not update the Salary field; a second that allows a different user or group to view and update the Salary field; and a third that allows another user or group to view the Salary field only if its value is less than a certain amount.
![]() To prevent users from viewing the
design of underlying tables or queries
To prevent users from viewing the
design of underlying tables or queries
You can exclude access to a field by omitting it. You can also limit access to a certain range of values by defining criteria for the query.
Note You can also set the RunPermissions property in SQL view of the Query window by using the WITH OWNERACCESS OPTION declaration in the SQL statement.
This typically includes Read Design, Read Data, Update Data, Delete Data, and Insert Data permissions, but you should specify only the permissions you want to allow.
Users can update data in the underlying tables or queries by using the new query or forms based on it. However, if they try to view the design of the tables or the new query, Access displays a message that they do not have permissions to view the source tables or queries.
Important By default, the user who creates a query is its owner, and only the owner of a query can save changes to it if the RunPermissions property is set to Owner's. Even members of the Admins group or users with Administer permission are prevented from saving changes to a query created by another user if the RunPermissions property is set to Owner's. However, anyone with Modify Design permission for the query can set the RunPermissions property to User's and then save changes to the query.
| This permission | Permits a user to do this | Which applies to these objects |
| Open/Run | Open a database, form, or report, or run a macro. | Databases, forms, reports, and macros |
| Open Exclusive | Open a database with exclusive access. | Databases |
| Read Design | View objects in Design view. | Tables, queries, forms, reports, macros, and modules |
| Modify Design | View and change the design of objects, or delete the objects. | Tables, queries, forms, reports, macros, and modules |
| Administer | For databases, set a database password, replicate a
database, and change startup properties.
For database objects, have full access to objects and data, including the ability to assign permissions. |
Databases, tables, queries, forms, reports, macros, and modules |
| Read Data | View data. | Tables and queries |
| Update Data | View and modify but not insert or delete data. | Tables and queries |
| Insert Data | View and insert but not modify or delete data. | Tables and queries |
| Delete Data | View and delete but not modify or insert data. | Tables and queries |
What if more than one user needs to view a query's design? Because the creator of a query owns it by default, having the RunPermissions property set to Owner's can create problems if you need to allow more than one user to work with the design of a query. To solve this problem, transfer the ownership of the query to a group. To do this, create a group, change the owner of the query to this group on the Change Owner tab in the User and Group Permissions dialog box (Tools menu, Security submenu), and then add the users who need to modify the query to the new group. Any member of the new group can edit the query and save changes. |
|
Several options and settings in Access affect how an Access database application functions in a multiuser environment. These settings are described in the following sections.
Helping Control How a Database Opens
There are three ways to help control how a database is opened in Access:
|
Click Options (Tools menu) to set the refresh interval. Access automatically checks the recordsets of open forms and datasheets to determine whether changes have occurred at the frequency set by the refresh interval. The default refresh interval is 60 seconds, which may be too long in some situations. If you set the refresh interval to too small a value, however, you may create excessive network traffic. You may need to experiment to find the proper setting for your situation. In general, the fewer nodes on the network, the smaller you can set the refresh interval without an adverse effect.
You can override the default refresh interval in your applications by using the Refresh method, the Requery method, or the Requery action. Refreshes of records — either automatic refreshes by Access using the refresh interval or manual refreshes using the Refresh method — are faster than the Requery method or action. However, new records added by other users appear only after a Requery method or action. Similarly, records deleted by other users are deleted from your copy only after a Requery method or action. All the values in the fields of deleted records are replaced with the string "#DELETED" when the record is refreshed.
In most cases, you should use the Requery method rather than the almostequivalent Requery action. The method reruns the query that is already in memory, and the action reloads it from disk. The exception to this rule is when you have used DAO to modify the underlying query definition. When this is the case, you should use the Requery action to reload the QueryDef object from disk.
Tip Even if you leave the refresh interval at a very high setting, Access automatically refreshes the current record whenever a user attempts to edit it. The benefit of a shorter refresh interval lies chiefly in giving quicker visual feedback when someone else has locked or changed a record while you are viewing it.
To provide concurrent access to records by multiple users, Access locks records. Unlike some database applications, Access does not lock individual records; instead it locks a 2 KB (2,048 bytes) page of records. The advantage of page locking is that there is less overhead and generally better performance over true record locking when performing operations that affect many records. Unfortunately, this also means that Access usually locks more records than you would like. This is especially an issue when you use pessimistic locking, which allows users to keep records locked for long periods of time. For information about pessimistic locking, see "Edited Record" later in this chapter.
In a multiuser environment you can open recordsets in one of three different modes:
This section explains each of these modes.
No Locks
Using no locks is often called optimistic locking and is the default setting. When you select the No Locks option on the Advanced tab in the Options dialog box (Tools menu), the page of records that contains the currently edited record is locked only during the instant when the record is being saved — not during the editing process. This allows for concurrent editing of records with fewer locking conflicts.
For forms and datasheets, two or more users can edit the same record simultaneously. If two users attempt to save changes to the same record, Access displays a message to the second user who tries to save the record. The user can then discard the record, copy it to the Clipboard, or replace the record changed by the other user.
For reports, no records are locked while a user previews or prints a report. However, if a report is printing data from a Memo or OLE Object field, the record is locked until Access is finished reading the Memo or OLE Object field data.
For queries, no records are locked while a user runs a query, except for action queries, where all the records are locked until the action query is finished.
When you select the Edited Record option on the Advanced tab in the Options dialog box (Tools menu), as soon as a user begins to edit a record, the page containing the currently edited record is locked until the changes are saved. This is known as pessimistic locking.
All Records
When you select the All Records option on the Advanced tab in the Options dialog box (Tools menu), all the records in the recordset are locked at once, as follows:
The All Records option is really only useful during batch updates or when you are performing administrative maintenance on tables. Although users can read the records, no one can add, delete, or edit any records until the form or datasheet is closed, the report is finished printing or the query is finished running.
Default Record Locking
You can set the default record locking behavior for most objects that access recordsets on the Advanced tab in the Options dialog box (Tools menu). These defaults affect the following objects:
If the default record locking option is set to No Locks, it is overridden for update, delete, maketable, and append query operations, because the records must be locked during these operations. Additionally, all records must be locked when you use datadefinition queries.
You can set record locking behavior for individual forms, queries, or reports by opening the object in Design view and setting the RecordLocks property. This allows you to override the current default setting on the Advanced tab in the Options dialog box (Tools menu).
Note Whether you set locking behavior by clicking Options (Tools menu) or by setting the RecordLocks property, when the data comes from an Open Database Connectivity (ODBC) database, the Access setting is ignored. All locking for linked ODBC tables, such as Microsoft SQL tables, is determined by the ODBC OLE server.
To help you decide which locking strategy is best for your particular situation, the following table shows advantages and disadvantages of using pessimistic or optimistic locking.
Unless you have a compelling reason to use pessimistic locking, consider an optimistic locking strategy. In most situations, you do not want to prevent users from editing or from adding new records for potentially long periods of time. If you decide to use pessimistic locking in your forms, you may have to teach users to recognize and work with locked records.
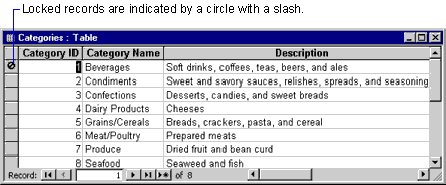
With pessimistic locking, users are unable to change a record that is on the same page as a record being edited by another user, as shown in the following illustration.
On the other hand, if you use optimistic locking in your forms, you may have to teach users how to use the Write Conflict dialog box, shown in the following illustration.
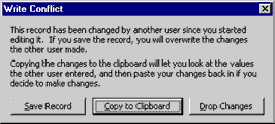
With optimistic locking, users may encounter the Write Conflict dialog box when attempting to save a record that has been changed by another user.
Tip If you have set the RecordSelectors property of a form to No, the circle with a slash does not appear when record locking is pessimistic. Access beeps at the user, but users receive no visual cue to explain why they cannot edit the values in the record. No trappable error is generated. Therefore, it is recommended that you leave the RecordSelectors property set to Yes when you use pessimistic locking with bound forms.
In some situations you may need to use both locking strategies on different forms. For example, in an inventory application you must ensure that the QuantityOnHand column is pessimistically locked, so that sales representatives do not try to post a sale beyond the QuantityOnHand without invoking backorder processing. Conversely, you can use optimistic locking on a vendor address form, as it is unlikely that two changeofaddress requests for the same vendor are given to two different users to be posted simultaneously.
Using the Locking Information File
The locking information (LDB) file stores information about any records that are currently locked in the database.
If the locking information file does not exist when the database is opened, the Access database engine creates it. It creates one locking information file for every Access database file that is opened in shared mode. Access gives the file the same name as the database that was opened, but with an .ldb file name extension. For example, Northwind.mdb has an associated locking information file called Northwind.ldb. The locking information file is stored in the same folder as the database. Access deletes the LDB file when the database is closed. In a multiuser setting, this occurs when all users have exited the application.
Forcing Microsoft Access to Lock Individual Records
You can force Access to lock individual records by creating record sizes that are larger than half a page — that is, larger than 1,024 bytes. This works because Access does not begin storing a new record on a partially filled page unless it can fit the entire record on the page. This strategy wastes a lot of disk space and increases network traffic. However, if you decide to use pessimistic locking and absolutely must have record locking, you may want to consider this technique. In order to use this technique, you need to be able to estimate the size of records.
You can estimate the size of records by using the following table and summing the size of each field.
| This strategy | Has these advantages | And these disadvantages |
| Pessimistic locking (Edited Record option) | Simple for the developer.
Prevents users from overwriting each other's work. May be less confusing to the user. Works well for small workgroups or where users are not likely to be editing the same record. |
Usually locks multiple records; how many depends on the
size of the records.
When a user is at the end of a table and thus has locked the last page, prevents other users from adding new records. Is not recommended where many users are editing the same records or adding new records at the same time. |
| Optimistic locking (No Locks option) | Simple to use.
Allows more than one user to edit the same record at the same time. (In some cases, this may be a disadvantage.) Is less likely to lock other users out of records. |
May be confusing to users when there is a write
conflict.
Users can overwrite each other's edits. |
| Byte | 1 byte | |
| Integer | 2 bytes | |
| Long Integer | 4 bytes | |
| Single | 4 bytes | |
| Double | 8 bytes | |
| Currency | 8 bytes | |
| AutoNumber | Depends on FieldSize property setting: Long Integer = 4 bytes ReplicationID = 16 bytes |
The contents of the Memo, OLE Object, and Hyperlink fields are stored elsewhere in the MDB file, so you need to count only the overhead for their address pointers, as described later in this section. Text columns present the greatest problem for estimating record size because they are variablelength fields. Access uses one byte per actual stored character up to the maximum length specified by the FieldSize property. Zerolength strings ("") use 1 byte; Null values use 0 bytes.
You also have to account for overhead, which includes the following:
Note These numbers are for estimating the record size rather than calculating the exact size.
The easiest way to pad a record so that it exceeds 1,024 bytes is to create one or more dummy text fields in the table with default values that are 255 characters long. For example, if you estimated the record size to be at least 130 bytes, you would calculate the needed dummy fields as follows:
Do not place these dummy fields on your forms. Whenever a new record is created, Access automatically creates a record with the four xfilled dummy fields, which forces it into recordlocking mode.
Splitting a Database into a Frontend/Backend Application
No matter which locking scheme you use, Access still puts everything (data, forms, reports, queries, macros, and code) in a single database by default. Performance can suffer considerably using this design, because every time an object (such as a form) is used, it must be sent across the network to the user. In a production setting, where the only thing being changed is the data stored in tables, much of this network traffic is unnecessary.
You can eliminate this unnecessary traffic by splitting the database into a frontend database and a backend database. Install the backend database, which contains the table data only, on a file server, and store a copy of the frontend database, which contains all other objects, on each workstation. From each copy of the frontend database, click Link Tables (File menu, Get External Data submenu) to link the set of tables in the backend database.
If the database is in Access 97 format, you can click Database Splitter (Tools menu, AddIns submenu) to split the database and link tables in a single operation.
| Field data type | Storage size |
| Yes/No | 1 bit |
| Date/Time | 8 bytes |
| Text | Variable |
| Memo | 14 bytes |
| OLE Object | 14 bytes |
| Hyperlink | 14 bytes |
The link to the table on the server keeps breaking If you specify the path to a linked table by using a mapped drive letter, the link to the table breaks if another user opens that copy of the frontend database and the network drive is not mapped or is mapped to a different letter on the user's computer. If your network supports universal naming convention (UNC) format, you can solve this problem by using the UNC path to specify a path to linked tables. Use the following format: \\server\share\path\filename |
There are several advantages and disadvantages to splitting a database.
The advantages are:
Changes to the application can be made offsite and merged back into the frontend database without disturbing the table data.
The disadvantages are:
Fortunately, Access enforces any referential integrity constraints you have established between individual tables in the remote database.
Because Access hard codes the paths to linked tables, using linked tables requires extra maintenance. If you move a backend database with linked tables, you have to delete and relink the tables. Click Linked Table Manager (Tools menu, AddIns submenu) to automate this process.
You can also use Visual Basic code to check table links and, if necessary, relink them. To see an example of how to do this, open the Orders sample application that comes with Access, open the Startup form in Design view, and then view the event procedure set for the OnLoad property of the form. This event procedure calls two functions from the RefreshTableLinks module: the CheckLinks function to see whether links to tables in the Northwind sample database are still working, and, if not, the RelinkTables function to relink tables.
Troubleshooting Other Multiuser Issues
This section covers additional issues you may encounter when sharing an Access database among multiple users.
Backup Multiuser Databases
To back up a multiuser database correctly, make sure that you have exclusive access to the database. If you back up a database while others are using it, you risk producing a damaged backup database. If you open a damaged backup database, you may receive a message stating that the database is corrupted. If you repair and compact the database, the data in the database may be truncated.
The only way to ensure the integrity of the backup database is to open a static copy of the database. To do so, you must have exclusive access to all the tables in the database at the same time. After you have exclusive access to the database, you can copy or export the database, and then archive it.
Microsoft Access Locking and Novell NetWare
When you use data from a backend database located on a server, Access uses the locking facilities provided by the server. The defaults in NetWare versions 3.x and 4.x allow a single workstation to have 500 locks at any given time. This results in a limit of 1 MB of data that Access can work with in a single transaction. Because Access tries to lock every record involved in either an update or a delete query before carrying out the operation, it is possible to encounter this limit on moderately large databases.
When you use Access with a NetWare 3.x or 4.x server, it is recommended that you increase the number of locks available to avoid encountering the lock limit. To increase the number of locks available, enter the following commands at the file server console or in the Autoexec.ncf file:
set maximum record locks per connection = 10000
set maximum record locks = 200000
The first command specifies the maximum number of locks in any single connection, and the second command specifies the maximum number of locks that the server can keep track of. These values (10,000 and 200,000, respectively) are the maximums that NetWare can accommodate. Access can handle a transaction of up to 20 MB of data when you set the maximum record locks per connection to 10,000.
|
Increasing the Number of Locks in NetWare 3.11 There is an error in NetWare 3.11 that can result in a server abending (abnormally ending) if the lock limit is exceeded when Access is running certain queries or otherwise requesting a large number of locks. If you are still using NetWare 3.11, it is highly recommended that you download the latest NetWare 3.11 patch file, which is available on CompuServe in the NOVFILES download area. You must load two of the NetWare Loadable Modules (NLMs) from this file, either directly from the file server console or by adding the following commands to the Autoexec.ncf file: load patchman.nlm load ttsfix.nlm This problem is
specific to NetWare 3.11 and has been fixed in later versions
of NetWare. |
|
Access database replication is the process of copying a database so that two or more copies can exchange updates of data or objects. This exchange is called synchronization. Each copy of the database is called a replica, and each replica contains a common set of tables, queries, forms, reports, macros, and modules. Each replica can also contain local objects that exist only in that specific replica.
Each replica is part of a replica set, which contains the Design Master and the other replicas for a database. The Design Master is the only replica where you can make changes to the database design and objects. Replicas that belong to the same replica set can synchronize with one another.
With database replication, you can:
You can use database replication to create copies of a corporate database to send to each satellite office. Each location enters data into its replica, and all remote replicas are synchronized with the replica at corporate headquarters. An individual replica can maintain local tables that contain information not included in the other replicas in the set.
New information that is entered into the database while sales representatives are out of the office can be synchronized any time the sales representatives establish an electronic link with the corporate network. As part of their workday routine, sales representatives can dial into the network, synchronize their replicas, and work on the most current version of the database. Because only the incremental changes are transmitted during synchronization, the time and expense of keeping uptodate information are minimized. By using partial replicas, it is also possible to synchronize only certain parts of the data. For more information about partial replicas, see "Replicating Part of a Database" later in this chapter.
If a database application does not need to have immediate updates to data, you can use database replication to reduce the network load on your primary server. Introducing a second server with its own copy of the database improves response time. You determine the schedule for synchronizing the replicas, and you can adjust the schedule to meet the changing needs of users. Replication requires less centralized administration of the database while offering greater access to centralized data.
When you replicate a database application, you automatically replicate not only the data in its tables, but also the application's objects. If you make changes to the design of the database, the changes are transmitted during the next synchronization exchange; you do not have to distribute complete new versions of the software.
At first glance, database replication may appear to be similar to copying a database. However, replication initially makes a complete copy of the database; thereafter it synchronizes the replica's objects with the source objects at regular intervals. This copy can be used to back up data if the original database is destroyed. Furthermore, users of any replica can continue to gain access to the database during the entire backup process.
Although database replication can solve many of the problems inherent in distributed database processing, it is important to recognize the situations in which replication is less than ideal. You may not want to use replication if:
Applications that require frequent updating of existing records in different replicas are likely to have more record conflicts than applications that only insert new records into a database. Record conflicts occur when two changes are made to the same record by users at different locations. Applications with many record conflicts require more time for someone to manually resolve these conflicts.
Applications that rely on information being correct at all times, such as funds transfers, airline reservations, and the tracking of package shipments, usually use a transaction method. Although transactions can be processed within a replica, there is no support for processing transactions across replicas. The information exchanged between replicas during synchronization is the result of the transaction, not the transaction itself.
The flexibility that database replication offers can be illustrated by the development of a simple application. Imagine that a company's field sales staff needs to develop a contact management application to monitor sales and orders. Each sales representative has a laptop computer that can be connected to the company's network.
One approach to building this application is to separate the tables from the other objects in the database. The data resides in tables in a backend database on a network server, and the queries, forms, reports, macros, and modules reside in a frontend database on each sales representative's computer. When sales representatives want to retrieve or update data, they open and use the frontend database. Because the objects in the frontend database are based on linked tables, changes that sales representatives make to the data using these objects change the data in the backend database. For more information about this approach to designing database applications, see "Splitting a Database into a Front-end/Back-end Application" earlier in this chapter.
A better way to build this application is to use database replication to create a single database that contains both the data and objects, and then make replicas of the database for each sales representative.
You would begin developing the application by creating an Access database as you would for any application. Then you would convert the database to a Design Master and make replicas on each user's computer. Sales representatives update data in the replicas on their computers during the course of a work session, and you synchronize their replicas with the Design Master on the server as needed. You can also create a set of custom forms or reports that is used at only one replica location.
This section addresses the tools you can use to implement this approach to designing database applications.
Implementing Database Replication
You can implement database replication by using:
The first three replication tools provide an easytouse visual interface. You can use DAO to build replication directly into an application's code.
Note If some users of the database need to continue using the database in its original form, make a copy of the database before you implement database replication.
Replication Commands in Microsoft Access
Access provides replication menu commands that you can use while working in your databases. By clicking Replication (Tools menu), you can:
One of the easiest ways to become familiar with the concepts and procedures associated with database replication is to experiment with the Access replication commands. To convert a database to a Design Master and create a replica, open the existing database, click the Tools menu, point to Replication, and then click Create Replica. You can then explore the changes made to the design of the database and the similarities between the replica and the Design Master. Next, make a change to the data in the replica and a change to a table design in the Design Master, and then click Synchronize Now (Tools menu, Replication submenu). You can then open the replica and the Design Master to confirm that the changes appear in the other member of the replica set.
For more information about the changes that are made to the design of a database when you convert it to a Design Master, see "Tracking Changes When a Database Is Replicated" later in this chapter.
Briefcase Replication in Windows 95
Microsoft Windows 95 Briefcase replication is a convenient way to implement replication on a laptop computer.
![]() To use Briefcase
replication
To use Briefcase
replication
The database file is converted to a Design Master, and a replica is created in your Briefcase.
During the conversion process, Briefcase gives you the opportunity to make a backup copy of the original database file. The backup copy has the same file name as the original, except that its file name extension is .bak instead of .mdb. It is stored in the same folder as the original database file. Save the backup copy, and use it only in the event that you cannot use a replica to recreate the replica set. For more information about recreating a replica set, see "Using Replicas Instead of Backups" later in this chapter.
Replication Manager provides a visual interface for converting databases, making additional replicas, viewing the relationships between replicas, and setting the properties of replicas. Replication Manager is provided only in Microsoft Office 97 Developer Edition. You can use Replication Manager to:
Laptop users can specify a network file location where synchronization information is deposited for later processing.
You can schedule synchronizations ahead of time so that they can occur unattended at anticipated times. You can also synchronize replicas at any time with a single command.
For more information about Replication Manager, see Access online Help.
DAO Programming
The DAO programming interface provides methods and properties that you can use to implement several Briefcase replication features in your Visual Basic code. You can use DAO to:
Although DAO requires programming, it gives you the ability to customize your replication system. Generally, you use DAO under the following circumstances:
For example, you may want to trigger synchronization whenever a replica receives updated product pricing information from headquarters.
In this case, you can use DAO to design a simplified replication interface or to make replication completely transparent to users.
For example, to minimize the disk space you use and to maximize performance, you may want to create a replica that contains only a subset of a large amount of data.
For more information about replication with DAO, see Chapter 20, "Using Replication in Your Application," in Building Applications with Microsoft Access 97.
To make replicas of a database, first convert the database to a Design Master. The Design Master becomes the first replica of the new replica set. As you make additional replicas from the Design Master, they are added to the set. You can have only one Design Master in a replica set. If you want to make changes to the tables, queries, forms, reports, macros, or modules, make the changes in the Design Master. This prevents users at multiple replicas from making conflicting changes to the database's design and objects.
![]() To convert a database to a Design
Master
To convert a database to a Design
Master
– or –
– or –
For information about using DAO to replicate a database, see "Using DAO to Replicate a Database" in Chapter 20, "Using Replication in Your Application," in Building Applications with Microsoft Access 97.
Important If you help protect a database with a database password, you cannot synchronize replicas of the database. Before you begin using replication, remove any database password protection from the database. If you established userlevel security for the database, this security does not interfere with synchronization. In fact, replicated objects retain the permissions that you give them in the Design Master.
Tracking Changes When a Database Is Replicated
When you convert a database to a Design Master, Access makes the following changes to the database:
Access uses these changes to track modifications to the design and data of the database and to synchronize the database with other replicas in the replica set.
Why did my database get so large after I replicated it? The addition of
three new fields to your tables increases the size of each record,
and the addition of new system tables increases the size of your
database. Many of these new tables contain only a few records, but
some of the new tables can grow significantly, depending on the
frequency of synchronization. To reclaim unused space, compact your
database frequently. For more information, see "Compacting a Replicated Database" later in this
chapter. |
New Fields
When you convert a database to a Design Master, Access first examines the existing fields in a table to determine whether any field uses both the AutoNumber data type and the Replication ID field size. The Replication ID AutoNumber is a 16byte value that appears in the following format:
{1234AB87231476230000012340506801}
If no field uses the data type and field size, Access adds the s_GUID field to the table. The s_GUID field stores the Replication ID AutoNumber value that uniquely identifies each record. The Replication ID AutoNumber value for a specific record is identical across all replicas.
During the conversion process, Access also adds the s_Lineage and s_Generation fields to each table in the database. The s_Lineage field contains the value of the ReplicaID property of replicas that have updated a record and the last version created by each of the replicas. The s_Generation field stores information about groups of changes. Access also adds a field for every Memo and OLE Object field in a table.
Note The s_GUID, s_Lineage, and s_Generation system fields are visible only when the System Objects check box on the View tab in the Options dialog box (Tools menu) is selected.
Generally, there is a single field per record that stores information about changes. However, to optimize synchronizations for databases that contain Memo or OLE Object fields (sometimes referred to as BLOBs, or binary large objects), an extra field is associated with each BLOB. If the BLOB is modified, this field value is set to 0 so that the BLOB is sent during the next synchronization. If other fields in the record are modified, but not the BLOB, this field value is not set to 0, and the BLOB is not sent.
This extra field is named Gen_FieldName, where FieldName is the BLOB field's name (truncated, if necessary). One of these fields is set for each BLOB field.
For more information about the s_GUID, s_Lineage, s_Generation, and Gen_FieldName fields, see Access online Help.
New Tables
When you convert a database to a Design Master, Access adds several new tables to the database. Most of these tables are system tables, which are not normally visible to users and cannot be manipulated by developers. The following table describes a few of the tables that are of the most interest to developers and administrators.
To view these and the other system tables, select the System Objects check box on the View tab in the Options dialog box (Tools menu). For more information about these tables, see Access online Help.
New Properties
When you convert a database to a Design Master, Access adds new properties to it: ReplicaID, ReplicableBool, and DesignMasterID.
The ReplicaID property contains the value that uniquely identifies the replica or Design Master. Access automatically generates this value when you create a new replica.
During the conversion process, the ReplicableBool property is set to True, indicating that the database can now be replicated. Once this property is set to True, it cannot be changed. If you change the property setting to False (or to any value other than True), Access returns an error message.
You can use the DesignMasterID property to make a replica other than the original Design Master the new Design Master. Set this property only in the current Design Master. Under extreme circumstances — for example, the loss of the original Design Master — you can set this property in the current replica. If you set this property in a replica when there is already another Design Master, you may prevent any further synchronization of data.
![]()
![]()
For more information about these properties, see Access online Help.
Behavior of AutoNumber Fields
When you convert a database to a Design Master, the NewValues property for AutoNumber fields in the tables is changed from Increment to Random. All existing AutoNumber fields retain their values, but new values for inserted records are random numbers. Random AutoNumber fields are not meaningful because they are not in any particular order, and the highest value is not on the record inserted last. When you open a table with a random AutoNumber field as the primary key, the records appear in the order of ascending random numbers, not in insertion order.
With random AutoNumber fields that have their FieldSize property set to Long Integer, it is possible for two different records to be assigned the same value, although the probability of this happening is very low. If this happens, updates could be made in incorrect records. To prevent this from happening, consider using the s_GUID field as the primary key. The s_GUID field is an AutoNumber field with its FieldSize property set to ReplicationID so that it generates a unique 16byte value called a globally unique identifier (GUID) for each newly added record.
Although you can make changes to the design of the database only in the Design Master, you can make additional replicas from any replica in the set. In fact, the only way to include new copies of the database in the replica set is to create them from an existing replica. Once you create them, all new replicas become part of the replica set.
All the replicas in a replica set have a unique identity and can communicate and synchronize with one another. Each replica set is independent from all other replica sets, and replicas in different sets cannot communicate or synchronize with each other.
Important Never try to make additional replicas from the original, nonreplicated database. The result would be a new Design Master and replica set, not an additional replica.
When you convert a database to a Design Master by setting its ReplicableBool property to True, you have only one replica (the Design Master) in the replica set, and you make the second replica from this. Make the second replica, and subsequent replicas, by clicking Create Replica (Tools menu, Replication submenu) in Access, or by using the MakeReplica method in code. For information about the MakeReplica method, see Access online Help.
When Access creates the new replica, all property settings of the source replica except custom property settings are included in the new replica. You can make subsequent replicas from either the Design Master or another replica in the set.
| Name | Description |
| MSysSidetables | Identifies the names of tables that experienced a conflict in the most recent synchronization and the name of the table that contains the conflicting records. MSysSidetables is visible only if a conflict has occurred between the user's replica and another replica in the set. |
| MSysErrors | Identifies where and why errors occurred during data synchronization. |
| MSysSchemaProb | Identifies errors that occurred while synchronizing the design of the replica. This table is visible only if a design conflict has occurred between the user's replica and another replica in the set. |
| MSysExchangeLog | Stores information about synchronizations that have taken place between replicas. |
|
Using Replicas Instead of Backups With database replication, you do not need to make a separate backup copy of the database. If the Design Master is destroyed, you can recover the data from any one of the replicas in the replica set. However, depending on how frequently you synchronize, a replica may not contain all the data in the Design Master or in other replicas. If you want to be able to recover most of the information in the Design Master, be sure to synchronize frequently. Although it is
possible to back up replicas by using traditional backup methods,
you are strongly advised not to back up and restore replicas as you
would ordinary files. If you back up and restore the Design Master,
you could lose critical information about changes to the design of
the database as well as the ability of the Design Master to
synchronize with other replicas in the set. If the Design Master is
damaged or unusable, do not copy or restore an older version of the
Design Master. Instead, make another replica into the Design
Master. |
Replicating Part of a Database
So far, this section has addressed full replicas, in which all records in all replicas of a replica set are synchronized in their entirety. However, you may want to replicate only part of the data. To do this, create partial replicas, which contain only a subset of the records in the full replica. With a partial replica, you can set filters and relationships that identify which subset of the records in the full replica you want to synchronize.
By replicating only part of the database, you can restrict access to data. In the case of a sales database, replicating part of a database can help ensure that people in a regional sales office do not view sales data for other regional offices. In addition, sales representatives who carry laptops can filter their data to include only the information that is relevant to their territory. Although you can restrict access to records or filter records when you replicate part of a database, this is not a substitute for a security system.
Replicating part of a database also has benefits for replicating data over local area networks (LANs) and wide area networks (WANs). By applying filters and relationships that restrict which data is replicated, you can reduce the amount of data transferred over a LAN or a WAN. This can reduce network traffic and lower telecommunications costs.
| World Wide Web To create a partial replica, you can use the Partial Replica Wizard provided through the Access Developer Forum. Connect to the Partial Replica download location at: |
http://www.microsoft.com/accessdev/articles/prtlrepl.htm
For information about using DAO code to create a partial replica, see Access online Help, or see "Creating Partial Replicas" in Chapter 20, "Using Replication in Your Application," in Building Applications with Microsoft Access 97.
Note You cannot synchronize data between two partial replicas; one of the replicas must be a full replica. Also, when you replicate part of a database, you can set restrictions on which records are replicated, but you cannot indicate which fields are replicated.
For database replication to be useful, replicas must communicate with one another to keep uptodate information. Synchronization is the process of making the design and data in the replicas identical. As changes are made to the existing records in one replica, the changes are communicated to each of the other replicas that has that same record. Similarly, new and deleted records in one replica are communicated to the other replicas in the replica set.
You can synchronize one replica with another by using Access commands, the Windows 95 Briefcase, or the Synchronize method in Visual Basic code. The method you use corresponds to the method you used to implement database replication.
![]() To synchronize two replicas using
Access commands
To synchronize two replicas using
Access commands
If you used the Windows 95 Briefcase to replicate the database, use the following procedure to synchronize replicas.
![]() To synchronize two replicas using
the Windows 95 Briefcase
To synchronize two replicas using
the Windows 95 Briefcase
– or –
If you want to synchronize all the replicas in the Briefcase, click Update All.
For information about synchronizing replicas by using the Synchronize method in Visual Basic code, see Access online Help.
If you want to prevent users from making changes to the design of a replicated database, do not make the replica on the network server the Design Master. Instead, keep the Design Master at a network location that is accessible only by you. As you make changes to your application, you can synchronize with the replica on the server and rely on it to pass these changes on to other replicas in the replica set.
Tip You can synchronize replicas over the Internet. Before you can synchronize over the Internet, however, you must configure your Internet server for replication. To configure your Internet server, you need Replication Manager, which includes a wizard that guides you through the configuration process. For more information about Replication Manager, see "Replication Manager" earlier in this chapter.
Handling Replication Conflicts and Errors
When using database replication, you may occasionally encounter design errors, synchronization conflicts, or synchronization errors. Design errors occur when a design change in the Design Master conflicts with a design change in a replica. The synchronization fails, and the content of different replicas starts to diverge.
Synchronization conflicts occur when users update the same record in two replicas in the replica set and Access attempts to synchronize the two versions. The synchronization succeeds, but the changes from only one of the replicas are applied to the other.
Synchronization errors occur when a change to data in one replica cannot be applied to another replica because it would violate a constraint, such as a referential integrity rule. The synchronization succeeds, but the content of replicas is different. For information about integrity rules, see "Synchronization Errors" later in this chapter.
Synchronization errors and design errors are more significant problems than synchronization conflicts because the replicas no longer share a common design or identical data. This section describes the factors that contribute to conflicts and errors, and suggests ways to prevent or resolve them.
When you make changes to the design of a database, Access records each change in the MSysSchChange system table. When Access applies all the design changes from one replica to another, it applies the changes in the order that the changes occurred in the Design Master. This ensures that all replicas become identical to the Design Master.
A design error most often occurs when you attempt to synchronize design changes with a replica that is opened exclusively. A locking error occurs, and the design changes are not transferred to the replica.
A design error can also occur if you set a primary key on a field in the replica and, before you synchronize this change, a user enters a duplicate value in that field in another replica. When you synchronize with the other replica, Access determines that the records do not have unique identifiers and, therefore, the field cannot be used as a primary key.
To identify the cause of an error, you can use the MSysSchemaProb table, which is present only when an error has occurred in updating the design of a replica. The table provides details about the cause of the error, including:
The MSysSchemaProb table is a local table and is not replicated. The records in the MSysSchemaProb table are automatically deleted when the corresponding design change is successfully applied during synchronization.
To correct design errors, use the MSysSchemaProb table to identify the action that failed, and then manually correct the corresponding object in the replica. Always fix the problem at the replica even if a design change in the Design Master caused the error. For example, to correct a locking error caused by trying to synchronize with a replica that is open exclusively, close the replica and try the synchronization again.
When you synchronize replicas, conflict between versions is always possible because the same record may be updated at two different locations. If this happens, Access cannot determine which of the two changes should take precedence.
Access accepts the changes from one replica and records the rejected changes in a conflict table in the replica whose changes were not accepted. By default, the record with the most changes since the last synchronization has priority. Access does not read the content of the data that has changed; instead, it examines the version number of the record. Each time a change is made to the data in a record, the version number increases by one.
For example, a record with no changes has a version number of 0. A change to data increments the version number to 1. A second change to the same data, or a change to different data in the record, increments the version number to 2, and so on. The update with the higher version number takes precedence because Access assumes that the replica that changed the most frequently is the correct version. When two replicas give an updated record the same version number, Access chooses which update to accept based on the value of the ReplicaID property. Because you cannot change the algorithm used to decide which changes are accepted and which are rejected, be prepared to manually resolve the errors in any replica.
After synchronizing two replicas, review the database for conflicts and determine whether you need to take any further action. You can determine whether a conflict has occurred for a specific table by looking at the ConflictTable property. This property returns the name of the conflict table that contains the database records that conflicted during synchronization. If there is no conflict table, or if the database is readonly or is a replica, the ConflictTable property returns a zerolength string ("").
You can then examine the conflicts and work through them record by record, fixing whatever is necessary. For example, you can:
Access automatically notifies you of a synchronization conflict. Click Resolve Conflicts (Tools menu, Replication submenu) to view conflict tables and resolve each conflict manually.
You can substitute a custom routine for the Resolve Conflicts command. For information about creating custom code for resolving conflicts, see Access online Help.
There are four sources of potential synchronization errors to consider when building your application:
Access allows you to establish tablelevel validation rules to restrict the value or type of data entered into a table. However, if you implement a rule without determining whether existing data conforms to the rule, you may encounter a synchronization error in the future. To correct the error, correct the invalid values in the replica that is sending the value. You can avoid the error by synchronizing all replicas in the replica set before you apply a tablelevel validation rule.
Duplicate keys can occur when two users of different replicas simultaneously insert a new record and use the same primary key for their respective records, or when a user changes a record's primary key so that it uses the same value as another record. When the replicas are synchronized, the synchronization succeeds, but Access records a duplicate key error in the MSysErrors table for each of the records. To correct a duplicate key error, change the value of one of the keys, or delete the duplicate record.
Referential integrity preserves the relationship between tables when you are adding or deleting records. Enforced referential integrity prevents you from adding a record to or deleting a record from a related table if there is no corresponding record in the primary table. In some situations, enforced referential integrity can result in synchronization errors. To reduce referential integrity errors during synchronization, you may want to use the s_GUID field as the primary key in some or all of the replicated tables.
If a record is locked when Access attempts to update it during synchronization, Access retries the update several times. If the record remains locked after repeated attempts, the synchronization fails, and Access records an error in the MSysErrors system table. Although this type of error is exceedingly rare, it may occur in certain multiuser applications. You can ignore errors caused by locked records, because Access retries updating the records during the next synchronization. Because it is unlikely that the same record is locked during the next synchronization, Access updates the record and removes the error from the MSysErrors table.
Synchronization errors are recorded in the MSysErrors table and replicated to all replicas in the replica set. This table includes information about the:
Correct errors as soon as possible, because they indicate that the data in different replicas may be diverging. Be especially careful to correct synchronization errors before you move a database, because the error is recorded against the value of the ReplicaID property at the time the error occurred. If the value of the ReplicaID property changes, Access cannot automatically remove the error records during a subsequent synchronization. If you do not remove the error record, you get an error each time you open the database even if you have corrected the problem.
In many circumstances, errors are selfcorrecting during the next synchronization. For example, if you attempt to synchronize a record that another user locked, the update fails. Access records an error and attempts to reapply the update at a later time. If the subsequent update succeeds, the error record is removed.
As a general rule, always synchronize all replicas in the replica set before manually correcting synchronization errors. Due to the nature of bidirectional synchronizations, it may take more than one synchronization to clear the error record from the MSysErrors table after the error is corrected. However, Access should clear all corrected errors from the MSysErrors table after two bidirectional synchronizations.
Compacting a Replicated Database
When you convert a database to a Design Master, Access adds three new fields to the tables and adds new system tables to the database. Many of these new tables contain only a few records, but some of the new tables can grow significantly depending on the frequency of synchronization. To reclaim unused space and to help optimize performance, compact a database frequently. In addition, always compact a database before you synchronize.
![]() To compact a replicated
database
To compact a replicated
database
For information about compacting a database, see Access online Help.
For example, if the original database is named Customers.mdb, rename it Customers.bak.
For example, rename Db1.mdb Customers.mdb.
Now you can open the original database. Because it has the same path and the same name, the value of its ReplicaID property does not change, and it is still recognized as the Design Master.
For more information about compacting databases, see "Compacting a Database" in Chapter 15, "Delivering Your Application," in Building Applications with Microsoft Access 97.
Setting Security for Replicated Databases
Replicated databases use the same security model as nonreplicated databases: Users' permissions on the database are determined at the time they start Access and log on. It is up to you to make sure the same security information is available at each location where a replica is used. You can do this by making the identical workgroup information file (the file that stores security information) available to users at each location where a replica is used. The default workgroup information file is called System.mdw.
You cannot replicate the workgroup information file, but you can manually copy it to each location. Another way to make the same workgroup information file available to all users is to recreate the entries for users and groups at each location in the local workgroup information file by entering the same user and group names with their associated personal identifiers (PIDs) at each location. Modification to permissions is a design change and can be made only in the Design Master.
There should always be at least one user with Administer permission on the database. For example, a user must have Administer permission on the database to:
You can change the setting of the ReplicableBool property only in the Design Master.
By default, Administer permission is granted to the Users group, the Admins group, and the creator of the database.
Designating a New Design Master
The Design Master is the most important replica in a set because it is the only replica where you can make changes to the structure of the database. Under certain circumstances, you may need to make another replica into the Design Master.
For example, you may have the Design Master on your computer, and another member of your development team has a replica on his or her computer. While you are on vacation, you want the other developer to be able to make changes to the database. The following procedure designates a new Design Master by using the Synchronize Now command to synchronize the two replicas and set the DesignMasterID property of the current Design Master to the value of the other replica's ReplicaID property.
![]() To make a replica into the new
Design Master
To make a replica into the new
Design Master
The Design Master is a read/write replica. If you make a readonly replica into the Design Master, the new Design Master is read/write, and the old Design Master is made readonly.
If the replica serving as the Design Master is erased or corrupted, you can designate another replica to act as the Design Master. However, remember that you can have only one Design Master at a time. If you decide to make your own replica into the new Design Master for the set, synchronize all the replicas in the replica set before making your replica the new Design Master.
Making a Replicated Database into a Regular Database
After you have converted a database to a Design Master, you cannot convert it back to a regular database. However, if you no longer want to use replication, you can create a new, regular database that contains all of the objects and data in the replicated database without the additional system fields, tables, and properties associated with replication.
![]() To make a replicated database into a
regular database
To make a replicated database into a
regular database
|
Microsoft Visual SourceSafe™ (for use with Microsoft Office 97 Developer Edition only) is a projectoriented version control system for all types of files, including text files, graphics files, binary files, sound files, and video files. You can track changes made to a file from the moment it is created by using Visual SourceSafe, and you can merge changes from two or more different versions of a file into one file that contains them all.
Microsoft Office 97 Developer Edition provides the Access Source Code Control component to integrate Visual SourceSafe functions into the Access development environment. However, you must purchase and install Visual SourceSafe in addition to Microsoft Office 97 Developer Edition to be able to use Visual SourceSafe within Access.
A workgroup developing Access database applications can use Visual SourceSafe to prevent conflicts and data loss during the development process. Visual SourceSafe includes the following services:
By default, Visual SourceSafe helps maintain security on projects, so that each new user has either read/write access or readonly access. When the Visual SourceSafe administrator enables security, access rights can be set by project or by user.
For more information about Visual SourceSafe, see the Visual
SourceSafe documentation.
|