There are four toolbars in ABBYY FineReader: Standard, Image Tools, Formatting and WizardBar. These toolbars provide quick and convenient access to the functions of the application. However, you can also access the same functions using the menus or hot keys. Allowing the mouse pointer to hover over a toolbar button displays the function of that button. The button's tooltip will be displayed, and the status bar will display additional button details.

The buttons on the WizardBar launch the main ABBYY FineReader functions: Scanning, Reading, Checking and Saving recognition results. The numbers on the buttons indicate the order in which the document input actions should be performed. You may perform each action separately or combine them into a single action by clicking the Scan&Read Wizard button to perform the full document processing cycle automatically.
Each button offers several function modes. Click the small downward-pointing arrow located at the right side of each button and select the mode of your choice in that local menu. The button icon automatically displays the previously selected mode. Click the button itself to run this mode again.
| Button name | Button description |
| Scan&Read
|
Scan&Read Wizard - launches Scan&Read mode.
ABBYY FineReader guides you through the document processing steps
and helps you to obtain the desired result. Scan&Read - scans and reads a document using the current options. Open&Read - opens and reads the images selected in the Open dialog. The list of the available ABBYY FineReader automated tasks : PDF/Images To Word Scan To Word Scan To PDF Automation Manager - opens the runs automated tasks, to create and modify automated tasks, and delete custom automated tasks which you no longer use. |
| 1-Scan
|
Open Image - adds images to the batch. Each added image
is copied to the batch folder. Scan Image - scans an image. Options - opens the Scan/Open tab (Options dialog) to allow you to set scanning options. |
| 2-Read
|
Read - reads the open batch page. Read All - reads all unrecognized batch pages. Options - opens the Read tab (Options dialog) to allow you to set document recognition options. |
| 3-Check Spelling
|
Check Spelling - searches the text for misspelt and
uncertain words (i.e. those words where character recognition was
uncertain). Options - opens the Check Spelling tab (Options dialog) to allow you to set spelling checker options. |
| 4-Save
|
Save Wizard - opens the Save Wizard to allow you
to select saving options and the destination application. Save Pages - saves the recognized text to a file. Send Selected Pages To - allows you to export only selected batch pages when you select the desired pages and export destination application. ABBYY FineReader will export the pages to the application of your choice without saving the text first. Click the button itself to run this mode again. Send All Pages To - exports all recognized pages to the application of your choice without saving the text first. Options - opens the Save tab (Options dialogue) to allow you to set saving options. |
The Standard toolbar features file and image tools (e.g. undo/redo an action, scroll the batch pages, clean and rotate the image) and the list of Recognition Languages.


The Formatting toolbar features various text-formatting tools. You can edit and format text in the Text window.

|
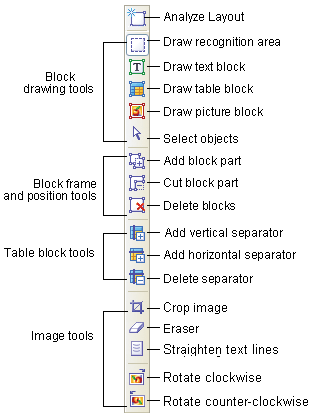
The Image toolbar features page layout analysis (e.g. block creation and editing) tools, as well as tools for scaling (increasing/decreasing the size) and editing (e.g. erasing portion of an image, for example) images. |
Note: Block creation and editing buttons can be used both in the Zoom and in the Image windows.
Note: Low monitor resolution may limit the number of buttons displayed on ABBYY FineReader’s toolbars. Although all of ABBYY FineReader’s functionality is available through the program menus, you must increase the monitor’s resolution to display all available buttons.
ABBYY FineReader allows you to customize the Standard, Image and Formatting toolbars by removing or adding application command buttons.
Each menu item has its own icon. You can access the full list of commands and their respective buttons in the Customize (Tools>Customize menu) dialog in the Commands list.
To add a button to a toolbar:
The selected command will be added to the list of toolbar commands and displayed on the chosen toolbar in the main window.
To remove a button from a toolbar:
Note: