| C H A P T E R 9 | Part 2 Deploying Microsoft Office | Microsoft Office Resource Kit |
| Troubleshooting Installation |
In This Chapter
Removing Previous Versions of Office
Solving Common Setup Problems
See Also
| Note The information in this chapter applies to Office 97 for Windows. For information about troubleshooting Office for the Macintosh installation, see "Rolling Out Office 98 for the Macintosh" in Chapter 4, "Installing Microsoft Office." |
For administrators who want to completely remove previous versions of Microsoft Office from the computers in their organization, this chapter describes the Microsoft Office 97 Upgrade Wizard. This chapter also addresses some of the issues that you may encounter when installing Office 97, or that may arise after Office has been installed.
|
When you install Office 97 for Windows, Setup allows you to remove files from previous versions of Office or Office applications from your hard disk. Because some shared files installed with previous versions of Office might be used by other applications, however, Setup may leave some files on your computer.
The Office 97 Upgrade Wizard allows you to find and remove all files left behind by previous installations of Office. This section describes how to use the Upgrade Wizard and how you can customize its operation.
| Tools and Utilities The Office Resource Kit Tools and Utilities include the Office 97 Upgrade Wizard. For more information about how to install the Upgrade Wizard, see "Network Installation Wizard version 2.1" in Appendix A, "Microsoft Office Resource Kit Tools and Utilities." |
Using the Office 97 Upgrade Wizard
The Upgrade Wizard helps you find and remove old Office files,
registry entries, INI file entries, and
Start menu items or Program Manager items that you no longer
need on your computer. The Upgrade Wizard recognizes components of
the following versions of Office and Officerelated products:
Note The Office 97 Upgrade Wizard runs on Windows 95 and the Windows NT operating system only.
Start the Upgrade Wizard
To start the Upgrade Wizard, doubleclick Offcln97.exe. The Upgrade Wizard displays a Welcome panel.
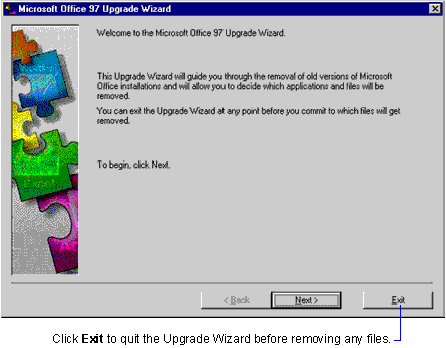
Note No files are removed by the Upgrade Wizard until you click Finish in the last panel. Until that time, you can click Exit to quit without removing any files, or you can click Back to change the option or files you have selected.
Select the Type of Cleanup
After the initial Welcome panel, the Upgrade Wizard presents you with three options, so you can control the degree to which the wizard cleans up your system.
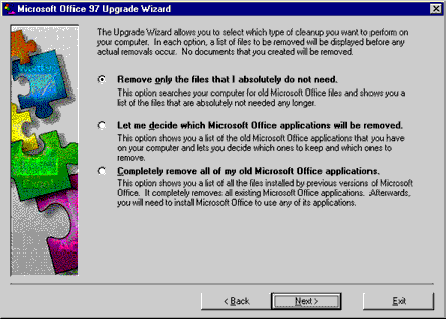
These options are:
The Upgrade Wizard runs in safe mode and looks only for Office files that are not being used by any other application. This typically includes files belonging to versions of Office that are no longer installed on the computer. The Upgrade Wizard does not remove files belonging to currently installed products or files shared among various applications, such as the spelling checker or clip art files.
When you select this option, the Upgrade Wizard displays the list of files that will be removed and allows you to select files you want to keep.
The Upgrade Wizard runs in safe mode, but first it displays a list of the Office and Officerelated applications currently installed on the computer. When you select one or more of these applications, the Upgrade Wizard adds the files from those applications to its list of files to remove, and also allows you to select files you want to keep.
The Upgrade Wizard runs in aggressive mode and looks for files belonging to all previous Office and Officerelated applications, as well as all shared files on your computer. In aggressive mode, the Upgrade Wizard performs the most thorough cleaning of your computer. When you select this option, the Upgrade Wizard displays the list of files that will be removed (typically a long list) and allows you to select files you want to keep.
Note If Office 97 is installed on your computer and you select the Completely remove all of my old Office applications option, the Upgrade Wizard displays a warning that Office 97 files may be removed. If you continue, you must reinstall Office 97 after the wizard finishes to restore any shared files needed by Office 97.
Select Applications to Remove
If you select the option Let me decide which Microsoft Office applications will be removed, the Upgrade Wizard displays a panel with a list of the applications it finds in the Applications to keep box. To move an application from this box to the Applications to remove box, select the application and then click the appropriate move button. All applications you move to the Applications to remove box are removed by the Upgrade Wizard.
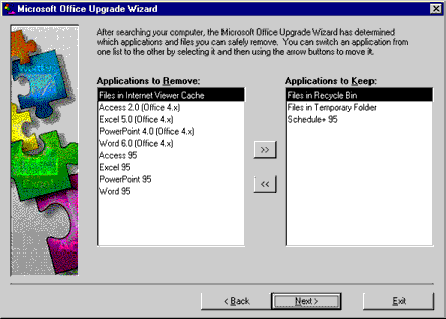
Two special entries in the list of applications are Files in Temporary Folder and Files in Recycle Bin. If you move Files in Temporary Folder to the Applications to remove box, then the Upgrade Wizard deletes all files found in the following folders.
If you move Files in Recycle Bin to the Applications to remove box, then the Upgrade Wizard deletes all files currently in the Recycle Bin.
Select Files to Keep
In the next step, the Upgrade Wizard searches the computer for
files belonging to the Office and Officerelated applications you
selected in the previous panels and then displays a list of the
files it finds in the Files to remove box. All files in this
list are removed by the Upgrade Wizard. When you select a file in
the Files to remove box, a description of the file is
displayed below the box, including which applications use the file.
To keep a file, select it and then click the appropriate move
button to move it to the
Files to keep box.

Note Another way to review this list of files is to save the list to a text file by clicking the Save As button, or to print the list by clicking the Print button.
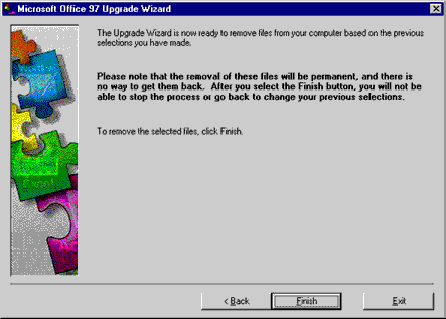
Start File Removal
In the final panel of the Upgrade Wizard, click Finish to remove the selected files from your computer. To return to a previous panel to change options or selected files, click Back. Click Exit to quit the Upgrade Wizard before any files are removed.
![]()
![]()
The Upgrade Wizard uses a text file (OPC) to identify all files, registry entries, INI entries, or Start menu or Program Manager items that were installed or modified by previous versions of Office and Officerelated products. The OPC file also contains rules that describe what files or entries to clean up, where they are located, and under what conditions the Upgrade Wizard can delete them. Files that are associated with a single Office application are marked so that they can be deleted in safe mode. Files that are shared by multiple Office applications, or that might be used by other applications, are marked so that they can be deleted only in aggressive mode. The default OPC included in the Office Resource Kit is named Offcln97.opc.
The Upgrade Wizard searches the computer to determine what
Office applications have been installed. If you selected Remove
only the files that I absolutely do not need, then the Upgrade
Wizard looks for files belonging to an Office application that is
no longer installed on the computer, and it flags only those files
for deletion. These are files that may have been left behind due to
an incomplete uninstall of the
Office application.
In addition, the Upgrade Wizard looks for files belonging to shared components that remain on the system even though a newer version of these components has been installed. For example, if the computer contains files from both Microsoft Graph version 4.0 and Microsoft Graph 95, the Upgrade Wizard flags the Graph 4.0 files for deletion because their functionality is replaced by Graph 95. However, if the computer has only Graph 4.0 files, they are not flagged for deletion.
If you selected Let me decide which Microsoft Office applications will be removed, the Upgrade Wizard also gives you the choice of marking for deletion any previous Office applications currently installed on the computer. The Upgrade Wizard does not delete any files that remove functionality from other Office applications. For example, if you select to remove Microsoft Word 95 but not Microsoft Excel 95, then the Upgrade Wizard will not remove any shared files used by Excel 95.
If you selected Completely remove all of my old Office applications, the Upgrade Wizard looks for all files associated with previous versions of Office applications and marks them for deletion. If you have already installed Office 97, you must reinstall it because there are some files installed by Office 97 that were also installed in previous versions of Office — the Upgrade Wizard removes all these files. To reinstall Office 97, rerun Setup and click Reinstall.
Customizing the Office 97 Upgrade Wizard
By specifying commandline options for the Upgrade Wizard, or by creating a copy of the OPC file with a few modifications, you can customize the Upgrade Wizard to perform the operations you need for your users' computers. For example, you can create a batch file that runs the Upgrade Wizard in quiet mode, removing all files from previous versions of Office and emptying the user's temporary folders and Recycle Bin. (For more information, see "Customization Example" later in this chapter.)
CommandLine Options
Using commandline options, you can specify the mode in which the Upgrade Wizard runs, the OPC file it uses, the log file it creates, and so forth. To run the Upgrade Wizard with commandline options, click the Run command on the Start menu (Windows 95 or Windows NT Workstation version 4.0) or on the File menu in Program Manager (Windows NT Workstation version 3.51).
The Upgrade Wizard recognizes the following commandline options:
Offcln97.exe [/a|/s [/q[/r]] [/l][!][log file]]] [opc file]
For example, to run the Upgrade Wizard in aggressive mode without user intervention, restarting the system automatically if needed and creating the default log file, type this:
Offcln97.exe /a /q /r /l
OPC File Syntax
The OPC file consists of two sections: Definitions and Commands. The Upgrade Wizard uses the Definitions section to help determine which commands in the Commands section to execute. When all the commands in the Commands section have been evaluated and either executed or skipped, the Upgrade Wizard is finished.
By making careful changes to the OPC file, particularly in the Definitions section, you can customize the way in which the Upgrade Wizard works.
Note Throughout the OPC file, comments are identified by a semicolon (;) at the beginning of the line. The Upgrade Wizard ignores all text following a semicolon.
Definitions Section
The Definitions section allows you to change the default value of dependency variables. These are special keywords that are used by the Upgrade Wizard in the Commands section to determine which groups of files may be deleted. Dependency variables represent either a specific application, such as Word 95, or a special set of files, such as files in the Windows\Temp folder.
The Definitions section consists of one or more lines, formatted as follows:
dependency variable = value
The values of the dependency variables indicate the following:
In safe mode, if the dependency variable is assigned the value DETECT in the Definitions section, then the Upgrade Wizard examines the computer to determine whether the application is currently installed. If it is, then the Upgrade Wizard reassigns the value KEEP to the dependency variable. If the application is not installed, then the Upgrade Wizard reassigns the value REMOVE to the dependency variable.
In aggressive mode, if the dependency variable is assigned the value DETECT in the Definitions section, then the Upgrade Wizard reassigns the value REMOVE to the dependency variable whether or not the application is currently installed.
After the Upgrade Wizard processes the Definitions section, all dependency variables have either the value KEEP or REMOVE. For example, suppose Word 95 is currently installed on the computer, and Excel 95 is not. The following definitions assign the values shown in safe mode.
Note The Upgrade Wizard determines whether a particular application is currently installed on the computer by looking for a specific file in a specific folder, or by checking registry or INI entries. The files or entries that the Upgrade Wizard looks for are defined by an internal table in the Upgrade Wizard and cannot be modified by the user. The Upgrade Wizard detects whether an application is installed only if the dependency variable is set to DETECT.
The following dependency variable application names are recognized by the Upgrade Wizard.
Dependency variables may be special purpose keywords. These have predefined values that may be changed in the Definitions section.
The Upgrade Wizard also uses certain special purpose keywords with predefined values that may not be changed in the Definitions section.
In safe mode, the Upgrade Wizard sets the value of the
dependency variable SAFE to REMOVE
and RISKY to KEEP. The result is that any command
that has the dependency variable RISKY is not executed in
safe mode. In aggressive mode, however, the Upgrade Wizard sets the
value of both SAFE and RISKY to REMOVE. The
result is that any command that has the dependency variable
RISKY is executed in aggressive mode, if no other dependency
variables have the value KEEP.
The OPC file included in the Office Resource Kit uses the RISKY dependency variable for commands that include files shared by several applications, such as the spelling checker or clip art files. These files are removed only if the Upgrade Wizard is run in aggressive mode, after which you need to reinstall Office 97 to restore the files.
Commands Section
The Commands section contains one or more commands that consist of a dependency list and a set of actions. The Upgrade Wizard evaluates the dependency list to determine whether the command should be executed.
The dependency lists contains dependency variables, each of which has the value KEEP or REMOVE. (The Upgrade Wizard already changed all DETECT values to KEEP or REMOVE when it finished processing the Definitions section.) If all the dependency variables in the dependency list have the value REMOVE, then the Upgrade Wizard executes the actions listed in the command. If any dependency variable has the value KEEP, then the Upgrade Wizard skips this command and goes to the next one.
Commands are formatted as follows:
[dependency list]
"description"
The following sections describe actions that may be associated with commands.
File
This action indicates a file to be removed. The syntax is:
folder\file "description"
A folder name may be an explicit path, such as C:\Users\Tools.dat, or you can use one of the following predefined folder names.
Registry Entry
This action indicates a registry entry to be removed. The syntax is:
HKxx\key
For example:
HKCR\MSOfficeSetup
Win.ini Entry
This action indicates a section or key to be removed from the Win.ini file. The syntax is:
Win.ini, section, key
Application INI Entry
This action indicates a section or key to be removed from an application INI file. The syntax is:
INI=folder\file, section, key
Menu Item
This action indicates an item on the Start menu (Windows 95 or Windows NT Workstation 4.0) or in a Program Manager group (Windows NT Workstation 3.51) to be removed. The syntax is:
MENU_ITEM=group\item
Special Action
This action includes special functions that are predefined in the Upgrade Wizard. The syntax is:
SPECIAL\function
Suppose you want to create a command for your users that does the following:
In addition, suppose you want to remove an internal company tool that is being replaced by Office 97 functionality. The program is called Chart.exe, and it resides in the C:\Program Files\Internal\Chart folder on users' computers, along with support files, Chartsub.dll, Chartprt.dat, and Readme.txt in the same folder.
To do this, use the following procedure:
![]() To create the customized Upgrade
Wizard command
To create the customized Upgrade
Wizard command
This file is too large for Notepad, but it can be edited in WordPad.
RECYCLEBINCONTENTS = REMOVE
TEMPFOLDERCONTENTS = REMOVE
TEMPTWIDDLEFILESONLY = REMOVE
[SAFE] "Internal charting tool"
C:\program files\internal\chart\chart.exe
C:\program files\internal\chart\chartsub.dll
C:\program files\internal\chart\chartprt.dat
C:\program files\internal\chart\readme.txt
You can distribute your customized OPC file to users, along with the Upgrade Wizard (Offcln97.exe). Instruct users to enter the following command using the Run command on the Start menu (Windows 95 or Windows NT Workstation 4.0) or on the File menu in Program Manager (Windows NT Workstation 3.51):
Offcln97.exe /a /q /r Newopc.opc
| Temporary folder | Description | |
| Windows\Temp or Windows\Tmp | The Windows temporary folder. | |
| %TEMP% or %TMP% | The folder identified by the MSDOS environment variable %TEMP% or %TMP%. | |
| drive:\Temp or drive:\Tmp | The MSDOS temporary folder; drive refers to a hard disk (the Upgrade Wizard looks at every hard disk on the computer). | |
| Option | Description | |
| /s | Indicates safe mode. This option performs the same function as selecting Let me decide which Microsoft Office applications will be removed in the Upgrade Wizard. When you use this commandline option, the Upgrade Wizard does not allow you to select which files to keep. | |
| /a | Indicates aggressive mode. This option performs the same function as selecting Completely remove all of my old Office applications in the Upgrade Wizard. When you use this commandline option, the Upgrade Wizard does not allow you to select which files to keep. | |
| /q | Indicates quiet mode. The Upgrade Wizard runs without prompting the user for information or displaying progress indicators. If the system needs to be restarted, the Upgrade Wizard does not do so automatically; the tasks are completed the next time the user restarts the system. This commandline option must be preceded by the /a or /s option. | |
| /r | Used with the /q option to restart the system automatically (without prompting the user) if needed. This commandline option must be preceded by the /q option. | |
| /llogfile | Generates the log file specified by logfile. (There is no space between /l and the name of the log file.) If /l is specified without a log file name, the default log file created is Pclogout.txt in the current folder of the Upgrade Wizard. | |
| /l!logfile | Does the same as /l, except the Upgrade Wizard does not delete any files. This option is useful to test what the Upgrade Wizard does before actually deleting files. | |
| Opc file | Indicates the name of the OPC file. The default is Offcln97.opc in the current folder of the Upgrade Wizard. | |
| Item | Description | |
| dependency variable | A reserved keyword recognized by the Upgrade Wizard. These may be application names or special purpose keywords used to trigger certain functions. | |
| Value | A dependency variable may have one of three values:
|
|
| This definition | Results in this value | |
| WORD95 = DETECT | KEEP | |
| EXCEL95 = DETECT | REMOVE | |
| Special purpose keyword | Description | |
| TEMPFOLDERCONTENTS | Used to determine whether to remove files from temporary folders. Defaults to KEEP. | |
| TEMPTWIDDLEFILESONLY | Used to determine whether to remove files preceded by a tilde (~) from temporary folders. Defaults to KEEP. | |
| RECYCLEBINCONTENTS | Used to determine whether to empty the contents of the Windows Recycle Bin. Defaults to KEEP. | |
| Special purpose keyword | Description | |
| RISKY | Set to REMOVE in aggressive mode and KEEP in safe mode. | |
| SAFE | Always set to REMOVE. This keyword is used only to clarify which section in the OPC file might be deleted in safe mode. | |
| AFTER97INSTALL | Defaults to REMOVE if RISKY has the value REMOVE or if OFFICE97 has the value KEEP. Otherwise, it defaults to KEEP. | |
| Item | Description | |
| dependency list | A list of one or more dependency variables separated by commas. | |
| description | A string that describes the files listed under this command. In the Upgrade Wizard, if a user selects a file associated with this command in the Files to remove list, the string is displayed. The string may contain any number of characters and spaces, but must not begin with a space, tab character, or quotation mark ("). | |
| action | The name and path of a file to delete, a registry entry to remove, an INI file entry to remove, or a special action to execute. | |
| Item | Description | |
| folder | A fully qualified path, or one of a predefined list of folder keywords; optional | |
| file | The name of the file to be removed | |
| description | An optional string describing the file | |
| This folder keyword | Represents this folder | |
| WINDIR | Windows root folder | |
| SYSDIR | Windows System folder | |
| ROOTDIR | Root folder of the hard disk containing Office 95 | |
| SYSMENUROOTDIR | Windows Start Menu folder | |
| SYSMENUPROGRAMSDIR | Programs folder under Windows Start Menu folder | |
| SYSMENUSTARTUPDIR | Start up folder under Windows Start Menu\Programs folder | |
| SYSPROGRAMFILESDIR | System Program Files folder | |
| OFFICE94DIR | Office 4.3 folder | |
| ACCESS94DIR | Microsoft Access version 2.0 folder | |
| BOOKS94DIR | Bookshelf 4.3 folder | |
| BUTTONS94DIR | MSBttns folder under the Office 4.3 folder | |
| CLIPART94DIR | Clip art folder for Office 4.3 | |
| EXCEL94DIR | Excel version 5.0 folder | |
| MSAPPS94DIR | Shared application files folder for Office 4.3 | |
| POWERPOINT94DIR | Microsoft PowerPoint version 4.0 folder | |
| SETUP94DIR | Setup for Office 4.3 folder | |
| STARTMENU94DIR | Office 4.3 folder under Windows Start Menu\Programs folder | |
| WORD94DIR | Word version 6.0 folder | |
| OFFICEROOT95DIR | Office 95 folder | |
| OFFICE95DIR | Office folder under Office 95 folder | |
| ACCESS95DIR | Access 95 folder | |
| BINDER95DIR | Office 95 Binders folder | |
| BOOKS95DIR | Bookshelf 95 folder | |
| CLIPART95DIR | Office 95 Clip art folder | |
| EXCEL95DIR | Excel 95 folder | |
| EXCEL95VIEWERDIR | Excel 95 Viewer folder | |
| IMAGER95DIR | Microsoft Imager 95 folder | |
| MSAPPS95DIR | Shared application files folder for Office 95 | |
| POWERPOINT95DIR | PowerPoint 95 folder | |
| POWERPOINT95VIEWERDIR | PowerPoint 95 Viewer folder | |
| SCHEDULE95DIR | Schedule+ 95 folder | |
| SOUNDS95DIR | Shared sound files folder for Office 95 | |
| TEMPLATES95DIR | Templates folder for Office 95 | |
| WORD95DIR | Word 95 folder | |
| WORD95IADIR | Word 95 Internet Assistant folder | |
| WORD95VIEWERDIR | Word 95 Viewer folder | |
| Item | Description | |
| HKxx | The toplevel registry key:
|
|
| key | The registry key or value to remove. | |
| Item | Description | |
| section | Section name in the Win.ini file. | |
| Key | Optional. If present, then only this key is deleted from the Win.ini file. If not present, then the entire section is deleted. | |
| Item | Description | |
| folder | A fully qualified path, or one of the predefined folder keywords described earlier in this section. | |
| file | The name of the INI file. | |
| section | The section name in the INI file. | |
| key | Optional. If present, then only this key is deleted from the INI file. If not present, then the entire section is deleted. | |
| Item | Description | |
| group | Name of the Program\Start Menu folder or Program Manager group. | |
| item | Item to be removed. | |
| This function | Removes these files | |
| RemoveTempFiles | All files from any of these folders and subfolders:
|
|
| RemoveTwiddleTempFiles | All files that start with a tilde (~) character in the temporary folders listed under RemoveTempFiles | |
| RemoveInternetExplorerCacheFiles | All temporary files from the Microsoft Internet Explorer cache folder | |
| RemoveNetscapeCacheFiles | All temporary files from the Netscape Navigator cache folder | |
| EmptyRecycleBinContents | All files except Desktop.ini and Info from the Recycle Bin | |
| RemoveOffice95ShortcutLnksAndTmps | All LMK, TMP, and PIF files in the Office 95 Shortcut Bar folder | |
| RemoveDuplicateWWINTL32DLL | Wwintl32.dll in the Windows\System folder if it is also found in the Word 95 folder | |
|
This section addresses some common Setup errors that you may encounter during or after your installation of Office 97. In addition to explaining the possible causes of each error, the following sections also describe steps you can take to resolve the problem. Typically, these Setup errors can be corrected by changing the way you install Office.
Problems Related to Running Setup
The following errors may occur when you run the Office Setup program.
Cannot Open Setup.exe
When you rerun Office Setup to add or remove components after installing Office, and the message "Cannot open Setup.exe" is displayed, Setup is unable to locate the Setup.exe file.
Cause This can occur if you originally installed Office from a network server using a drive letter, but the Setup files have been moved or you are disconnected from the correct network drive.
Solution Connect to the administrative installation point using the same drive letter you used when you installed Office.
Disk Is Full
If you install Office or an Office component on a compressed drive, you may receive a message stating that the disk is full. This can occur even though Setup indicates that you have sufficient disk space for the components when you began the installation process.
Cause When you install to a compressed drive, the amount of available disk space depends on the types of files that are on the compressed drive and how effective the disk compression technology is when you compress different types of data. In some cases, you may need significantly more disk space than the Setup program indicates.
Solution Free some disk space and rerun Setup.
Setup Creates Mscreate.dir in Every Folder
After you run Setup, the file Mscreate.dir appears in every new folder created by the Setup program.
Cause Setup creates Mscreate.dir (a 0byte hidden file) in each folder to indicate that the folder was created by Setup. When you run Setup in maintenance mode and remove a component or click Remove All, Setup uses this file to determine whether an empty folder can be removed. If an empty folder does not contain Mscreate.dir, Setup does not remove the folder.
For example, you might create the folder My Files in the Office folder. When you run Office Setup in maintenance mode and click Remove All, your My Files folder is not removed by Setup, even if it is empty when you run Setup.
Solution No action is needed.
~Mssetup.t\~Msstfqf.t Folder Remains After Setup
After you run Setup, a folder with the name ~Mssetup.t\~Msstfqf.t may be left on your hard disk.
Cause This can occur if you run Setup to add or remove Office components and Setup restarts your computer to complete the installation update. Setup creates these temporary folders during installation, but cannot remove them while the computer is restarting.
Solution After Setup has completed, you can delete these temporary folders manually if they remain on your hard disk after Setup is complete.
Problems Caused by Previously Installed Files
The following errors are caused by previously installed files. Most of these errors can be corrected by manually deleting the old files after you run Setup.
Not All Folders Are Deleted When You Remove Office
After you run Setup and select Remove All, the Office folder structure (Program Files\Microsoft Office by default or another folder you choose during Setup) remains on your disk.
Cause This behavior is a function of Setup. Setup leaves Office folders intact so that files and INI entries that were not created by Office are not deleted. The Setup program deletes only what it installed.
Solution Once you have removed any user files from the Office folder structure, you can delete the folders manually.
Setup Does Not Remove Application Shortcut
When you run Setup and click Remove All, the shortcut for the application that you remove may still be available in Windows. (This error occurs only when you install Office 97 in Windows 95 or Windows NT Workstation 4.0.)
Note Shortcuts are added to the Windows\Start Menu\Programs folder and appear on the Programs submenu (Start menu).
Cause This occurs if you have renamed the shortcut for the application. For example, if you rename the shortcut for Microsoft Word to Word, the shortcut is not removed when you run Setup and click Remove All. If Setup cannot locate the shortcut with the original name, it assumes that the shortcut does not exist.
Solution You can delete the shortcut manually after running Setup.
Program Group Cannot Be Displayed
When you run Setup, you may receive the following message: "Program group groupname cannot be displayed." The message may appear repeatedly. (This error occurs only when installing Office 97 in Windows NT Workstation 3.51.)
Cause This occurs when Setup tries to exceed the maximum of 40 program groups that Program Manager allows. If you already have 40 program groups, and you run Setup, you receive this error message if you choose to add a new program group.
Solution To avoid receiving this error message when you already have 40 program groups in Program Manager, do one of the following:
Setup Installs Shared Files Locally
When you install Office from an administrative installation point, the Setup program may copy shared files to the hard disk even if you specify that they should be run from the server. You do not receive a message informing you that these files are being installed locally; after Office is installed, the applications function correctly.
Cause Setup checks the computer to see if a previous version of shared files exists on the hard disk. If so, Setup updates the existing version with Office 97 shared files.
Solution Rerun Setup and click Remove All to uninstall Office 97, remove the previous Office files, and then install Office 97 again. You can remove files from previous versions of Office using the Office 97 Upgrade Wizard. See "Using the Office 97 Upgrade Wizard" earlier in this chapter.
Cannot Install _MSIMP.DLL into Notes Folder
When you run Setup on a workstation on which Lotus Notes is already installed, you may receive the error message: "_MSIMP.DLL can't be installed into Notes directory." _MSIMP.DLL is a converter that allows Lotus Notes to import Word documents.
Cause If the Lotus Notes program file (Notes.exe) is located on a network server instead of in your local Notes folder and the server location is readonly, Setup cannot write the converter file to the server folder. Lotus Notes requires that the converter be in the same folder as the Lotus Notes program file.
Solution Change the readonly setting of
the Notes folder on the server and run Setup again.
|