| C H A P T E R 32 | Part 5 Using Microsoft Office Throughout Your Organization | Microsoft Office Resource Kit |
| Workgroup Features in Microsoft PowerPoint |
In This Chapter
Security Features in PowerPoint
Presentation Conferencing
Workgroup Review of Presentations
The Pack and Go Wizard
See Also
This chapter explains how to administer features in Microsoft PowerPoint 97 for Windows and PowerPoint 98 for the Macintosh that are designed for sharing presentations among users in a workgroup. It describes how the various workgroup features of PowerPoint work and provides information for supporting them.
|
PowerPoint has no features to help protect presentations or the content of slides. Instead, use the security features built into the operating system used by your workgroup.
For example, if you administer Windows NT Server version 3.51 or 4.0, you can help protect folders and files and configure user access privileges on the server. Users running PowerPoint under Windows NT Workstation version 3.51 or 4.0 can help protect folders and files for which they have ownership, and can configure user access privileges if they have permission to do so. Users running PowerPoint on a Windows 95 computer can restrict the way a folder is shared, and can help protect files by making them readonly.
Macintosh users can set access privileges for individual files by putting the files in a shared folder or disk. To set access privileges for the folder or disk, click the Sharing command (Finder’s File menu).
For information about using these security features, consult the documentation for your operating system.
|
| In Windows, presentation conferencing allows a user on one computer to show a slide show on other computers connected over a local area network (LAN) or over the Internet. This section describes how presentation conferencing works, lists system requirements, provides suggestions for troubleshooting, and explains the role of the presenter and the audience members in a presentation conference. |
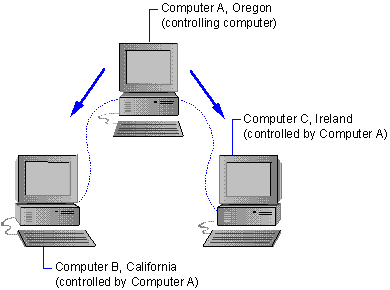
A presentation conference consists of the presenter (or conference owner) and the audience (or conference participants). The following diagram illustrates a presentation conference. Computer A, located in Oregon, is the conference owner and controls the presentation. Computer B in California and Computer C in Ireland are conference participants, or nodes, linked to the conference owner.
|
Showing a Presentation on Two Linked Computers A feature similar to presentation conferencing is the ability to show a presentation on one computer from another computer, connected serially with a nullmodem cable. Use the View On Two Screens command (Slide Show menu) to present slide shows this way. The advantage to
delivering a presentation on two linked machines, rather than
connecting a largescreen monitor to the presenter's computer, is
that the presenter can use the Stage Manager feature (as in
presentation conferencing) without it being visible to the
audience. Using the Stage Manager toolbar, the presenter can
skip to other slides in the show or view the speaker notes. For
more information about viewing on two screens, see PowerPoint
online Help. |
Each computer participating in a presentation conference must have the following:
Users with only the PowerPoint Viewer or an earlier version of PowerPoint cannot participate in the conference.
PowerPoint for the Macintosh does not support presentation conferencing.
For information about file sharing, see your Windows documentation.
Computers communicating over a network must be connected to the same LAN and must have TCP/IP networking protocol installed. Presentation conferences use the Pptconference network port (port number 1711). However, presentation conferences between PowerPoint 97 and PowerPoint 95 users must use the Conference network port (port number 531) to ensure proper compatibility.
Note Presentation conferences over Internet connections cannot be made through a proxy server. The Internet connection must be direct or by modem through an Internet service provider.
Understanding the Conferencing Process
A presentation conference must be set up in advance. Typically, users make a conference call on their telephones to go through the Presentation Conference Wizard together. To start the Presentation Conference Wizard, click Presentation Conference (Tools menu). The wizard allows users to identify conference participants and the conference owner; establishes the type of connection for each participant; and allows users to share information for making the connection, such as the computer name or IP address of each participant.
Some of the steps in setting up a conference require advance planning and communication between the presenter and audience members. The following sections explain the details of the conferencing process.
Setting the Type of Connection
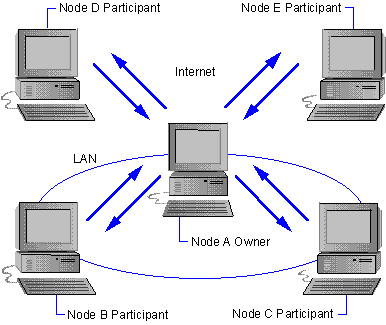
Presentation conferences can mix Internet and LAN connections. The conference owner may have an Internet connection to some participants and a LAN connection to others. Each participant chooses either a LAN or Internet connection to the conference owner. For Internet connections, all conference participants (including the presenter) must have an Internet connection active before starting the conference. For LAN connections, conference participants must be connected by TCP/IP protocol.
The following diagram illustrates these connection scenarios.
Getting Connection Information
For Internet connections, the presenter must supply the IP address for each Internet audience member. Internet audience members can enter their IP address in the Connection Details panel in the Presentation Conference Wizard.
For LAN connections, the presenter must supply the computer name of each audience member. LAN audience members enter their computer name in the Connection Details panel of the Presentation Conference Wizard.
Note Presenters can use the Save List and Open List buttons in the Presentation Conference Wizard to save and reuse lists of audience computer names and IP addresses. These lists, called conference address lists, are stored in a CFL file. Presenters can save different address lists for different audience groups.
Starting and Ending the Conference
The presenter can choose whether all participants must join the conference immediately or whether participants may join the conference inprogress.
If all participants must join immediately, all audience members must click Finish on the Presentation Conference Wizard before or about the same time as the presenter does. As soon as the presenter clicks Finish, PowerPoint connects the presenter's computer to the nodes of all the participants. If a node does not respond (because the user has not yet clicked Finish), PowerPoint attempts two or three more times to make the connection. The conference does not begin unless all nodes are connected.
If participants may join the conference inprogress, the conference can begin as long as PowerPoint can connect the presenter's computer to at least one participant node. Once the conference is in progress, the presenter's computer attempts periodically to connect to other nodes.
When the presenter's computer establishes a connection with each audience node, it sends a copy of the presentation to each participant's Windows\Temp folder; the file is named with the standard temporaryfile naming scheme. The presentation opens as an untitled presentation on each of the audience nodes.
My presentation did not copy successfully to the audience nodes The presentation file cannot be written as a temporary file to an audience members' computer if the computer does not have a valid SET TEMP statement in its Autoexec.bat file, or if the folder specified in the SET TEMP statement does not exist. Verify that the SET TEMP statement exists, and that the specified folder exists. |
To end the conference, the presenter clicks the End Show button (Stage Manager toolbar). PowerPoint terminates communication with the audience nodes.
Understanding the Presenter's Role
For the presenter, a presentation conference appears the same as viewing the presentation in slide show mode. For audience nodes, the presentation is a readonly version of the slide show, although audience members have access to the pen tool for marking slides. The presenter has access to Speaker Notes, Meeting Minder, Slide Meter, and Slide Navigator, but these features are not visible to audience nodes.
The following elements in a presentation are not supported on audience nodes during a presentation conference:
For example, if the presenter doubleclicks a chart, audience members see a readonly chart. Microsoft Graph runs only on the presenter's computer.
For example, if the presenter doubleclicks an embedded Microsoft Word table, the table is displayed readonly on the nodes. PowerPoint runs the Word tools necessary for editing the table only on the presenter's computer.
Note Sound effects applied to animation effects and slide transitions are transmitted to audience nodes and play on audience computers, provided the computers are equipped with the necessary hardware and software to play the sounds.
Using the Stage Manager Toolbar
The presenter runs the slide show with the Stage Manager toolbar. Buttons on this toolbar allow the presenter to navigate through the presentation by advancing to the next slide, going back to the previous slide, or opening the Slide Navigator to go to any slide in the presentation. Using the toolbar, the presenter can also run Slide Meter to compare presentation timing with prerecorded rehearsal timing, and can open Meeting Minder to take down minutes and action items.
The Stage Manager toolbar also gives the presenter access to the pen tool for marking on the current slide, and a button for erasing all participants' marks. For information about the pen tool, see "Understanding the Audience's Role" later in this chapter. Marks that participants make on the current slide disappear when the presenter goes to another slide.
| To pause for an intermission, the presenter can click the Black Screen button. Clicking the End Show button or closing the Stage Manager toolbar ends the presentation. |
The presenter can view speaker notes while delivering the presentation without going to speaker notes view. By rightclicking anywhere on a slide during the slide show, and then clicking Speaker Notes on the shortcut menu, the presenter can view and edit notes for the current slide.
Using Meeting Minder, a presenter can keep meeting minutes and assign action items during the presentation. By rightclicking anywhere on a slide during the slide show, and then clicking Meeting Minder on the shortcut menu, the presenter can type minutes on the Meeting Minutes tab and action items on the Action Items tab in the Meeting Minder dialog box.
Action items accumulated during the slide show are placed on a slide that PowerPoint automatically appends to the end of the presentation. Since this slide is created during the slide show, the presenter must send it to the audience members in order for them to see it. The presenter clicks the Send Slide button on the Stage Manager toolbar to transmit the action items slide to each participant's computer.
|
Did You Know? When PowerPoint appends action items slides to the end of a slide show, it generates a new slide based on the Number of bullets should not exceed option on the Visual Clarity tab in the Style Checker Options dialog box. (To display this dialog box, click Style Checker on the Tools menu, and then click the Options button). This option identifies the maximum number of bullets per slide. For example, a
user can specify that the number of bullets on one slide cannot
exceed 6. If the presenter creates 10 action items during a
presentation conference, PowerPoint appends 2 slides to the end of
the presentation: the first slide contains the first 6 action
items, and the second slide contains the remaining 4. |
To review the action items, the presenter can distribute them to participants, either as Word documents or as Microsoft Outlook tasks.
![]() To distribute action items and
meeting minutes as a Word document
To distribute action items and
meeting minutes as a Word document
PowerPoint starts Word and places both the action items and the meeting minutes in a new document.
Note You must have a messaging system installed on your computer to distribute documents through electronic mail. For information about using Microsoft Office applications with email, see Chapter 28, "Working with Messaging Systems and Connectivity Software."
If the participants decide to schedule a new meeting, the presenter can click Schedule in the Meeting Minder dialog box (Tools menu) to launch the meeting scheduling feature in Outlook. If Outlook is not installed on the presenter's computer, the Schedule command is not available. For information about using Office applications with Outlook see "Sharing Information with Outlook 97" in Chapter 27, "Sharing Information with Microsoft Office Applications."
Understanding the Audience's Role
Audience members cannot control the flow of the slide show; only the presenter can advance from one slide to the next. When the presenter goes to the next slide, that slide is transmitted to the audience nodes.
Audience members can respond to the presentation directly, however, by marking the current slide with the pen tool. To select the pen tool, audience members rightclick anywhere in a slide during the slide show and then click Pen on the shortcut menu. Audience members can choose their own pen color by pointing to Pointer Options on the shortcut menu, clicking Pen Color, and then selecting a color. Each mark a participant makes with the pen tool is broadcast to all other participants as soon as the user releases the mouse button.
The conference ends when the presenter ends it, or audience members can leave a conference by rightclicking and then clicking End Show on the shortcut menu. At the end of the conference, the presentation remains open on the audience nodes. If audience members close the presentation, the file is not saved on their computers. To save the presentation, they must click Save As (File menu). If they leave the conference before the presentation is over, PowerPoint prompts them to save the presentation.
Saving a presentation on audience nodes does not save marks made with the pen tool. To save individual slides, along with marks made by participants during a conference, the presenter must send the current slide to audience nodes using the Send Slide button (Stage Manager toolbar).
PowerPoint 95 audience members cannot participate in my presentation conference For PowerPoint 95 users to participate in PowerPoint 97 presentation conferences, the conference must be running on the Conference network port (if the conference takes place on a LAN), and the presenter must save the presentation in a format that PowerPoint 95 can read: either the PowerPoint 95 format or the PowerPoint 95 & 97 dual format. To set the PowerPoint 97 network port to communicate with PowerPoint 95, modify the Windows registry. In the HKEY_LOCAL_MACHINE\Software\Microsoft\Office\8.0\PowerPoint\DLL Addins\CONFERENCE subkey, change the value of ServiceName to conference. For information about converting PowerPoint 97 presentations to PowerPoint 95 format, see "Sharing Presentations with PowerPoint 95" in Chapter 14, "Upgrading from Previous Versions of Microsoft PowerPoint." |
Troubleshooting
If you encounter problems running a presentation conference, determine whether the problem is coming from PowerPoint or from the network connection. You can do this by running the Presentation Conference Wizard and by testing the network connection.
If they cannot, the problem may not be with the network, but with PowerPoint or the wizard. You may need to reinstall PowerPoint program files from Setup.
If users cannot connect or exchange files, the problem may not be with PowerPoint, but with the network or with the network configuration on the presenter's or audience members' computers.
My workgroup presentation conference failed A presentation conference can fail for one of the following reasons:
|
|
You can send a presentation through e-mail when you want all recipients to receive a copy at the same time. When you want others to review a presentation, you can route the presentation to one recipient after another so that each sees the previous person’s comments or you can route it to all recipients at once.
Users in a workgroup running Windows 95, Windows NT Workstation, or Windows NT Server 3.51 or later can review presentations by routing or sending a presentation through e-mail. Each recipient can add comments to the slides.
Macintosh users in a workgroup running Quarterdeck Mail can review presentations by routing or sending a presentation through e-mail. Macintosh users running one of the following products can send presentations through e-mail:
![]() To review a presentation in a
workgroup
To review a presentation in a
workgroup
PowerPoint inserts an empty text box on the current slide.
When users in the workgroup receive the presentation, they can insert their own comments. When all the recipients have reviewed the presentation, it is routed back to the original sender.
Note If you are routing or sending a presentation to a user who has not yet upgraded to PowerPoint 97, first save the presentation in a format that the target version of PowerPoint can open, such as PowerPoint 95 & 97 format. For information about sharing presentations among different versions of PowerPoint, see Chapter 14, "Upgrading from Previous Versions of Microsoft PowerPoint."
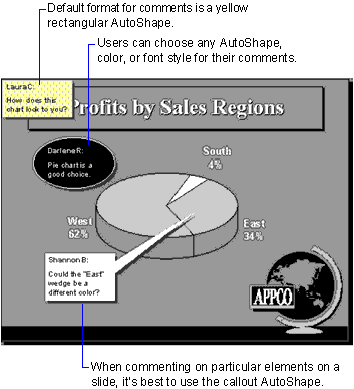
Comments are text objects with unique formatting. You can change the default formatting of the object using the Comment command (Format menu), and you can change the shape of the object by using commands on the Change AutoShape submenu (Draw menu). Each user in the workgroup can use a different shape or format to differentiate comments, as shown in the following illustration.
If a slide becomes cluttered with comments, you can use the Comments command (View menu) to hide them. Clicking Comments again on the View menu displays the comments. Comments are on the top layer of a slide whenever you display them.
|
The Pack and Go Wizard packages all the contents of a presentation so that the presentation can be delivered on another computer, such as a laptop. Because the Pack and Go Wizard can pack a PowerPoint viewer along with the presentation, in many cases the destination computer does not need to have PowerPoint installed. To start the Pack and Go Wizard, click Pack and Go (File menu).
For presentations that contain ActiveX controls or objects that are linked or embedded in the presentation, the corresponding component must be installed on the destination computer for the control or object to run when doubleclicked. For example, the Pack and Go Wizard packs Microsoft Graph objects along with the presentation to which they are linked, but it does not pack the Microsoft Graph application. If the destination computer does not have Microsoft Graph installed, the chart is displayed readonly.
If the destination computer has PowerPoint installed, you do not need to pack a viewer to show your presentation. When you pack the presentation, select Don’t include a viewer in the Pack and Go Wizard.
If the destination computer does not have PowerPoint installed, but is running under Windows NT Workstation 3.51 or later, Windows NT Server 3.51 or later, or Windows 95, you can pack a PowerPoint viewer to show your presentation. Select Viewer for Windows 95 or NT in the Pack and Go Wizard. You cannot pack a presentation to show on a Macintosh unless the destination computer has PowerPoint installed.
Note Microsoft plans to release a 16-bit PowerPoint viewer for Windows 3.1 at a later date. For the latest information about PowerPoint viewers, connect to the PowerPoint home page at:
http://www.microsoft.com/powerpoint/
The Pack and Go Wizard saves the presentation according to the viewer that is selected in the wizard and the default format for saving presentations specified on the General tab of the Options dialog box (Tools menu).
| Tip In Windows 95 and Windows NT Workstation 4.0, you can use a system policy to define the Save as type option in the Save As dialog box for all PowerPoint users in your workgroup. In the System Policy Editor, set the following policy: |
User\PowerPoint\Tools_Options\Save\Default Save
For more information, see "Using Windows System Policies to Customize Office" in Chapter 7, "Customizing and Optimizing Microsoft Office."
Because the PowerPoint viewer must be able to read the presentation file format, the Pack and Go Wizard may need to pack along converters, depending on the format of the presentation. To determine the file format for saving the presentation and whether to pack along any converters, the Pack and Go Wizard detects which viewer is included and what default format for saving presentations is selected, as shown in the following table.
| With this viewer | And this default format | The wizard saves in this format | And packs this converter |
| 16bit | PowerPoint 4.0 or earlier | Default format | None |
| 16bit | PowerPoint 95 or later | PowerPoint 95 & 97 | Pp7trans.dll |
| 32bit viewer for PowerPoint 95 | PowerPoint 4.0 or earlier | Default format | Pp4x32.dll (Windows)
Pp4x32 (Macintosh) |
| 32bit viewer for PowerPoint 95 | PowerPoint 95 or later | PowerPoint 95 & 97 | None |
| 32bit viewer for PowerPoint 97 | PowerPoint 4.0 or earlier | Default format | Pp4x32.dll(Windows)
Pp4x32 (Macintosh) |
| 32bit viewer for PowerPoint 97 | PowerPoint 95 | PowerPoint 95 | Pp7x32.dll |
| 32bit viewer for PowerPoint 97 | PowerPoint 97 | PowerPoint 97 | None |
| World Wide Web With the updated 32bit viewer for PowerPoint 97, the Pack and Go Wizard can save the active presentation in the default format specified in the Options dialog box (Tools menu), regardless of the format of the active presentation. For the latest information about this viewer, connect to the PowerPoint home page at: |
http://www.microsoft.com/powerpoint/
For more information about PowerPoint converters and PowerPoint viewers, see "Running Multiple Versions of Microsoft PowerPoint" in Chapter 22, "Supporting Multiple Versions of Microsoft Office."
When you finish the Pack and Go Wizard, it packs up the Pack and Go Setup program, along with all the identified files and links, and stores them in a CAB file. On the destination computer, Pack and Go Setup decompresses the CAB file and writes the necessary PowerPoint entries in the Windows registry or in PowerPnt.ini (depending on the version of Windows), or in the PowerPoint settings file (Macintosh).
When the 32bit viewer is packed, Pack and Go Setup gives you the option of starting the viewer automatically with the presentation.
Typically, presentations delivered from a laptop are delivered over a largescreen monitor attached to the laptop. If the largescreen monitor has its own CPU with PowerPoint 97 installed, however, you can deliver the presentation from the laptop with the View On Two Screens feature (Slide Show menu). This feature does not use a PowerPoint viewer; PowerPoint 97 must be installed on both computers, and the computers must be connected serially by nullmodem cable. For more information about viewing a presentation on two screens, see PowerPoint online Help.
Sending and Routing Presentations with Electronic Mail
Users in a workgroup who have e-mail capability can review presentations by routing or sending them through e-mail, with each recipient adding comments to the presentation.
To route a presentation, the sender creates a routing slip, and then routes the presentation to the recipients either one at a time or all at once. The sender can track the status of the routed presentation as the recipients review it. After all of the recipients have reviewed the presentation, it is automatically returned to the original sender.
When sending a presentation through e-mail, the original sender does not create a routing slip. Whether the sender routes or sends a presentation, the presentation is received as an attachment in an e-mail message.
| Windows users running one of the following e-mail programs can both route and send presentations through e-mail: |
| Macintosh users running one of the following e-mail programs can both route and send presentations through e-mail: |
![]() To route a presentation to other
members of your workgroup
To route a presentation to other
members of your workgroup
Note Macintosh users running other e-mail programs (for example, Outlook Express, Eudora Pro, Eudora Light, and Netscape) can send presentations through e-mail.
![]() To send a presentation to other
members of your workgroup
To send a presentation to other
members of your workgroup
Note If you are routing or sending a presentation to a user who has not yet upgraded to PowerPoint 97 or 98, first save the presentation in a format that the target version of PowerPoint can open (such as PowerPoint 95 or 4.0 format), or make sure the recipient has installed the PowerPoint 97 or 98 file converter. For information about sharing presentations among different versions of PowerPoint, see Chapter 14, "Upgrading from Previous Versions of Microsoft PowerPoint."
For more information about using Office applications with
e-mail, see Chapter 28, "Working with
Messaging Systems and Connectivity Software."
|