| C H A P T E R 33 | Part 5 Using Microsoft Office Throughout Your Organization | Microsoft Office Resource Kit |
| Workgroup Features in Microsoft Word |
In This Chapter
Security and Document Sharing Protection
Features in Word
Workgroup Review of Documents
This chapter explains how to administer features in Microsoft Word 97 for Windows and Word 98 for the Macintosh that are designed for sharing documents among users in a workgroup. It describes how the various workgroup features of Word work and provides information for supporting them.
See Also
|
As a workgroup administrator, you might initiate or oversee workgroupwide security practices to help protect Word documents. This section describes options available in Word to help protect documents. These options are independent of any additional security measures you put into place at the operating system level.
Word 97 (Windows) and Word 98 (Macintosh) incorporate the symmetric encryption routine known as RC4. RC4 is stronger than the encryption routine used in previous versions of Word, known as Office 4.x encryption. Documents from previous versions of Word are not as protected as passwordprotected documents in Word 97 or Word 98 format. For more information about Office encryption, see "Security Features in Office" in Chapter 34, "Microsoft Office Architecture."
| Note Strong encryption such as RC4 is banned in France. If a Windows user's locale setting in the Regional Settings Properties dialog box (Control Panel) is set to French (Standard), that user cannot open Office documents that are password protected. Nor can the user save an Office document with RC4 encryption. |
Word supports three levels of document sharing protection. The author of the document, who is the user with read-write access to a document, helps to control all three levels. The three levels of document sharing protection are:
Word requires the user to enter a password to open a document. Files with file open password protection require the use of RC4 or Office 4.x encryption. This is provided automatically when a Password to open password is provided. This is the strongest form of securing a file from within Word.
Word prompts the user to enter a password to open the document in readwrite mode. If the user clicks Read Only at the prompt, Word opens the document readonly. This is not a form of security. Files with Password to modify protection enabled are not encrypted. This only prevents users from making inadvertent changes to the content of the original document. A user can still open the document for viewing even though they may not have the password needed to modify the document. Once the file is open, they can still save the content of the file to a file with another name.
Word prompts the user to open the document readonly. If the user clicks No at the prompt, Word opens the document readwrite, unless the document has other password protection. This is not a form of security. This only serves to block the inadvertent changing of a document by disabling the ability of the user from saving the content of the file back to the original file. It is still possible to save the content of the file to a file with another name.
These methods are more for collaboration purposes than for security needs. Protection of this type is not meant to protect intellectual property from malicious users. For example, field codes can be viewed in a text editor such as Notepad even if forms or sections of a document are set to use the following protection methods instead of using encryption.
![]() To help protect a
document
To help protect a
document
– or –
To require a password to open the document, type a password in the Password to open box, and then click OK.
– or –
To require a password to save changes to the document, type a password in the Password to modify box, and then click OK.
| Note Encrypted documents are not indexed by Find Fast (Windows only). For more information about document indexing and searching, see Chapter 26, "Finding Microsoft Office Documents on the Network." |
In addition to helping protect an entire document, you can help protect specific elements from inadvertent changes. The following protection methods can all be circumvented through simple actions of any user who has access to the file. These methods serve only to block inadvertent changes to the specific elements or sections of the document by the originator of the document.
The elements you can help protect are:
Changes made to the document can be neither accepted nor rejected, and change tracking cannot be turned off.
Users can insert comments into the document but cannot change the content of the document.
Users can make changes only in form fields or unprotected sections of a document.
![]() To help protect a specific element
in a document from unauthorized changes
To help protect a specific element
in a document from unauthorized changes
![]()
![]()
|
Word includes several features that support group review of documents. If your workgroup has access to electronic mail (email), users can also send or route documents to their coworkers.
Many of the features described in this section are available through the Reviewing toolbar.

To display the Reviewing toolbar, click Toolbars (View menu), and then click Reviewing.
Creating a Document with Many Authors
Word provides a number of features that are especially useful when several members of a workgroup jointly write long documents:
When you print the document, Word combines all of the subdocuments into one and automatically numbers pages, lines, and footnotes in sequence. You can generate a table of contents, a table of illustrations, an index, and crossreferences for the master document. You can use fields to create captions for illustrations and to number items (such as tables of figures) in series.
Templates also allow you to provide customized features, such as additions to toolbars and menus, special key assignments, and macros.
For more information about using these features, see Word online Help.
The remainder of this section describes other features to use when several members of a workgroup jointly write or review Word documents.
The commands on the Track Changes submenu (Tools menu) allow reviewers to make revisions to a document. The author of the document can then accept or reject these revisions.
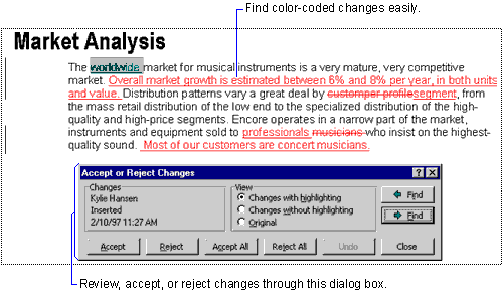
The author or any reviewer can specify how revisions should appear (for example, whether deleted text should be formatted as strikethrough or hidden) on the Track Changes tab in the Options (Windows) or Preferences (Macintosh) dialog box (Tools menu).
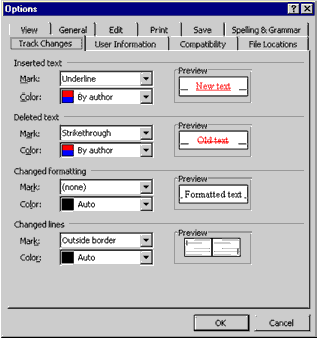
Note In previous versions of Word, the track changes feature was called revision marking.
Comments in a Word document are analogous to reviewer notes written in the margins of a printed document. You insert comments with the Comment command (Insert menu). Word formats the comment indicator and the preceding word with a light yellow background, so the comment and the text to which it refers are clearly visible. You can also select a range of text before clicking Comment, and Word formats all of the selected text with a light yellow background.
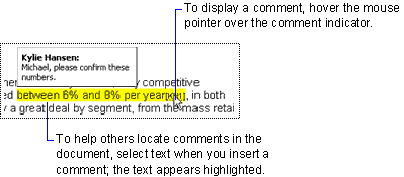
You can view comments by resting the pointer over text shaded with light yellow, or over a comment indicator in the text. All of the comments appear in the comments pane below the document.
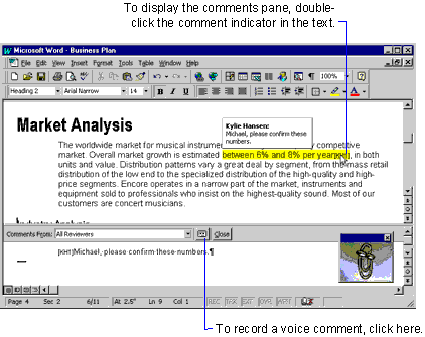
Tip Comments are especially useful when used with change tracking. When a reviewer makes a change to a document, the reviewer can also insert a comment explaining why the change is necessary.
| In addition to entering text comments, users who have computers equipped with sound cards and microphones can insert voice comments. To insert a voice comment, click the Insert Sound Object button in the comments pane. |
Note In previous versions of Word, comments were called annotations.
Saving and Comparing Different Versions of Documents
Word supports two ways of working with different versions of documents: saving versions of a document in a single file, and comparing differences between different documents.
Saving Document Versions
New in Word is the ability to save multiple versions of a document within a single file. This feature, called version control, is available through the Versions dialog box (File menu). For example, you can use version control to save a version of a document after you write the first draft, save another version after the document is edited, and then save a final version after you have polished the document for publication. All three versions are saved within the document file, but only one version is active at any given time.
Recorded with each version are the name of the author who last saved the version of the document, the date and time it was saved, and any additional comments the author included. In the Versions dialog box, you can switch between versions of a document, delete versions, or display a version and then save it as a separate file.
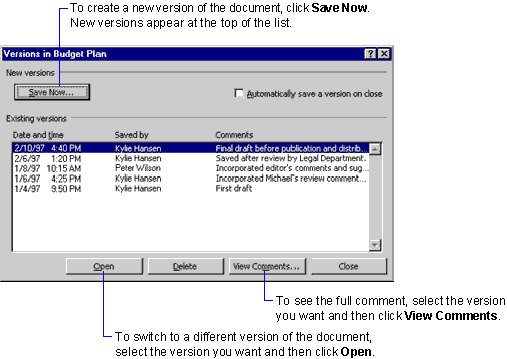
Saving versions of a document in this way is similar to saving a document to different file names at different times. For example, you might start with the draft document Mydocument1, save it after editing as Mydocument2, and then save it again before distribution as Mydocument3. Saving multiple versions in the same file is more efficient, however: Word saves only the differences between versions, so less disk space is used, and you can more easily switch between versions. Version control is also a useful tool when you must maintain a clear record, or audit trail, of revisions to a document, such as a legal contract.
Comparing Documents
The Compare Documents command (Tools menu, Track Changes submenu) is useful when you want to see the differences between two documents. When you click Compare Documents, Word prompts you to select a document to compare with the active document. Word then indicates differences between the two by making revisions to the active document with change marks. You can then review the revisions and accept or reject them.
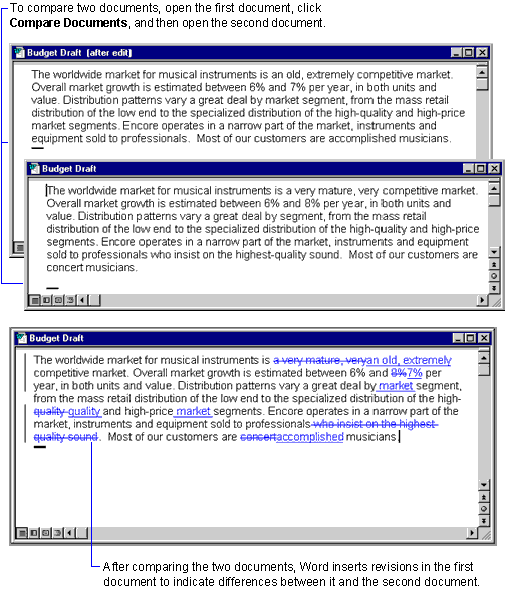
Unlike version control, comparing documents with the Compare
Documents command requires two documents to compare. If you
used version control and you want to compare two versions of a
document in this way, you must first save one of the versions as a
separate document. To do so, click Versions
(File menu) to switch to the other version of the document,
and then save it with a different file name by clicking Save
As (File menu). You can then use the Compare
Documents command to compare the two documents.
Merging Documents
With the Merge Documents command (Tools menu), you can combine tracked changes from several documents into one document. Unlike the Compare Documents command (Tools menu, Track Changes submenu), the merge documents feature requires that you turn on change tracking in order to merge both documents.
Sending and Routing Documents with Electronic Mail
Users in a workgroup who have email capability can review documents by routing or sending them through email, with each recipient adding comments to the document.
To route a document, the sender creates a routing slip, and then routes the document to the recipients either one at a time or all at once. The sender can track the status of the routed document as the recipients review it. After all of the recipients have reviewed the document, it is automatically returned to the original sender.
When sending a document through email, the original sender does not create a routing slip. Whether the sender routes or sends a document, the document is received as an attachment in an email message.
Windows users running one of the following email programs can both route and send documents through email:
Macintosh users running one of the following email programs can both route and send documents through email:
![]() To route a document to other members
of your workgroup
To route a document to other members
of your workgroup
Note Macintosh users running other email programs (for example, Microsoft Outlook Express, Eudora Pro, Eudora Light, and Netscape) can send but not route documents through email.
![]() To send a document to other members
of your workgroup
To send a document to other members
of your workgroup
Note If you are routing or sending a document to a user who has not yet upgraded to Word 97 (Windows) or Word 98 (Macintosh), first save the document in a format that the target version of Word can open (such as Word 6.0 format), or make sure the recipient has installed the Word file converter for previous versions of Word. For information about sharing documents among different versions of Word, see Chapter 15, "Upgrading from Previous Versions of Microsoft Word."
For more information about using Office applications with
email, see Chapter 28, "Working with
Messaging Systems and Connectivity Software."
|