


3D overview
Microsoft® Expression Blend™ offers useful tools for creating, modifying, and animating 3D objects. Expression Blend can import 3D content in the .obj file format. In order for these files to render correctly, you will also need to import the material file that defines what materials are used on the 3D object. This file is often an .mtl file format. In addition, if there are any images that are used as textures on your 3D content, you should import those image files into your project as well.
3D content is contained within a Viewport3D control. This viewport essentially acts as a wrapper or container for the 3D content. You can modify the materials, lights, and the camera in the Properties panel to give desired effects and visual attributes to your 3D content.
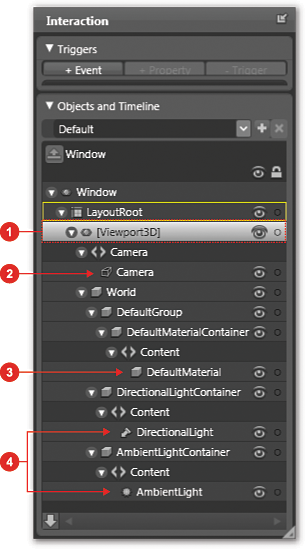
| Viewport3D | A two dimensional element (control), like an ellipse, that acts as a container for rendering 3D content in a document. | |
| Camera | Represents a viewpoint in a document, and behaves much like a video camera would. The camera is used to take the 3D content and convert it into a 2D image (a normal, flat object) for the screen. There are two types of camera: Perspective and Orthographic. | |
| Material | Materials for 3D content represent the color, texture, and general appearance of the actual 3D object itself. Lighting can affect the visual appearance of the object as well, but materials actually directly affect the surfaces of the 3D object. There are 3 types of material: Diffuse, Emissive, and Specular. | |
| Lights | As you might expect, lights add light to the 3D content. Without light you will not see much of your 3D content as this is much like trying to see something with absolutely no light. There are 4 types of light: Ambient, Spot, Directional, and Point. |
The 3D model
There are a few ways that you can change the orientation and location of a 3D
object using handles. For example, using the Selection
![]() tool, you can double-click the 3D object to select
it—not any of the
axes handles—then drag it around the artboard. If you try this, you'll notice that
the 3D object does not get closer or farther away from you as you drag it. If
you then press ALT and drag the mouse up and down you will notice that
the 3D object moves closer and farther away from you.
tool, you can double-click the 3D object to select
it—not any of the
axes handles—then drag it around the artboard. If you try this, you'll notice that
the 3D object does not get closer or farther away from you as you drag it. If
you then press ALT and drag the mouse up and down you will notice that
the 3D object moves closer and farther away from you.
You can also rotate, reposition, and scale a 3D object under Transform in the Properties panel just as you would with any object.
|
|
Scaling and resizing are very different ways to change the size of an object. Scaling changes the size of an object and all of its properties by a percentage of the starting size—for example, the stroke of a stroked object will scale as well and no longer map to a specific stroke width. Resizing just means that you are changing the Height and Width properties (dimensions) of the object. |
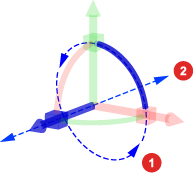
The transformation handles are unique in 3D, so it is helpful to understand how to best use each one:
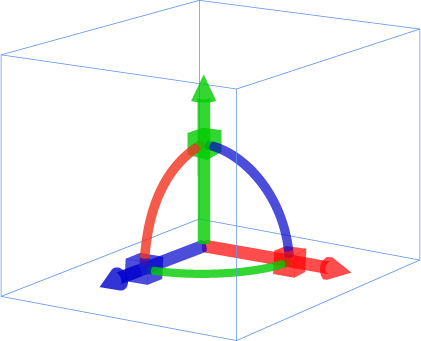
3D object showing all handles
| Axis | Description | Handles |
|---|---|---|
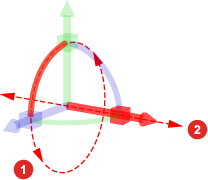
| X axis | You can rotate the object about the
X axis (red handles) by clicking and dragging the X rotation handle  (red arc). The rotation handle allows you to rotate the object about the X
axis, the position handle
(red arc). The rotation handle allows you to rotate the object about the X
axis, the position handle  (red box) allows you to scale the object along the X axis.
 |
X axis handles for |
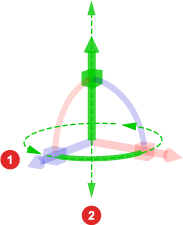
| Y axis | You can rotate the object about the Y axis (green handles) by clicking and dragging
the Y rotation handle  (green arc). The rotation handle allows you to rotate the object about the Y
axis, the position handle
(green box) allows you to scale the object along the Y axis.
(green arc). The rotation handle allows you to rotate the object about the Y
axis, the position handle
(green box) allows you to scale the object along the Y axis. |
Y axis handles for |
| Z axis | You can also rotate the object about the Z axis (blue handles) by clicking
and dragging the Z rotation handle
 (blue arc). The rotation handle allows you to rotate the object about the Z
axis, the position handle
(blue box) allows you to scale the object along the Z axis.
(blue arc). The rotation handle allows you to rotate the object about the Z
axis, the position handle
(blue box) allows you to scale the object along the Z axis. |
Z axis handles for |
|
|
When rotating, you can snap the rotation every 15 degrees by holding the SHIFT key. |
Materials
Materials for 3D content represent the color, texture, and general appearance of the actual 3D object itself. Lighting can affect the visual appearance of the object as well, but materials directly affect the surfaces of the 3D object. Selecting from the 3 different material types allows you to make different modifications to your 3D content:
- Diffuse Material
 determines the color of the 3D
object with direct light (white light) applied to it much like the paint on a
wall.
determines the color of the 3D
object with direct light (white light) applied to it much like the paint on a
wall. - Emissive Material
 causes the object to appear
that it is giving off light. The color of the light is determined by the color
of the material.
causes the object to appear
that it is giving off light. The color of the light is determined by the color
of the material. - Specular Material
 controls the color of the specular highlight on a 3D object. Specular highlights are the bright spots that
you see on a glossy surface such as chrome.
controls the color of the specular highlight on a 3D object. Specular highlights are the bright spots that
you see on a glossy surface such as chrome.
The camera
The camera for 3D content represents a vantage point and behaves much like a video camera would. The camera is used to take the 3D content and convert it into a 2D image (a normal, flat object) for the screen. The camera for a each Viewport3D can be found as a property of that viewport. If you select a camera in the objects view under Objects and Timeline in the Interaction panel, you can then modify its properties using the Properties panel under Camera. There is only one camera property for each viewport, but you can switch the type of camera between a perspective camera and an orthographic camera to change how the objects appear in your application.
A perspective camera works like a normal camera lens. As objects get further
away from the camera they appear to get smaller. Click Perspective Camera
 under Camera in the Properties panel to switch to this camera.
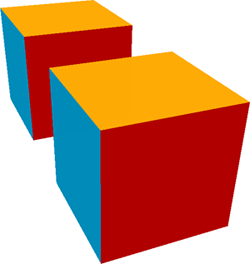
Perspective camera
An orthographic camera turns off the perspective of a normal camera. Objects
do not get smaller or distort as they move further from an orthographic camera.
Click Orthographic Camera
 under Camera in the Properties panel to switch to this camera.
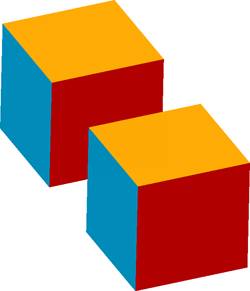
Orthographic camera
You can move the camera by using the Camera Orbit ![]() tool. You can also move the camera,= and make additional changes to each type of camera
under Camera in the Properties panel:
tool. You can also move the camera,= and make additional changes to each type of camera
under Camera in the Properties panel:
- Perspective Field Of View For the perspective camera only, this attribute changes the amount of the content that is visible through the camera and the amount that objects in the document appear to be distorted by the camera. Small values will reduce the amount that an object is distorted by perspective and large values will cause objects to become very distorted as with a fisheye lens.
- Width For the orthographic camera only, this attribute controls how much of the content is visible. As this number gets larger, more of the content will be visible.
- Position The position of the camera in the world.
- Direction The point at which the camera is looking in the world.
- Up Vector Which direction is “up” for this camera.
- Far/Near Clipping Planes These control how close to or far away from the camera an object can get before it disappears from the rendered view.
For more information about how to modify the camera, see Move the camera.
Lights
As you might expect, lights add light to the 3D content. Without light, you will not see much of your 3D content because the appearance would be much like trying to see something with absolutely no light. Lights are properties of Viewport3D controls and you can modify their settings by selecting them in the objects view under Objects and Timeline in the Interaction panel.
You can transform a light by using the transformation handles that appear when you select a light (the red, green, and blue handles in the following images in the "Types of light" section that follows). For more information about how to move lights, see Move the direction of a light.
Additionally, you can change several attributes of a light, but the two primary attributes you will want to change are its color and type.
Light color
Changing the color of a light is as simple as changing the color of a 2D object. Light color can be changed as long as you have a Light object selected within a Viewport3D. Then, you can make changes to a light using the color editor under Light in the Properties panel. For an example, see Change the color of a light.
Types of light
The following table describes the types of light that can be applied to a 3D object. Light type can be changed as long as you have a Light object selected within a Viewport3D. Then, you can select a different light type under Light in the Properties panel. For an example, see Change the type of a light.
| Light type and description | Working with lights on the artboard | ||
|---|---|---|---|
Ambient Light

Ambient light casts light as if it is coming from all directions. Use this when you want to light all objects evenly.
|
|
||
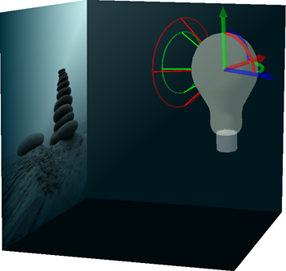
Spot Light

Spot light casts light like a real spot light. The light starts from the position of the light and spreads out in the shape of a cone. Parts of a 3D object outside the cone of light cast will not be affected by the spot light. |
|
||
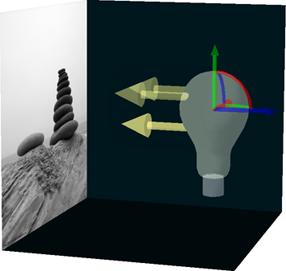
Directional Light

Directional light casts light evenly in a specific direction much like sunlight. |
|
||
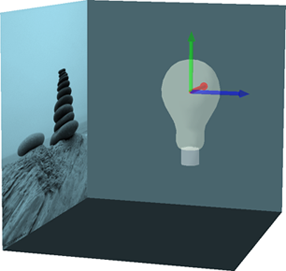
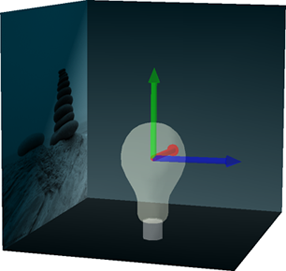
Point Light

Point light casts light outward from a single point in all directions much like a standard light bulb. |
|
|
|
To see all of the lights acting on your object at once, point to 3D on the View menu, and then click Toggle Lights. |
Other light properties
You can make additional changes to each type of light under Light in the Properties panel by modifying the following attributes:
- Attenuation Controls the way in which the power of the
light decays as it gets further from the lit object. You can modify the
following attenuation properties:
- ConstantAttenuation The power of the light will not change as the lit object gets further from the light.
- LinearAttenuation The power of the light will drop at a constant rate as the lit objects gets further from the light.
- QuadraticAttenuation The power of the light will drop quickly at first then more slowly as the lit object gets further from the light.
- Direction The direction in which the light is
facing.
Direction properties only apply to the Spot Light and the Directional Light. - Cone Angle The angle that determines how wide
the cone of light that extends from this light is. If you shine a flashlight on
the ground, you will notice that it does not light the ground evenly, but
that the light gets dimmer the farther from the center it gets. Cone angle
lets you control how quickly this falloff happens. You
can modify the following cone angle properties:
- InnerConeAngle The angle of the brightest, central portion of the light.
- OuterConeAngle The angle of the more dim, outer portion of the light. To create a strong light, make the inner and outer cone angles the same. If the value of the inner cone angle is larger than the outer cone angle, the values are treated as the same as the outer cone angle.
- Position The position of the light in the group
that contains it. The three values are the X, Y, and Z position of the light.
Position properties only apply to the Spot Light and Point Light. - Range The range of the light. Objects that are
within the range will be lit by the light. Objects beyond the range of the light
will not be lit by the light.
Range properties only apply to the Spot Light and Point Light.