
Updated: 2008-08-14
In this article:
As with the Custom Installation Wizard in earlier versions of Office, you can use the Office Customization Tool (OCT) in the 2007 Microsoft Office system to either configure new Outlook profiles or modify existing Outlook profiles. This article covers the new functionality in the OCT related to Microsoft Office Outlook 2007 profile customization.
Default e-mail account
In earlier Office versions, the Custom Installation Wizard allows you to configure a Microsoft Exchange Server e-mail account and add other e-mail accounts, such as a Post Office Protocol 3 (POP3) account. However, you are unable to specify which e-mail account to set as the default e-mail account.
Historical issues
The following two screen shots show how both Exchange and POP e-mail accounts can be configured by using the Custom Installation Wizard from Office 2003.
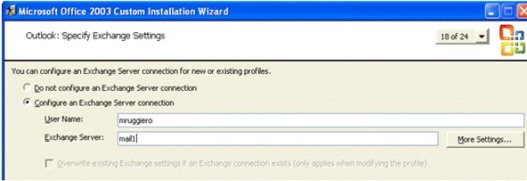
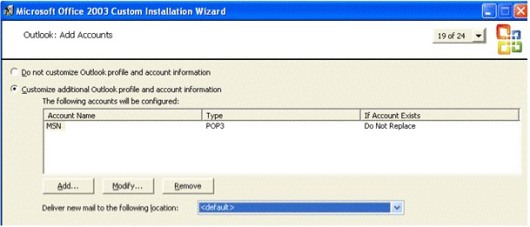
With earlier Outlook versions, the preceding configuration results in the non-Exchange e-mail account set as the default account, which can result in inconsistent behavior. The inconsistencies in Outlook usually revolve around e-mail being sent by the wrong account.
For Office Outlook 2007, this issue is addressed by a new option in the OCT that allows you to specify which e-mail account is the default e-mail account.
Specifying default e-mail account by using the OCT
When you want to deploy more than one e-mail account in a profile, use the following steps to specify which e-mail account is the default profile. These steps assume that you have taken all the necessary prerequisite steps to get to this point in the OCT and you have an Exchange account in the profile.
-
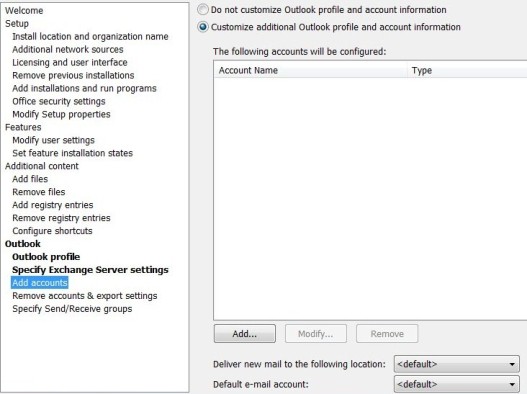
In the OCT, under Outlook, click Add Accounts, select Customize additional Outlook profile and account information, and then click Add.
Add accounts section of the OCT
-
In the Add Account dialog box, select the appropriate e-mail account type, and then click Next.
-
Fill out the remaining details for the e-mail account (this varies per account type), and then click Finish.
The e-mail account is now listed in the Add Accounts section of the OCT.
-
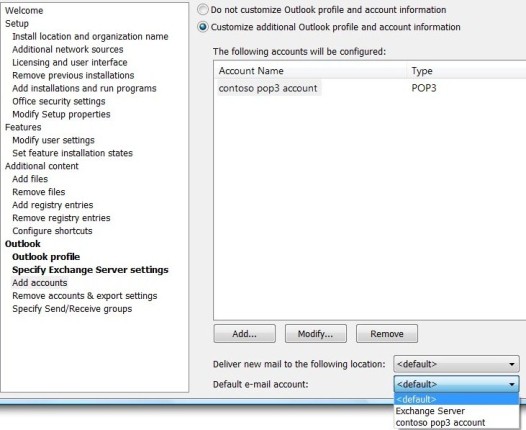
Click the Default e-mail account drop-down list, and then select the account that you want to use as your default e-mail account.
Specifying the default e-mail account
 Note: Note:
|
|---|
|
If you have both an Exchange account and a POP3 account (for example), and leave the <default> option selected for Default e-mail account, your Exchange account is the default e-mail account. Also in this example scenario, if you leave the Deliver new mail to the following location option set to <default>, both Exchange and POP3 accounts deliver mail to the Exchange mailbox. If you do not have an Exchange account but you have two POP3 accounts (for example), the first account listed is the default account if you leave the Default e-mail account option configured with <default>. |
PRF file ramifications
When you configure Office Outlook 2007 profile settings in the OCT, a profile descriptor file (.prf) is actually generated and included in the Setup customization file (.msp) used in the deployment. If you use the new Default e-mail account setting in the OCT, a new line with DefaultAccount=True is added in the .prf file under the e-mail account configured as the default account.
 Copy Code Copy Code |
|
|---|---|
;*************************************************************** ; Section 3 - List of internet accounts ;*************************************************************** [Internet Account List] Account1=I_Mail ;*************************************************************** ; Section 4 - Default values for each service. ;*************************************************************** [ServiceEGS] MailboxName=%UserName% HomeServer=exch-server [Service1] OverwriteExistingService=No UniqueService=Yes MailboxName=%UserName% HomeServer=exch-server AccountName=Microsoft Exchange Server DefaultAccount=TRUE |
|
For more information about .prf files created by the OCT, see Using the OCT to generate a .prf file later in this document.
Similarly, if a POP account is set as the default, the .prf file includes text similar to the following:
| Copy Code |
|
|---|---|
;*************************************************************** ; Section 5 - Values for each internet account. ;*************************************************************** [Account1] UniqueService=No AccountName=contoso pop3 account POP3Server=mail.contoso.com SMTPServer=smtp.contoso.com POP3UserName=user2 EmailAddress=user2@contoso.com POP3UseSPA=0 DisplayName= ReplyEMailAddress= SMTPUseAuth=0 SMTPAuthMethod=0 ConnectionType=0 LeaveOnServer=0x0 POP3UseSSL=0 ConnectionOID=MyConnection POP3Port=110 ServerTimeOut=60 SMTPPort=25 SMTPSecureConnection=0 DefaultAccount=TRUE |
|
Because .prf files can be edited manually, it is technically possible for more than one account to have the DefaultAccount tag set to TRUE. In this case, the last account to have this tag is made the default.
Modify an existing profile and set it as the default
In earlier Office versions, the Custom Installation Wizard allows you to modify the default Outlook profile or create a new profile and set it as the default. One option that it does not provide is to modify an existing profile that is not the default and then set it as the default.
To understand the need for this functionality, consider the following scenario.
-
The administrator deploys Outlook 2003 to all employees with only an Exchange account in the profile.
-
An employee that is very familiar with Outlook creates a new Outlook profile that contains e-mail accounts for both the Exchange account and a personal mail account that is hosted by an external Internet service provider (ISP).
-
The employee sets the new profile as the default.
-
The administrator deploys Office Outlook 2007 and wants to update the original Exchange account. However, the administrator encounters problems with the profile created by the employee with the two e-mail accounts.
The OCT interface
To allow more control over the profiles that are deployed with Office Outlook 2007, the Office Customization Tool allows you to modify a profile that is not the default profile and set it as the new default profile.
To explicitly define which profile is to be the default profile, regardless of the current default profile, complete the following steps:
-
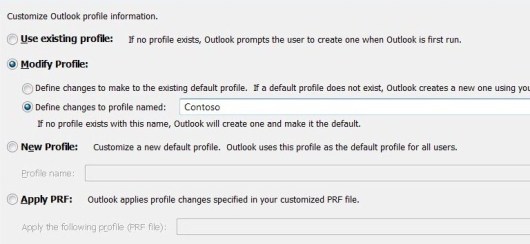
In the OCT, click Outlook Profile.
-
Select Modify Profile.
-
Select Define changes to profile named.
-
Enter the name of the profile that you want configured as the default Outlook profile.
With these steps, the OCT ends up with the following configuration.
PRF file ramifications
By default, this OCT setting configures the following profile-related .prf settings for you.
| Copy Code |
|
|---|---|
; ************************************************************** ; Section 1 - Profile Defaults ; ************************************************************** [General] Custom=1 ProfileName=test DefaultProfile=Yes OverwriteProfile=Append ModifyDefaultProfileIfPresent=false |
|
Each of the following scenarios outline the expected outcome based on the information that you provide in the OCT and your current multiple Outlook profile configuration. If the outcome of the scenario does not match the outcome you want, you might have to manually modify the default .prf setting generated by the OCT.
For more information about .prf files created by the OCT, see Using the OCT to generate a .prf file later in this document.
"Define changes to profile named" used with existing non-default profile
This scenario includes the following configuration:
-
You have multiple existing Outlook profiles.
-
You specify the name of an existing non-default profile by using the Define changes to profile named option.
In this configuration, you should expect the following results if you apply the default .prf file generated by the OCT to Office Outlook 2007.
-
A new profile is created by using the original existing profile settings and the modifications specified by the .prf file.
-
The name of the profile matches the name specified in the OCT.
-
This profile is the default Outlook profile.
-
The original existing profile is maintained, but renamed to Backup Of <profile name>.
If you do not want this previously non-default profile to become the new default profile, modify the DefaultProfile line in the .prf file to match the following line:
| Copy Code |
|
|---|---|
DefaultProfile=No |
|
"Define changes to profile named" used with no existing matching profile
This scenario includes the following configuration:
-
You have multiple existing Outlook profiles.
-
You specify the name of a non-existent profile by using the Define changes to profile named option.
In this configuration, you should expect the following results if you apply the default .prf file generated by the OCT to Office Outlook 2007.
-
A new profile is created with the name specified in the OCT.
-
This new profile becomes the default Outlook profile.
If you do not want this newly created profile to become the new default profile, modify the DefaultProfile line in the .prf file to match the following line:
| Copy Code |
|
|---|---|
DefaultProfile=No |
|
"Define changes to profile named" used with existing default profile
The Define changes to profile named option can also be used against Office Outlook 2007 installations where the default profile name matches the profile name you specify in the OCT. This scenario includes the following configuration:
-
You have multiple existing Outlook profiles.
-
You specify the name of the existing default profile by using the Define changes to profile named option.
In this configuration, you should expect the following results if you apply the default .prf file generated by the OCT to Office Outlook 2007:
-
A new profile is created by using the original existing profile settings and the modifications specified by the .prf file.
-
The name of the profile matches the name specified in the OCT.
-
This profile is the default Outlook profile.
-
The original existing profile is maintained, but renamed to Backup Of <profile name>.
| Note:
|
|---|
|
If you choose to make additional manual edits to the .prf file, the following warnings should be heeded:
|
LDAP configuration in the OCT
With the OCT in Office Outlook 2007, you can customize the following two new LDAP account settings:
-
Search Base
-
Check Names Filter
All other settings available in the OCT are also available in the Custom Installation Wizard.
To configure an LDAP account that has these new settings, complete the following steps:
-
In the Outlook section of the OCT, select Add Accounts, and then click Add.
-
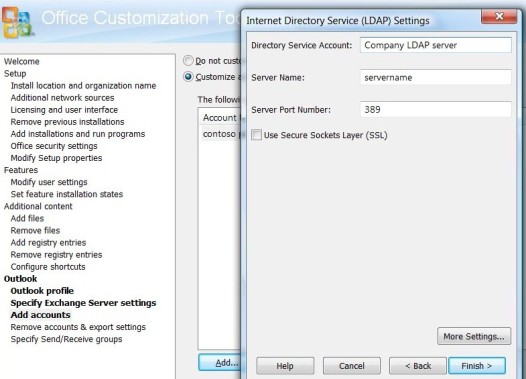
In the Add Account dialog box, select Internet Directory Service (LDAP), and then click Next.
-
In the Internet Directory Service (LDAP) Settings dialog box, enter the relevant LDAP details for the account.
Internet Directory Service (LDAP) entry in Add Account
-
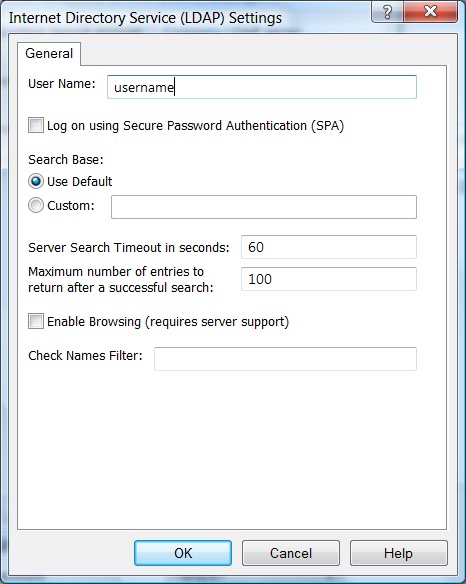
In the Internet Directory Service (LDAP) Settings dialog box, click More Settings to enter additional configuration information for your LDAP account and to configure the new LDAP settings for Office Outlook 2007.
Additional LDAP account settings
-
To configure a custom Search Base, click Custom under Search Base, and then enter your search base string in the text box next to Custom.
-
To configure a custom Check Names Filter, enter the filter string in the text box next to Check Names Filter.
For example, you can specify the following filter that searches against standard parameters and a custom customerID property that exists for each user on the LDAP server.
Copy Code(&(mail=*)(|(mail=%s*)(displayName=%s*)(customerID=%s*))
| Note:
|
|---|
|
All LDAP account settings vary from server to server. Customers should see their network administrator for the correct values for these settings. |
PRF file ramifications
When you configure an LDAP account in the OCT, the configuration details are written into a .prf file that is included in the .msp file generated by the OCT. As in earlier versions of Outlook, the .prf information is read the first time you start Outlook.
The different LDAP configuration settings displayed in the previous LDAP exhibits can be seen in the text extracted from a sample .prf file. The new Search Base and Check Names Filter settings are highlighted in bold text.
| Copy Code |
|
|---|---|
;*************************************************************** ; Section 4 - Default values for each service. ;*************************************************************** [Service2] UniqueService=No ServerName=dc1 DisplayName=FourthCoffee LDAP ConnectionPort=389 UseSSL=false UseSPA=false EnableBrowsing=1 UserName= SearchBase=ou=Corporate,dc=FourthCoffee,dc=com DefaultSearch=0 SearchTimeout=60 MaxEntriesReturned=100 CheckNames=(&(mail=*)(|(mail=%s*)(displayName=%s*)(EmpID=%s*)) |
|
For more information about .prf files created by the OCT, see Using the OCT to generate a .prf file later in this document.
Using the OCT to generate a .prf file
After you have configured your Outlook profile settings, you can use the following steps to see the contents of the .prf file generated by the OCT.
-
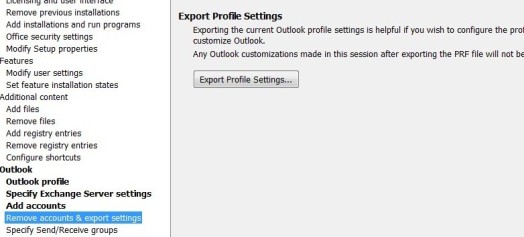
Select Remove accounts & export settings under Outlook in the left pane of the OCT.
Export Profile Settings button in the OCT
-
Click Export Profile Settings.
-
Save the file by using any name on your hard disk.
If you need to manually modify the .prf file, you can import the modified file back into the OCT by using the Apply the following profile (PRF) file option.
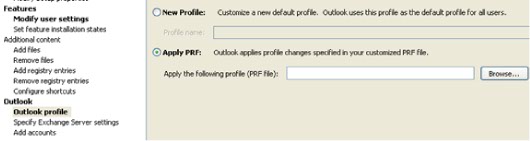
Instead of the original .prf file created by the OCT, this imported version of the .prf file will be used with your 2007 Office system deployment.
Underlying architecture of Outlook profiles created by the OCT
When you configure an Office Outlook 2007 profile by using any of the sections under Office Outlook 2007 in the OCT, a .prf file is automatically generated and embedded in the .msp file created by the OCT. When you deploy 2007 Office system with the .msp file, the following actions also take place:
-
A file named Custom12.prf is placed in the \Program Files\Microsoft Office\ folder.
-
The registry is updated to import the .prf file the next time you start Office Outlook 2007.
| Note:
|
|---|
|
If you exported the .prf file out of the OCT to make manual modifications to it, the name of the .prf file installed by the .msp file is not Custom12.prf. In this scenario, the name of the .prf file is the file name you specified when you exported the .prf file from the OCT. |
Profile descriptor (.prf) file processing changes
2007 Office system includes improved processing for .prf files to eliminate a very common scenario found in earlier versions of Outlook.
Historical issue
Ambiguous Name Resolution (ANR) occurs when the mailbox name provided in a .prf file matches more than one mailbox, either in whole or in part. The following example illustrates this:
|
Michael Raheem |
michaelr |
|
Michael Ruggiero |
michaelru |
Both accounts contain michaelr in the account name, which creates the ambiguity during name resolution for Michael Raheem. When attempting to determine which Exchange mailbox to connect to, you are prompted to select the correct name from a list in the Check Name dialog box.
In earlier Outlook versions, this prompt causes Outlook to stop processing the rest of the .prf file settings. For example, your .prf file includes configuration information for the following services:
-
Exchange Server
-
LDAP
-
Personal Folders (.pst) file
-
Outlook Address Book
When MichaelR starts Outlook with the .prf file, the Ambiguous Name Resolution prompt results in only the Exchange Server service being configured for the profile. All other services in the .prf file are not processed by Outlook and are silently not added to the Outlook profile.
| Note:
|
|---|
|
The prompt for ambiguous name resolution occurs when you use the default MailboxName=%USERNAME% in the .prf file. This is the most widely used setting because most people's mailbox name matches their domain logon name. This is why this can be a very common scenario. |
Office Outlook 2007 solution
2007 Office system resolves this issue by continuing to process the other services specified in the .prf file, even if the Exchange Server service requires Ambiguous Name Resolution for the Exchange service to be properly set up. The solution is a simple change in code to keep processing the .prf file in this scenario.
| Note:
|
|---|
|
The .prf file is no longer associated with Outlook.exe. Double-clicking a .prf file does not automatically import the profile settings into 2007 Office system, as it does in earlier versions. |
